Before you choose
Choose the pattern and the finish together
These cornrow photographs show how row direction, spacing and the final bun or loose ends work together. Compare overhead views for the scalp pattern, then use side and rear angles to judge the outline. A photograph cannot establish how much tension a style uses or whether it will feel comfortable on your scalp.
The hairstyle gallery
18 cornrow hairstyles for men ideas to compare
Compare the visible length, shape, texture, and finish before choosing a salon reference.
Idea 01
Straight Rows Into a Small Bun
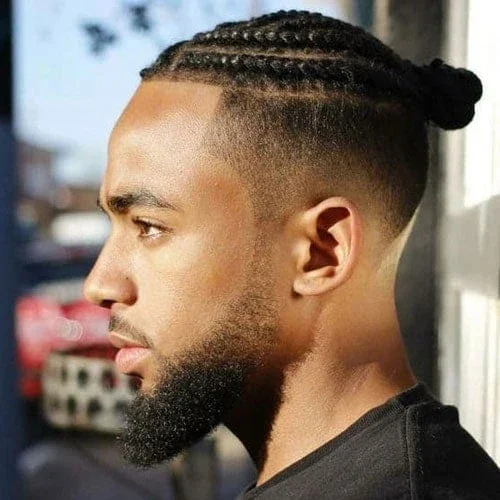
Parallel rows run back from the forehead and gather into a small bun. The side profile makes the contrast between the braided top and closely clipped sides especially easy to see.
- Shape
- Parallel cornrows
- Detail
- Clipped sides
The bun sits behind the crown rather than high above it. The exposed ear and temple keep the outer shape narrow.
Wearability note: Choose this reference for the combination of a compact finish and clear side contrast. Show the bun placement as well as the braid direction when explaining the look.
Idea 02
Four Bold Rows With Fine Partings
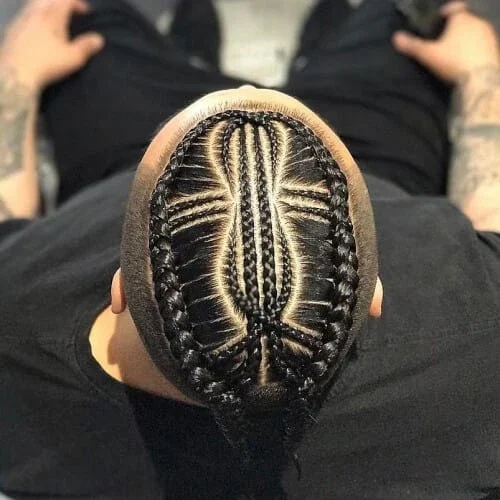
Broad braids create a strong frame across the top, while much finer curved sections fill the spaces between them. The overhead angle shows how these two scales work together.
- Shape
- Broad braids
- Detail
- Fine curved sections
The pattern is balanced around the center, with the larger braids remaining easy to follow. Its detail comes from the arrangement of the partings rather than a large loose finish.
Wearability note: Use a top view like this when the scalp pattern matters most. A front portrait alone would leave much of this layout unexplained.
Idea 03
Zigzag Part With a Rear Knot
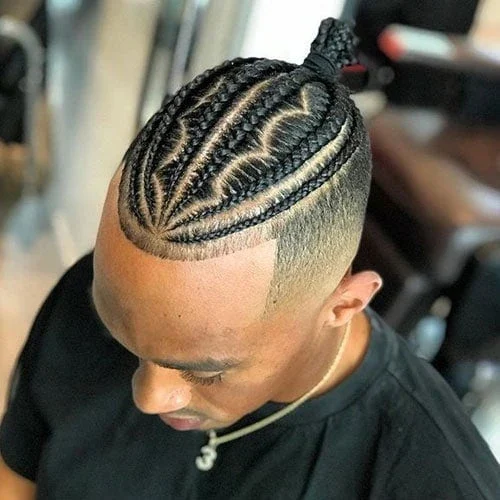
A zigzag part draws the eye through the center of the braided top. Smaller rows follow either side before gathering into a knot at the back.
- Shape
- Zigzag center part
- Detail
- Small rear knot
The closely cut sides leave the pattern as the main detail. Even with the compact finish, the changing direction of the part prevents the top from looking like simple parallel lanes.
Wearability note: Consider this if you want detail concentrated above the head rather than hanging lengths. Keep an overhead reference alongside a side view so the part and finish are both clear.
Choose your direction
Follow the rows
Compare straight, curved and angular paths.
Check the finish
Choose between a small bun and hanging braid ends.
Look from the side
Compare full braided sides with closely cut areas.
Idea 04
Fine Rows With Short Hanging Ends
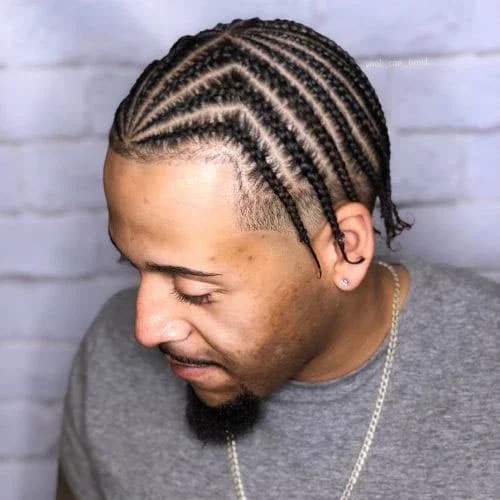
Fine cornrows follow angled paths across the scalp, then continue into short hanging braid ends. Those ends soften the edge beside the face compared with a fully gathered bun.
- Shape
- Fine cornrows
- Detail
- Short loose braid ends
The pattern stays detailed without relying on a single oversized braid. The camera angle also shows how the rows change direction near the temple.
Wearability note: Compare where you would like the loose ends to fall before choosing a similar pattern. Short hanging ends and a tied finish will feel different around glasses, ears and collars.
Idea 05
Curved Rows Seen From Behind
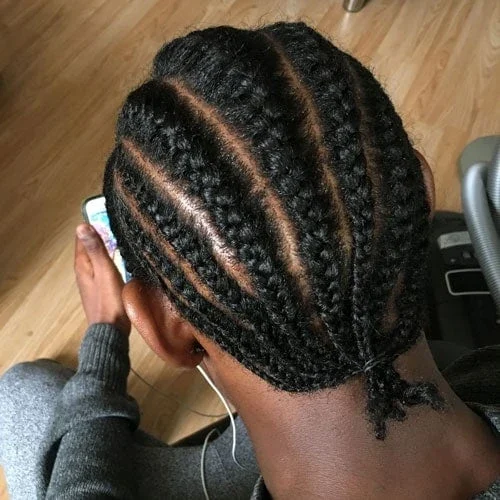
Curved rows sweep around the back of the head and finish in short ends near the nape. This rear view gives the layout a different emphasis from a face-framing portrait.
- Shape
- Curved rear partings
- Detail
- Short nape ends
The spaces between the braids remain visible right through the back. The ends are separated, leaving a lighter outline than one large gathered knot.
Wearability note: Take note of the nape finish if you often wear a high collar. The direction of the rear rows and the length of their ends are separate choices to discuss.
Idea 06
Two Broad Braids Above Close Sides
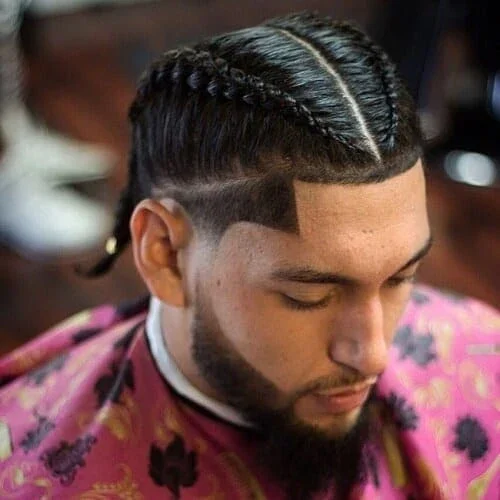
Two broad braids keep the top pattern simple and easy to read. A center part divides them, while the closely cut side creates a strong boundary beneath the braided area.
- Shape
- Two broad top braids
- Detail
- Closely cut sides
The larger braid size stands out against the open space at the temple. There are fewer visible paths here than in the more intricate overhead designs.
Wearability note: Choose this as a reference for broad scale and a clean outline. If you prefer smaller rows, compare another photograph rather than assuming the same pattern will have the same visual weight.
Idea 07
Nested Arcs With Two Long Plaits
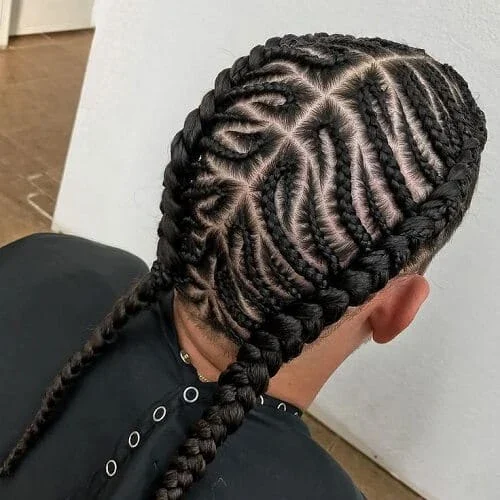
Nested arcs create a layered pattern across the back, with two longer plaits carrying the shape below the scalp. The curved paths give this design a rounded rhythm.
- Shape
- Nested curved rows
- Detail
- Two rear plaits
The rear angle reveals small rows between the larger braids. Those finer sections make the pattern more detailed than a pair of plain straight-back cornrows.
Wearability note: Choose the hanging finish deliberately if you like movement behind the head. Ask to see both the overhead layout and the rear length before settling on a similar combination.
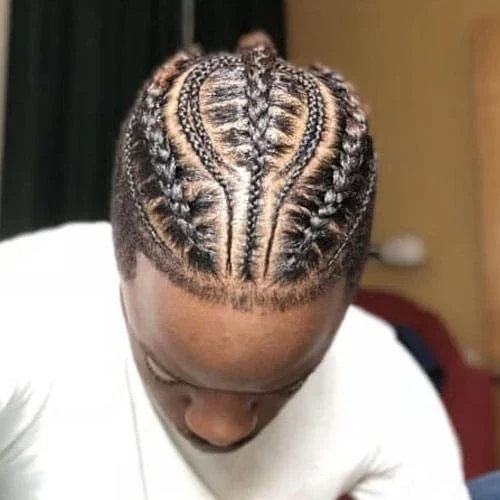
Idea 08
Oval Center With Alternating Row Sizes
An elongated oval sits at the center of this pattern, surrounded by rows of different widths. The shape gives the top a clear focal point before the eye follows the braids backward.
- Shape
- Oval center pattern
- Detail
- Mixed braid widths
The finer rows add definition between the broader ones. This is a useful example of detail created by spacing and scale rather than by loose accessories.
Wearability note: Keep the center shape visible in the reference you bring. A side photograph can show the finish, but it would not explain this oval arrangement nearly as clearly.
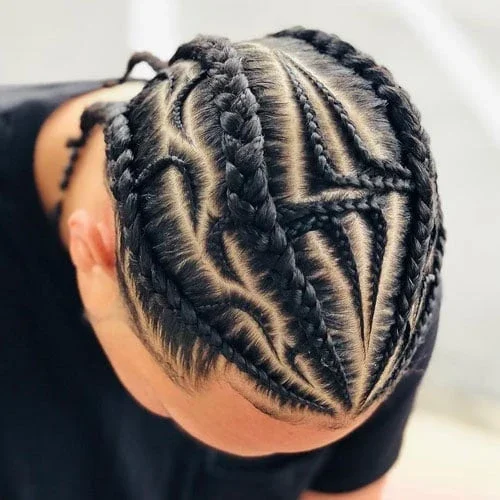
Idea 09
Angular Paths Across the Crown
Angular paths break the top into a graphic arrangement of connected sections. The braids change direction around the crown instead of following one straight route toward the nape.
- Shape
- Angular partings
- Detail
- Interwoven top pattern
The overhead photograph makes the relationship between the larger lines and smaller partings visible. Most of the interest stays close to the scalp, keeping the outer silhouette restrained.
Wearability note: Use this when the arrangement itself is your priority. Keep a clear top-view photograph handy, since describing the pattern simply as cornrows would omit its defining detail.
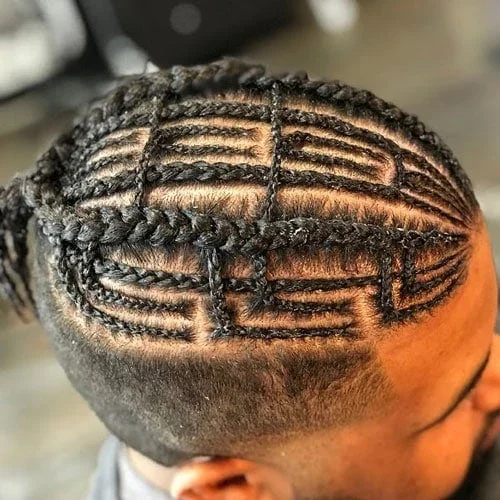
Idea 10
Squared Paths With Short Sides
Squared turns give these cornrows a structured, maze-like layout. The lines change direction across the top while the closely clipped sides leave the pattern clearly outlined.
- Shape
- Squared partings
- Detail
- Closely clipped sides
The mixture of fine and broader rows adds another level of contrast. The photograph shows a compact outer shape despite the amount of detail inside the braided section.
Wearability note: Compare the angular partings with the curved designs nearby. Both can keep a narrow profile, but their scalp patterns create quite different impressions when viewed from above.
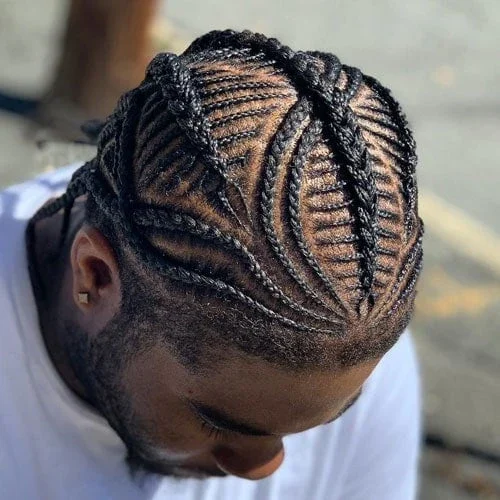
Idea 11
Leaf-Shaped Center With Curved Borders
A leaf-shaped central section anchors this overhead design. Curved outer braids frame it, while finer rows follow the changing spaces between the center and the edges.
- Shape
- Leaf-shaped center
- Detail
- Curving outer braids
The pattern has a clear middle and a softer rounded border. That combination distinguishes it from the squared layouts even though both use several different row widths.
Wearability note: Choose the central motif and the border as separate details to discuss. A clear overhead reference will help keep the proportions of the design visible in the conversation.
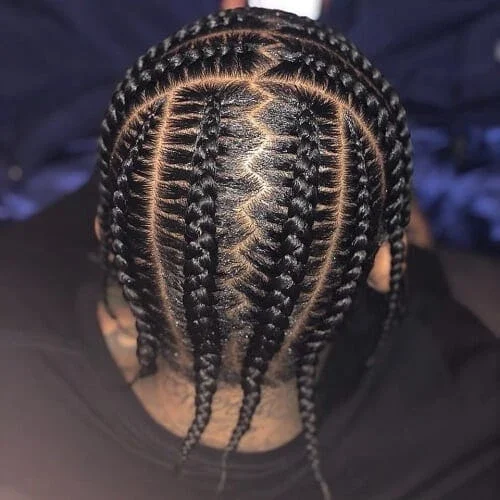
Idea 12
Straight Rows With a Zigzag Center
Long straight rows frame a zigzag center part, combining a simple outside direction with a more detailed middle. Longer tails continue the lines behind the head.
- Shape
- Long straight rows
- Detail
- Zigzag central part
The larger braids remain easy to distinguish from the fine partings. The overhead angle shows both the central zigzag and the way the outer rows stay more direct.
Wearability note: Consider whether you want the detail mostly at the center or throughout the pattern. This reference keeps those two areas different without needing a large bun at the back.
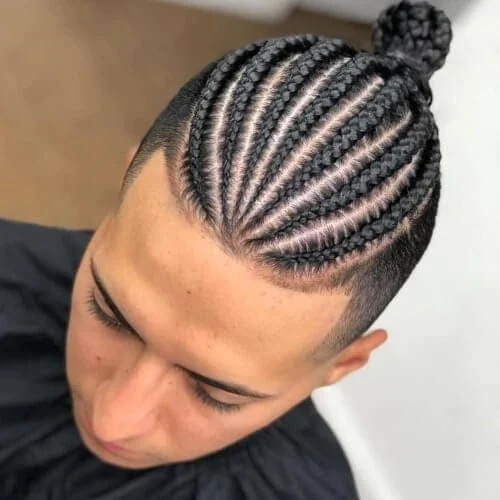
Idea 13
Narrow Rows With a Compact Rear Finish
Narrow rows travel straight back into a compact gathered finish. The side and rear angle makes this a particularly clear reference for a restrained cornrow outline.
- Shape
- Narrow straight rows
- Detail
- Small gathered finish
The rows remain distinct without spreading into wide loops or angular motifs. The close side keeps the ear exposed and lets the small finish sit neatly behind the head.
Wearability note: Choose this if the overall shape matters more to you than an intricate top pattern. Show the height of the gathered section when discussing how compact you want the result.
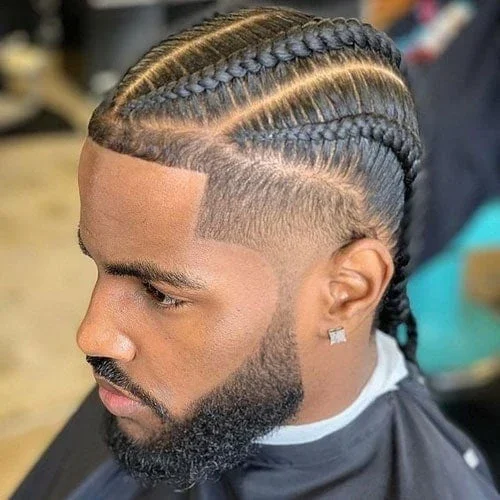
Idea 14
S-Shaped Rows Along the Side
S-shaped rows create flowing lines along the side of the head. The curves remain close to the scalp, so the movement comes from their direction rather than loose hair.
- Shape
- Curving side rows
- Detail
- Close nape outline
The clean nape outline adds a straighter edge beneath the curved pattern. This side angle makes the contrast especially clear around the ear and lower back.
Wearability note: Use a profile photograph when choosing a design meant to be seen from the side. An overhead view alone could hide the curves that make this particular arrangement distinctive.
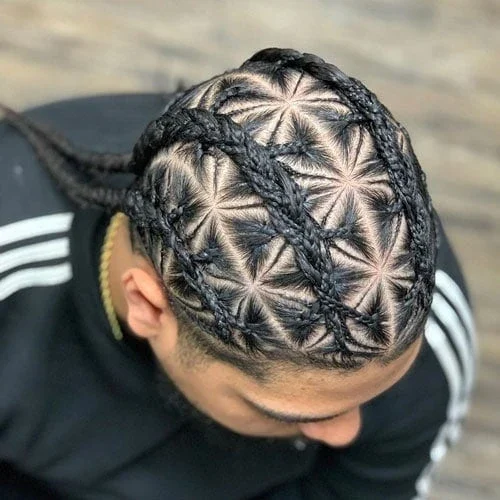
Idea 15
Starburst Partings Inside Broad Braids
Starburst partings spread through several sections of the top, each framed by a broader braid. The repeated radiating lines give the pattern a detailed, geometric character.
- Shape
- Starburst sections
- Detail
- Broad framing braids
The larger braids hold the layout together while the fine sections fill each area. The overhead view shows the complete arrangement more clearly than a front-facing portrait could.
Wearability note: Choose this for its fine internal detail rather than for a different outer silhouette. Save a sharp top-view reference if you want to discuss the spacing between the individual sections.
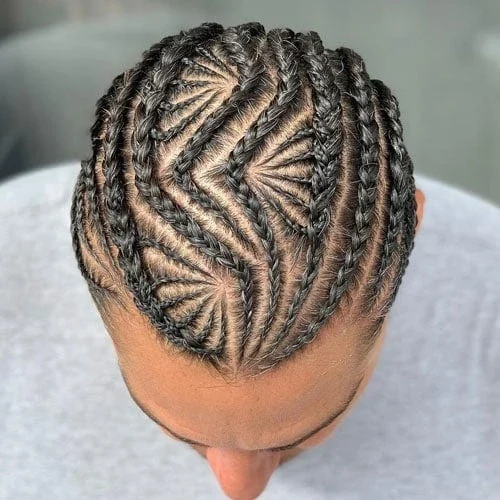
Idea 16
Long Waves Through the Center
Long wavy paths travel through the center of the head, with fine angled partings filling the spaces beside them. The repeated bends create a flowing pattern across the top.
- Shape
- Wavy central rows
- Detail
- Fine angled partings
The broader central rows stay prominent against the narrower surrounding lines. This balance gives the design movement without relying on loose curls or hanging accessories.
Wearability note: Compare the wave spacing with the tighter curved designs in this gallery. Wider bends make a different statement even when the braid size and overall length seem similar.
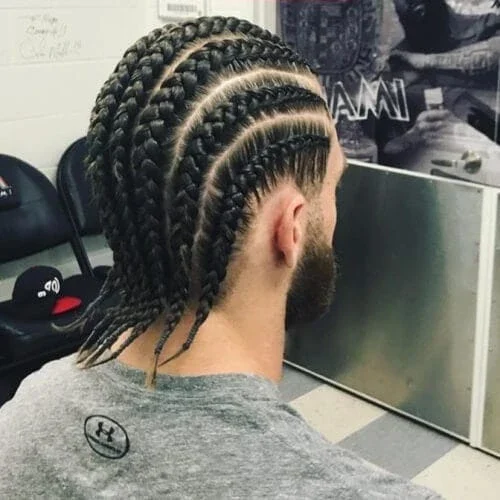
Idea 17
Curved Rows With Loose Rear Ends
Curved rows sweep around the side and continue into separate tails behind the head. The loose ends make the rear outline longer and more mobile than a small tied knot.
- Shape
- Curving side rows
- Detail
- Separate rear tails
The photograph shows the partings around the ear as well as the hanging finish. Larger and smaller braids sit beside one another, adding variation without a central decorative motif.
Wearability note: Choose this angle when rear length is an important part of your plan. Compare where the ends meet a collar before deciding how much hanging length you would enjoy.
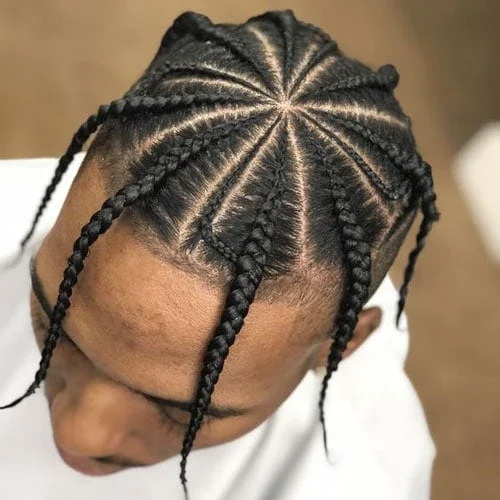
Idea 18
Radial Sections With Front Plaits
Radial sections meet near the crown and open out toward the hairline. Several plaits continue forward beside the forehead instead of being gathered entirely behind the head.
- Shape
- Radial partings
- Detail
- Face-framing plaits
Those front pieces change the way the design frames the face. The overhead angle reveals how the central meeting point connects to the separate braids around the outside.
Wearability note: Consider the hanging front pieces as well as the scalp pattern. They will sit closer to your eyes and glasses than the pulled-back finishes shown elsewhere in this gallery.
Bring more than one angle
An overhead photograph explains the partings, while a rear view explains the finish. Keep both when the pattern and the hanging length matter equally to you.
Discuss comfort as well as appearance with your braider. A detailed scalp pattern does not need to feel painfully tight, and a photograph cannot tell you how it feels on the person wearing it.

About the author
Bella Ross
Bella Ross is the hairstyle editor behind Latest Easy Hairstyles. She curates practical haircut, braid, color, and styling ideas with a focus on looks that are easy to browse, realistic to recreate, and useful for everyday hair decisions.