
Before you choose
Compare the ripples and the outline
These waves haircuts keep the hair close to the head while repeated ridges create the surface pattern. Look at the top and crown as well as the fade around the ears. Some photographs include carved lines; those are optional design details, separate from the wave pattern. This is a gallery of finished looks rather than a wave-training tutorial.
The hairstyle gallery
16 waves haircuts ideas to compare
Compare the visible length, shape, texture, and finish before choosing a salon reference.
Idea 01
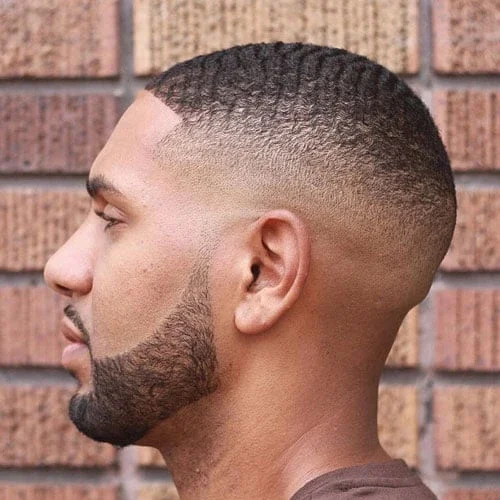
Short Ripples Above a Smooth Fade
Close ripples remain visible across the top while a smooth fade lightens the area above the ear. The side profile makes the short, head-hugging outline clear.
- Shape
- Close ripple texture
- Detail
- Smooth side fade
A squared temple corner gives the front a sharper edge than the soft wave texture above it. The beard is separate from the haircut and need not be part of your choice.
Wearability note: Choose this for a compact wave shape with side contrast. Compare how high the lightest side area sits before selecting a similar fade.
Idea 02
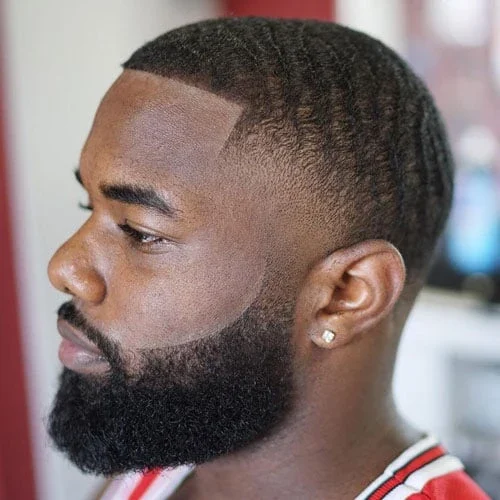
Fuller Waves With a Soft Temple Taper
Waves continue down the upper side, keeping more dark coverage around the head. A softer temple taper adds contrast without exposing a large pale band above the ear.
- Shape
- Fuller ripple coverage
- Detail
- Soft temple taper
The visible ridges curve back from the front. Their spacing remains clear even with the fuller side outline, making this a useful comparison with the higher fades.
Wearability note: Choose this if you prefer the wave pattern to remain visible beyond the top. Discuss the side coverage separately from the sharpness of the front edge.
Idea 03
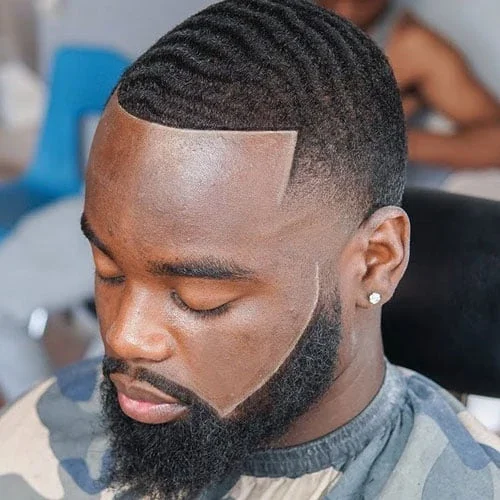
Defined Curves With a Squared Front
Defined curves travel across the top above a squared front edge. The slightly downward camera angle gives a clear view of the ripple spacing and the front corners.
- Shape
- Defined curved waves
- Detail
- Squared front edge
The close temple transition narrows the side while keeping a dark upper band. The pattern follows the rounded head shape rather than adding height above it.
Wearability note: Use this reference when both the wave definition and the front outline matter. A side-only photograph would show the fade but leave much of the top pattern unexplained.
Choose your direction
Choose the side coverage
Compare full upper sides with stronger close fades.
Look around the crown
Use an overhead or rear view to see the pattern.
Decide on linework
Compare plain outlines with optional carved details.
Idea 04
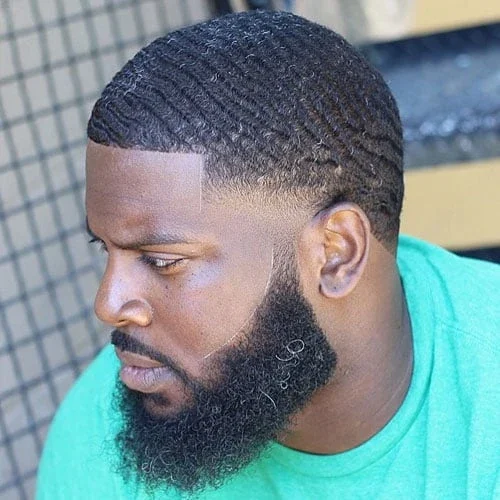
Fine Waves With a Narrow Temple Fade
Fine waves cover a close-cropped top with a narrow lighter area around the temple. The upper sides keep enough length for the ripple pattern to remain visible.
- Shape
- Fine close waves
- Detail
- Narrow temple fade
The front edge is clear but the overall silhouette stays rounded and low. Small differences in the wave spacing are easier to see from this angled view.
Wearability note: Choose this if you want a restrained side transition rather than a high-contrast band. Compare the pattern under ordinary light as well as the crisp outline in a barber photograph.
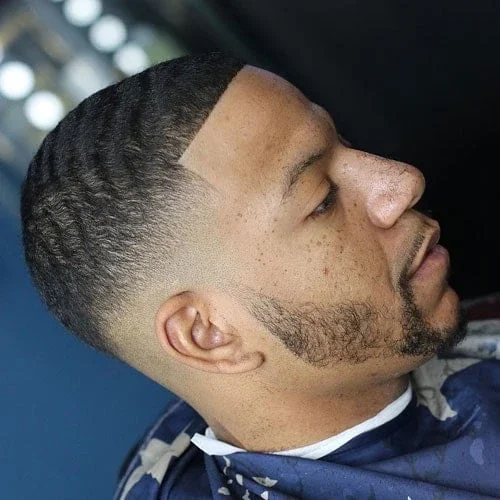
Idea 05
Broad Waves Above a Low Side Transition
Broad ridges curve over the top while the side transition sits lower around the ear. The reclined profile shows how the wave pattern follows the rounded crown.
- Shape
- Broad wave ridges
- Detail
- Low side transition
The upper side stays dark and connected to the top. This creates a fuller outline than a cut with a large closely shaved area beneath the waves.
Wearability note: Choose this if keeping the pattern along the upper sides appeals to you. Show the ear area clearly when explaining how low you want the transition to remain.
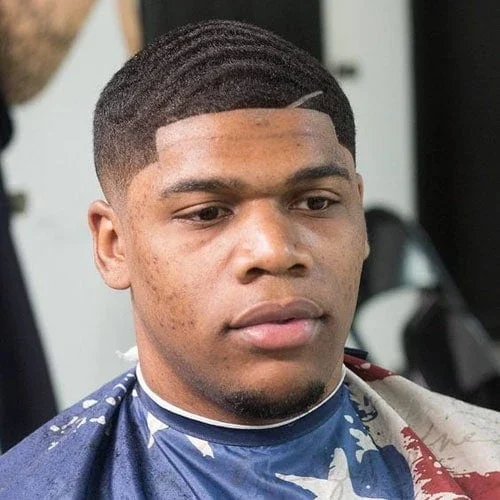
Idea 06
Angled Front Detail With Short Waves
A small angled line adds a sharp detail beside the short wave pattern. The front edge remains squared, giving the decorative mark a clear place near one corner.
- Shape
- Short dark waves
- Detail
- Small angled line
The rest of the top stays compact and rounded. The line is a separate detail rather than part of the wave texture itself, so the main shape works without it.
Wearability note: Choose the pattern first, then decide whether you also want the front detail. Compare its placement with your natural front outline before copying the entire photographed finish.
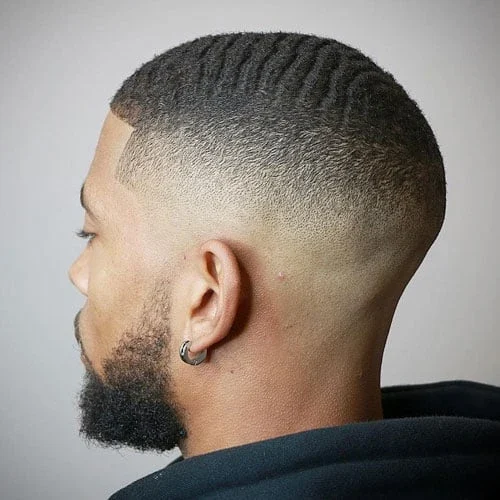
Idea 07
Close Waves With a High Pale Side
Close waves sit above a high pale side area, concentrating the dark pattern near the top. The rear side angle makes the height of that contrast easy to compare.
- Shape
- Close top waves
- Detail
- High side contrast
The transition curves around the head rather than forming a straight horizontal shelf. Little height is added at the crown, preserving a compact silhouette.
Wearability note: Choose this for strong side contrast rather than fuller side coverage. Keep a rear angle in your reference so the shape behind the ear is as clear as the temple.
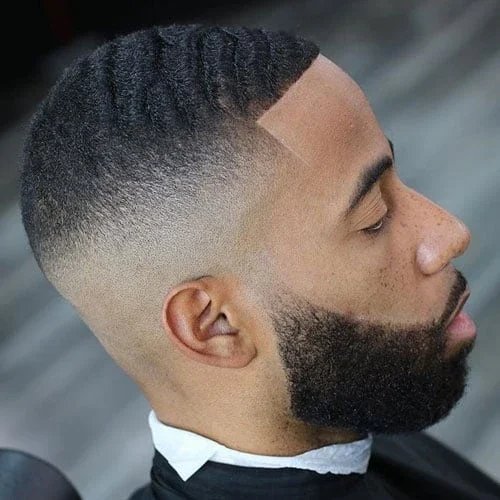
Idea 08
Parallel Waves With a Close Side Fade
Parallel ridges form a clear sequence across the upper head. A close side fade leaves the wave pattern as the darkest area above the ear.
- Shape
- Parallel wave ridges
- Detail
- Close side fade
The angled view shows both the surface pattern and the gradual change in side length. The front corner is defined without adding a separate carved design.
Wearability note: Choose this if you want the wave spacing to be the main detail. Compare how much upper-side pattern remains before deciding on the height of the fade.
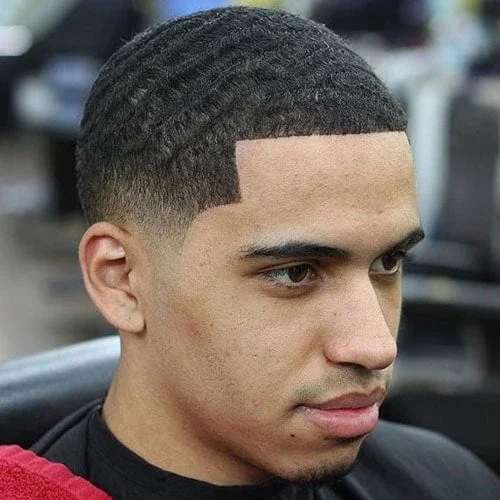
Idea 09
Rounded Wave Crop With Full Upper Sides
A rounded wave crop keeps fuller coverage around the upper sides. The front corner stays squared, creating a crisp frame around the softer rippled surface.
- Shape
- Rounded wave crop
- Detail
- Full upper-side coverage
The lower side lightens near the ear without removing the entire dark band above it. This gives the outline more continuity than the higher exposed fades.
Wearability note: Choose this if you like a fuller short shape with visible texture. Discuss the dark upper-side band as well as the top length when comparing it with a closer version.
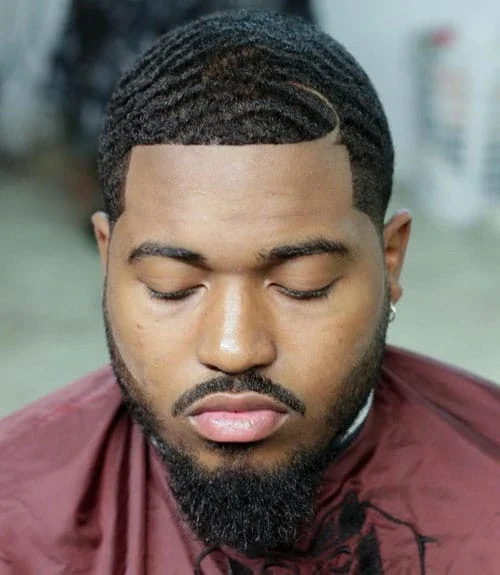
Idea 10
Curved Front Line Across the Waves
A curved shaved line crosses the wave pattern near one front corner. The downward-facing portrait shows the curve against the repeated ridges on top.
- Shape
- Curved shaved line
- Detail
- Visible top ripples
The top remains rounded and fairly full, while the side outline stays close. The decorative line changes the visual direction without changing the basic head-hugging shape.
Wearability note: Choose this if you want a small design detail beside the waves. Treat the line and the haircut as separate preferences so you can keep the pattern without the extra mark.
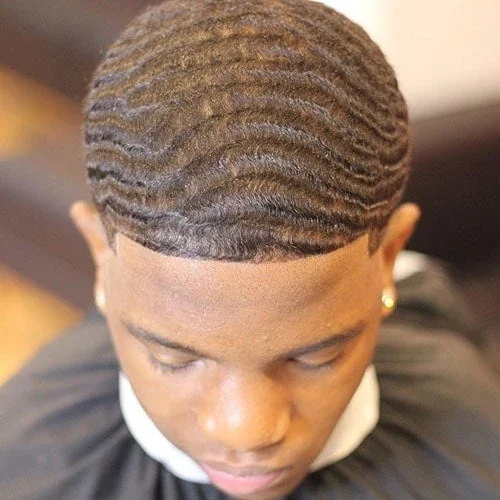
Idea 11
Warm Brown Waves From Above
Warm brown waves spread across the top in repeated curved ridges. The overhead angle makes their direction easier to read than a straight front portrait would.
- Shape
- Brown ripple pattern
- Detail
- Clear overhead view
The front edge follows a gentle curve beneath the pattern. Bright lighting makes the surface look lighter, so this photograph is most useful for spacing and direction rather than a precise color match.
Wearability note: Choose this as a top-pattern reference. Pair it with a side view when discussing the cut, since the overhead crop does not explain the full transition around the ears.
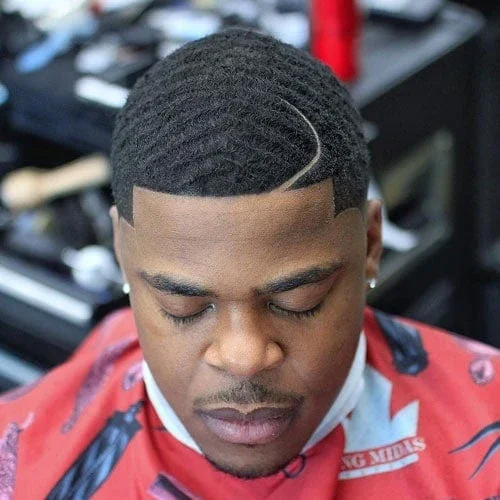
Idea 12
Long Curved Line Beside Fine Waves
A long curved line sweeps from the front toward the side beside a fine wave pattern. The curve adds a larger directional detail than a small notch at the hairline.
- Shape
- Fine wave pattern
- Detail
- Long curved line
The rest of the top sits close and rounded. The front edge stays defined beneath the wave texture, separating the surface pattern from the surrounding outline.
Wearability note: Choose this if the curve itself is part of what you like. Bring an angled reference so its length and position are visible rather than describing it simply as a part.
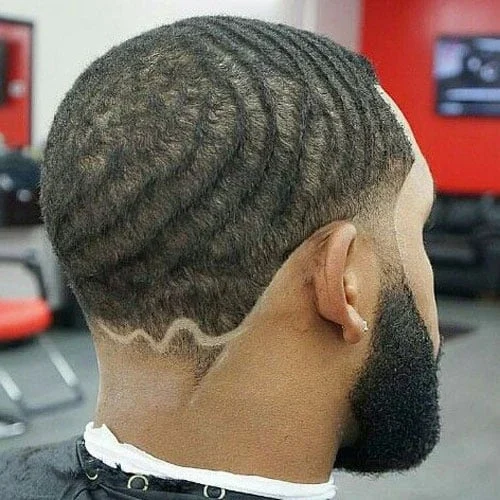
Idea 13
Crown Waves With a Wavy Nape Design
A rear view reveals waves curving around the crown above a carved wavy nape line. The decorative line creates a second rhythm beneath the natural-looking surface ridges.
- Shape
- Visible crown pattern
- Detail
- Wavy nape line
The upper back keeps enough length for the pattern to remain visible. The lower outline is closely cut, leaving a clear contrast at the nape.
Wearability note: Choose this if the back view matters as much as the front. The nape design is optional, so compare the wave pattern separately before deciding whether you want both details.
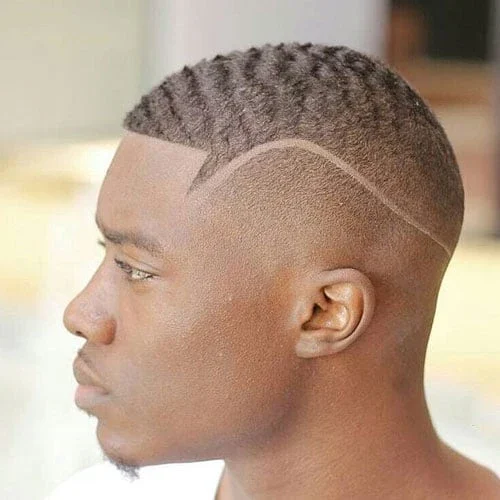
Idea 14
Light Brown Waves With a Side Arc
Light brown waves sit above a long carved arc at the side. The arc follows a different path from the short repeated ridges, making the two details easy to distinguish.
- Shape
- Light brown waves
- Detail
- Carved side arc
The closely cut lower side keeps the design visible around the temple and ear. The top remains compact rather than forming a raised curly shape.
Wearability note: Choose this for the combination of short texture and a clear side mark. Compare the arc placement with the simpler line-free crops before deciding how much extra detail you want.
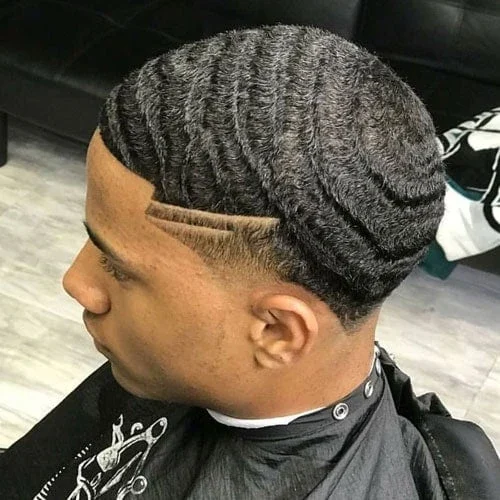
Idea 15
Sweeping Waves With Two Side Lines
Broad waves sweep across the top above two parallel carved side lines. The ridges have enough visible depth to stand apart from the straight decorative marks below them.
- Shape
- Broad sweeping waves
- Detail
- Two carved side lines
The upper side keeps fuller coverage, while the area around the ear stays shorter. This creates a layered contrast between the waves, the linework and the close perimeter.
Wearability note: Choose this if you enjoy both a pronounced pattern and a small graphic detail. Discuss the two lines separately from the wave length so the haircut remains clear without them.
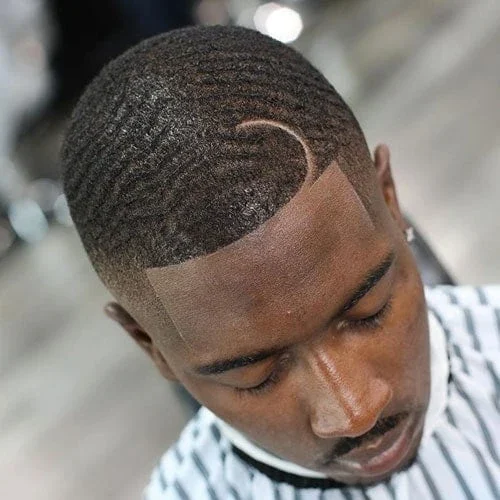
Idea 16
Rounded Waves With a Curved Front Mark
A curved front mark cuts through the rounded wave pattern beside one corner. The overhead angle shows the short ridges continuing across the rest of the top.
- Shape
- Rounded ripple crop
- Detail
- Curved front mark
The front edge stays squared beneath the curved detail, creating a contrast between straight outline and rounder interior lines. The haircut remains close to the head throughout.
Wearability note: Choose this if you like a small focal point near the forehead. Compare its position with the longer sweeping lines in the gallery before choosing how prominent it should be.
Separate surface pattern from side length
Two close cuts can look quite different when one keeps waves along the upper sides and another has a high fade. Point out both the ripple pattern and the area you want cut closer.
A photograph shows one finished moment. Compare clear views under different lighting, and discuss the length and shape with a barber who can assess your own texture in person.

About the author
Bella Ross
Bella Ross is the hairstyle editor behind Latest Easy Hairstyles. She curates practical haircut, braid, color, and styling ideas with a focus on looks that are easy to browse, realistic to recreate, and useful for everyday hair decisions.