Haircut guide
30 Shoulder Length Hairstyles for Thin Fine Hair
Updated June 13, 2026
A photo-first guide to shoulder length hairstyles for thin fine hair, with lobs, layers, bangs, waves, and styling notes that help fine hair look fuller.
Shoulder length hairstyles that help fine hair look fuller
Shoulder length hairstyles for thin fine hair should make the hair look shaped before you add much product. A blunt lob can make the ends look stronger, soft layers can create movement, and curtain bangs can add lift around the face.
If you are still comparing all lengths, start with haircuts for thin fine hair. If you already know you want this medium-lob zone, use the examples below to choose between blunt, layered, wavy, sleek, and bang-friendly shapes.
30 Shoulder Length Hairstyles for Thin Fine Hair photo ideas
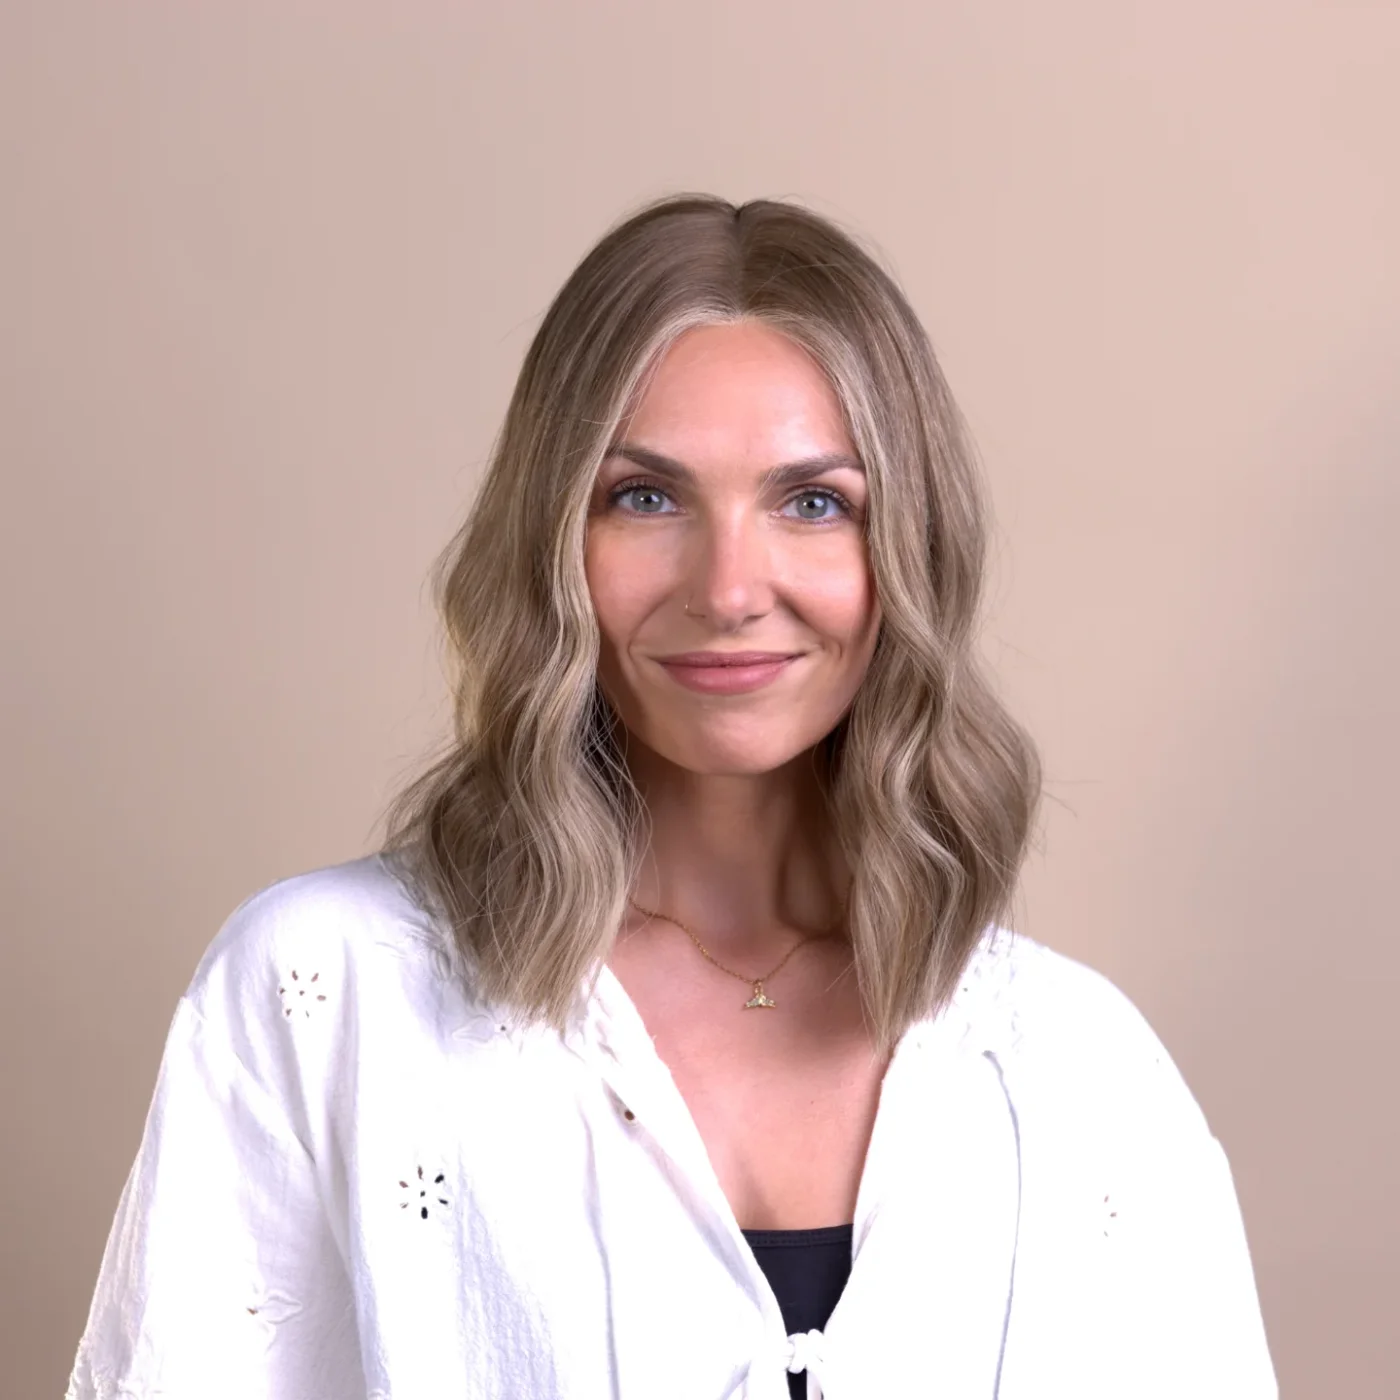
1. Blunt Center-Part Lob
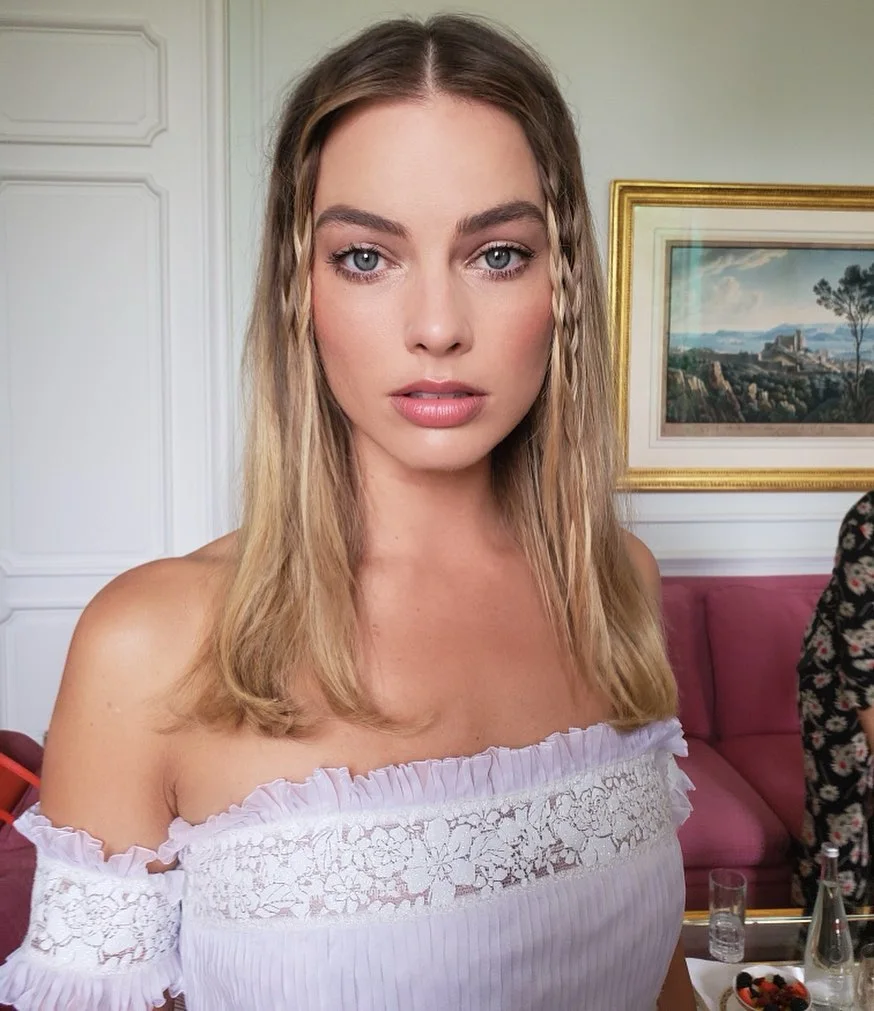
Description
This center-part lob keeps the lower edge clean, so fine hair looks more solid through the shoulders. The soft bend keeps it from feeling too flat.
Why it works
A blunt perimeter gives thin fine hair a stronger outline while the slight face frame prevents the shape from hanging straight down.
Best for
Straight to softly wavy fine hair that needs a simple shoulder length shape with fuller-looking ends.
Maintenance
Trim the ends regularly and keep conditioner below the ears so the roots stay lifted.
Try it yourself for Blunt Center-Part Lob
How to DIY
- Prep the roots of the blunt center-part lob with a small amount of volumizing mousse before styling.
- Dry the roots of the blunt center-part lob first so the shape has lift before the ends are finished.
- Keep product light through the blunt center-part lob, because thin fine hair can collapse when it is coated.
- Shape the face-framing pieces of the blunt center-part lob away from the face, then let them cool before brushing.
- Finish the blunt center-part lob by checking that the bottom edge still looks full and not separated.
2. Side-Part Tucked Lob
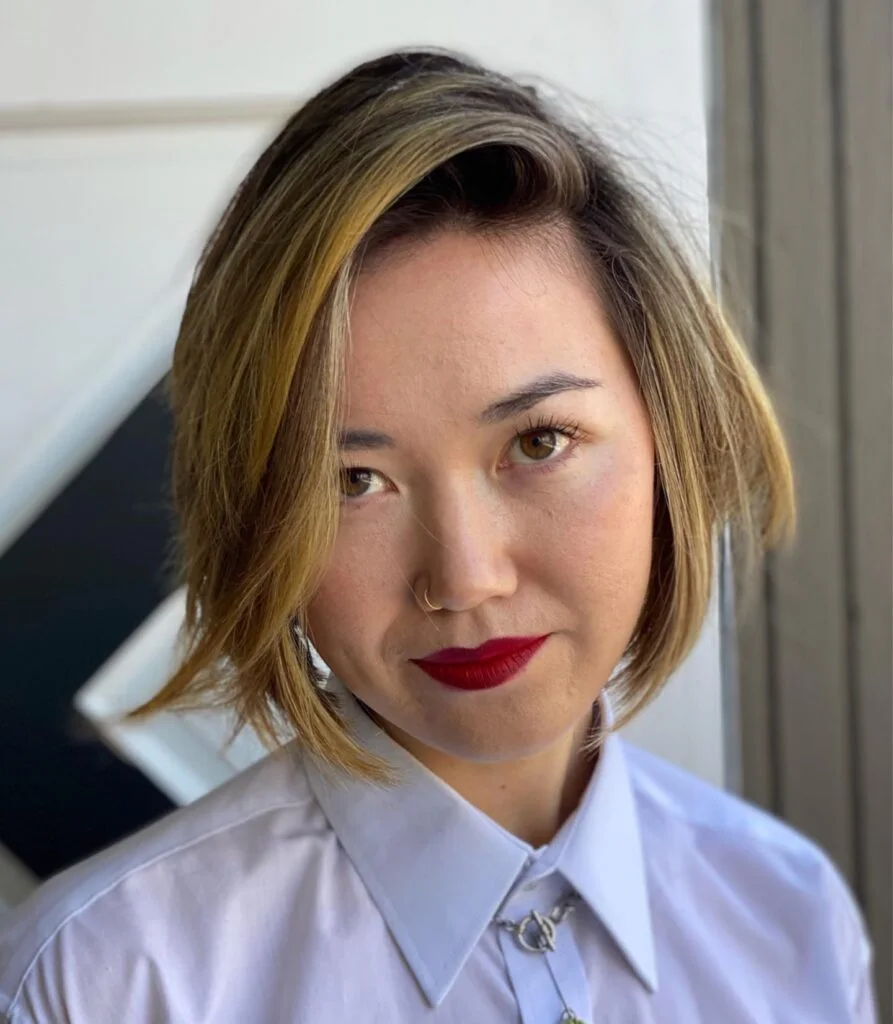
Description
A side part and tucked finish give this lob instant direction. It is polished without asking fine hair to hold a complicated style.
Why it works
The diagonal part adds volume on one side, and the tucked edge makes the ends look deliberate instead of thin.
Best for
Fine straight hair, oval or heart faces, and anyone who likes a neat shoulder length finish.
Maintenance
Refresh the part line first and use shine spray only on the outer layer.
Try it yourself for Side-Part Tucked Lob
How to DIY
- Prep the front pieces of the side-part tucked lob with a small amount of heat protectant before styling.
- Dry the front pieces of the side-part tucked lob first so the shape has lift before the ends are finished.
- Keep product light through the side-part tucked lob, because thin fine hair can collapse when it is coated.
- Shape the face-framing pieces of the side-part tucked lob away from the face, then let them cool before brushing.
- Finish the side-part tucked lob by checking that the bottom edge still looks full and not separated.
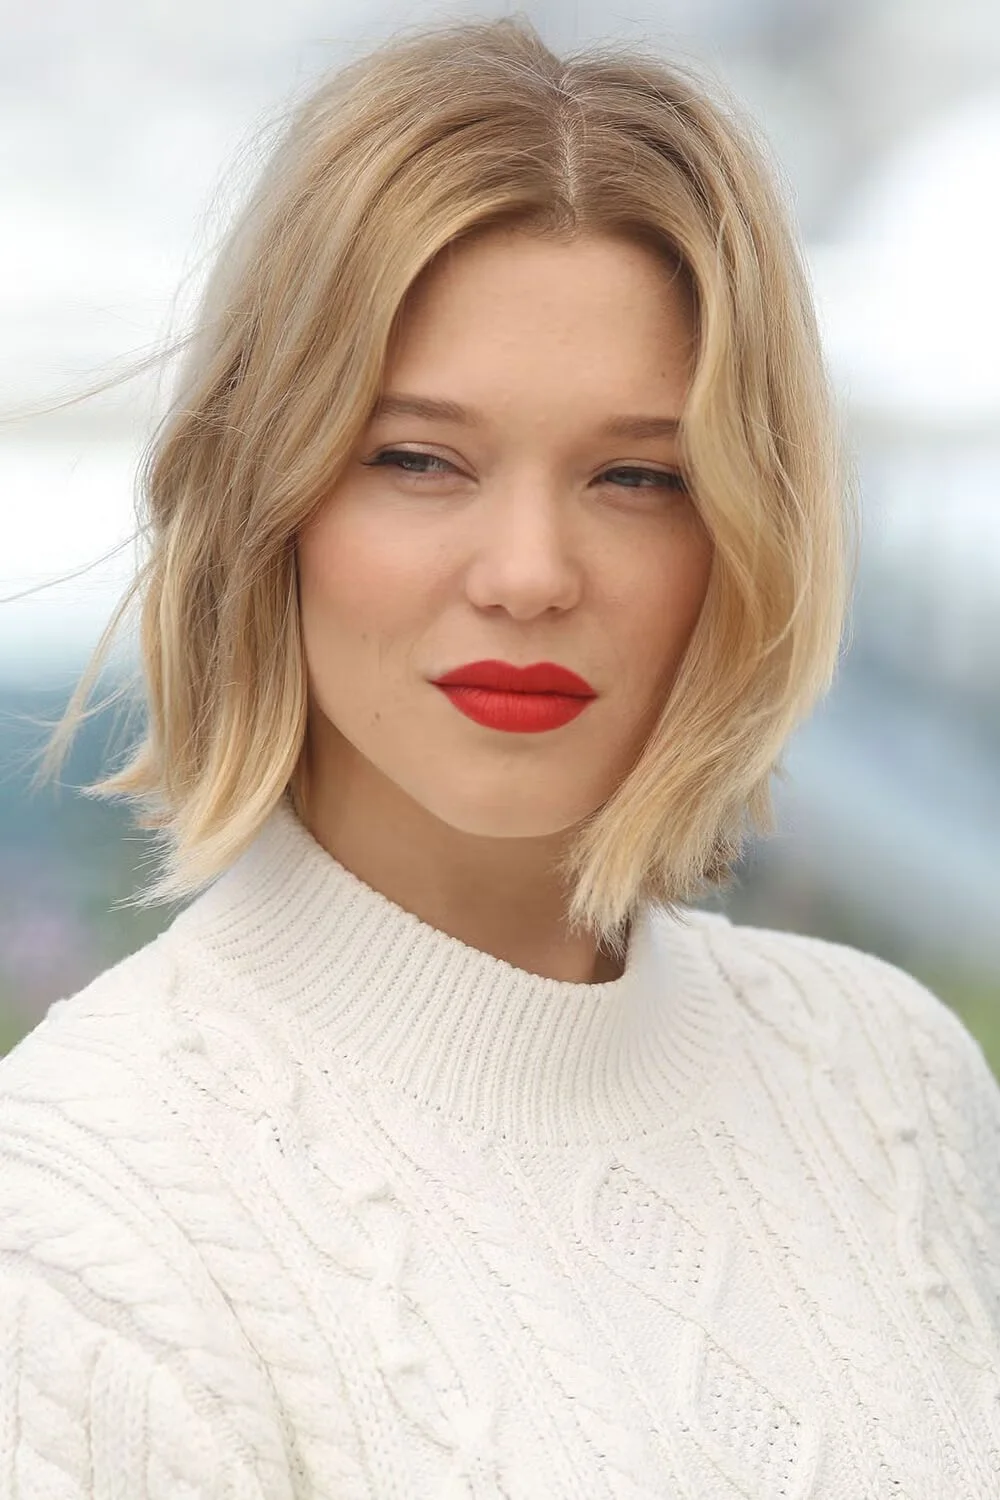
3. Soft Wavy French Lob
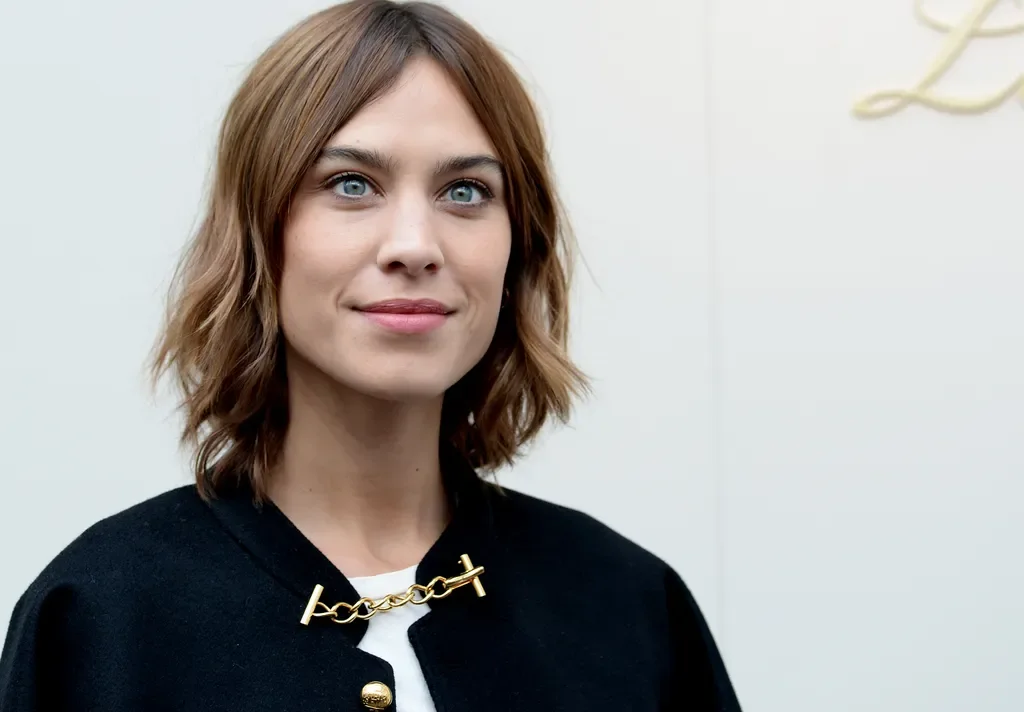
Description
This soft French-inspired lob sits around the shoulders with light waves and an easy center part. The finish feels effortless but still shaped.
Why it works
Fine hair gets movement from the wave pattern while the length stays compact enough to avoid wispy ends.
Best for
Fine hair with a natural bend, simple lobs, and low-effort styling routines.
Maintenance
Use a small amount of root lift and let the ends stay touchable.
Try it yourself for Soft Wavy French Lob
How to DIY
- Prep the ends of the soft wavy french lob with a small amount of dry texture spray before styling.
- Dry the ends of the soft wavy french lob first so the shape has lift before the ends are finished.
- Keep product light through the soft wavy french lob, because thin fine hair can collapse when it is coated.
- Shape the face-framing pieces of the soft wavy french lob away from the face, then let them cool before brushing.
- Finish the soft wavy french lob by checking that the bottom edge still looks full and not separated.
4. Angled Shoulder Lob
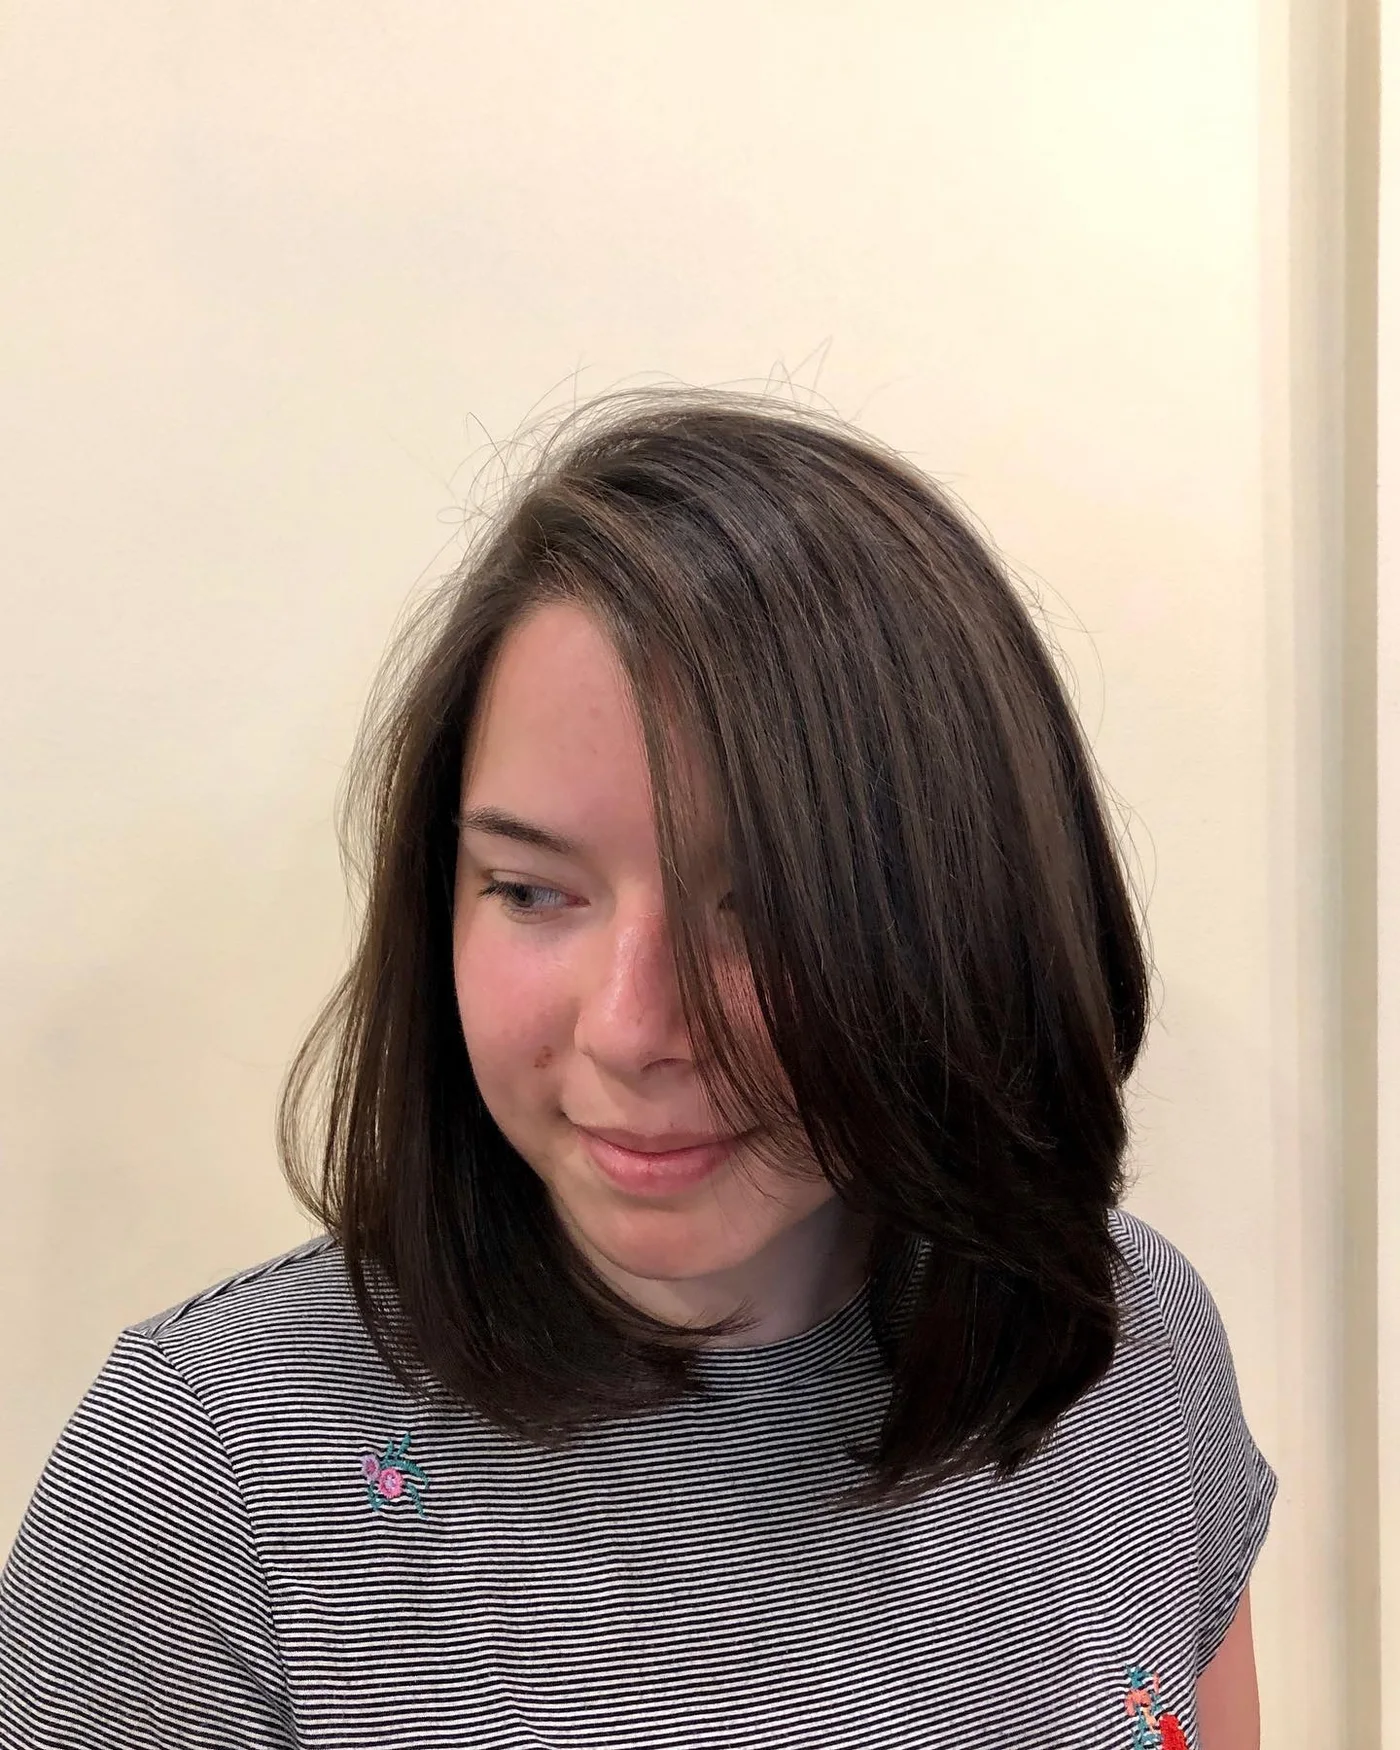
Description
The longer front panel gives this shoulder lob a clean salon shape. The angle makes the hair look fuller because the eye follows one strong line.
Why it works
Angled lobs help fine hair look intentional, especially when the back is slightly shorter and the front has a smooth curve.
Best for
Straight or lightly wavy fine hair that needs structure without short layers.
Maintenance
Blow-dry the nape first, then smooth the front pieces last.
Try it yourself for Angled Shoulder Lob
How to DIY
- Prep the crown of the angled shoulder lob with a small amount of heat protectant before styling.
- Dry the crown of the angled shoulder lob first so the shape has lift before the ends are finished.
- Keep product light through the angled shoulder lob, because thin fine hair can collapse when it is coated.
- Shape the face-framing pieces of the angled shoulder lob away from the face, then let them cool before brushing.
- Finish the angled shoulder lob by checking that the bottom edge still looks full and not separated.
5. Beige Wavy Lob
Description
Soft beige waves make this shoulder length lob look fuller without heavy layering. The color variation also helps the texture show.
Why it works
Loose bends widen the silhouette slightly, which is helpful when fine hair looks narrow or flat.
Best for
Fine hair that can hold a wave and anyone who wants a relaxed everyday lob.
Maintenance
Curl only the middle lengths and leave the ends lightly polished.
Try it yourself for Beige Wavy Lob
How to DIY
- Prep the part line of the beige wavy lob with a small amount of dry texture spray before styling.
- Dry the part line of the beige wavy lob first so the shape has lift before the ends are finished.
- Keep product light through the beige wavy lob, because thin fine hair can collapse when it is coated.
- Shape the face-framing pieces of the beige wavy lob away from the face, then let them cool before brushing.
- Finish the beige wavy lob by checking that the bottom edge still looks full and not separated.
6. Tousled Shoulder-Length Lob
Description
This tousled lob has airy movement through the sides and a clean shoulder-skimming length. It gives fine hair texture without looking over-layered.
Why it works
Piecey waves make the sides look fuller while the lob length keeps the ends from spreading too thin.
Best for
Fine hair that falls flat quickly, soft waves, and casual styling.
Maintenance
Mist texture spray under the top layer instead of coating the whole style.
Try it yourself for Tousled Shoulder-Length Lob
How to DIY
- Prep the mid-lengths of the tousled shoulder-length lob with a small amount of dry texture spray before styling.
- Dry the mid-lengths of the tousled shoulder-length lob first so the shape has lift before the ends are finished.
- Keep product light through the tousled shoulder-length lob, because thin fine hair can collapse when it is coated.
- Shape the face-framing pieces of the tousled shoulder-length lob away from the face, then let them cool before brushing.
- Finish the tousled shoulder-length lob by checking that the bottom edge still looks full and not separated.
7. Bouncy Shoulder Layers
Description
These bouncy layers create movement around the shoulders while keeping the bottom edge full. The blowout finish makes the cut look plush.
Why it works
Long layers add lift and swing without carving too much density from fine ends.
Best for
Fine to medium hair, round-brush styling, and readers who want soft volume.
Maintenance
Set the front pieces with a round brush and avoid heavy serum near the crown.
Try it yourself for Bouncy Shoulder Layers
How to DIY
- Prep the roots of the bouncy shoulder layers with a small amount of lightweight mousse before styling.
- Dry the roots of the bouncy shoulder layers first so the shape has lift before the ends are finished.
- Keep product light through the bouncy shoulder layers, because thin fine hair can collapse when it is coated.
- Shape the face-framing pieces of the bouncy shoulder layers away from the face, then let them cool before brushing.
- Finish the bouncy shoulder layers by checking that the bottom edge still looks full and not separated.
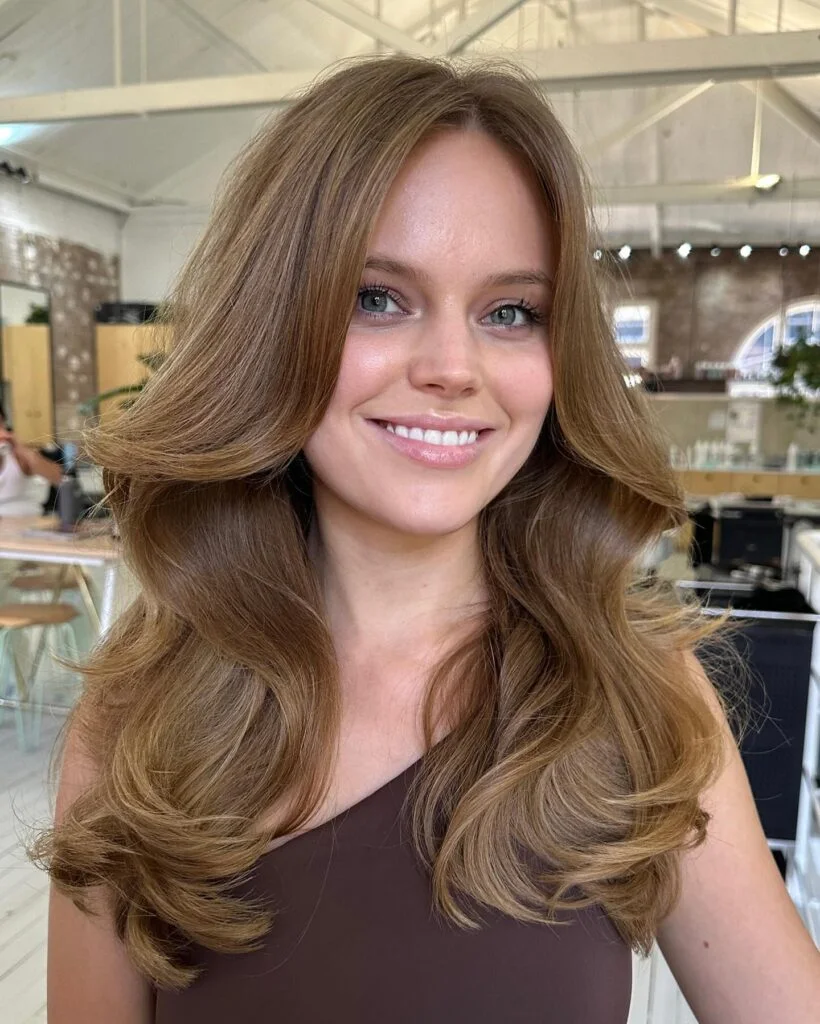
8. Face-Framing Blowout Layers
Description
Face-framing layers open the cheekbones and give this shoulder length style a lifted finish. The ends still look full because the layers are not too short.
Why it works
The volume sits near the face and crown, the places where fine hair usually needs help first.
Best for
Fine hair with enough length for a round-brush blowout and soft face framing.
Maintenance
Use velcro rollers at the crown while the hair cools.
Try it yourself for Face-Framing Blowout Layers
How to DIY
- Prep the front pieces of the face-framing blowout layers with a small amount of lightweight mousse before styling.
- Dry the front pieces of the face-framing blowout layers first so the shape has lift before the ends are finished.
- Keep product light through the face-framing blowout layers, because thin fine hair can collapse when it is coated.
- Shape the face-framing pieces of the face-framing blowout layers away from the face, then let them cool before brushing.
- Finish the face-framing blowout layers by checking that the bottom edge still looks full and not separated.
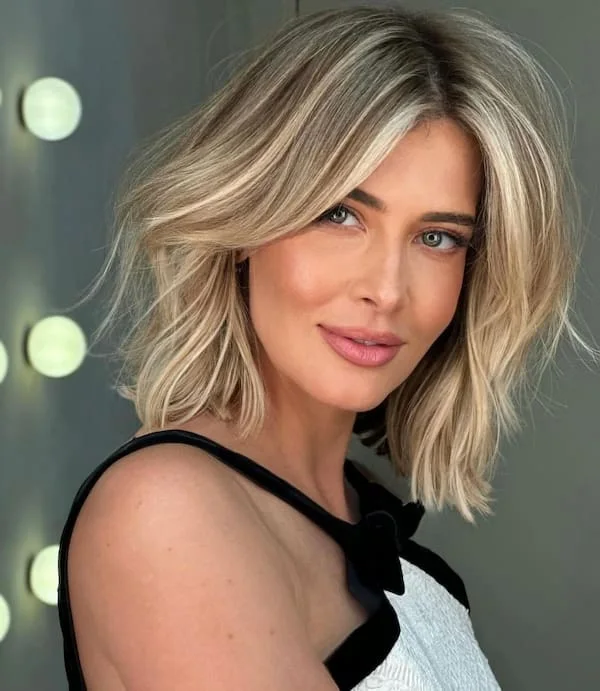
9. Dimensional Blonde Shoulder Layers
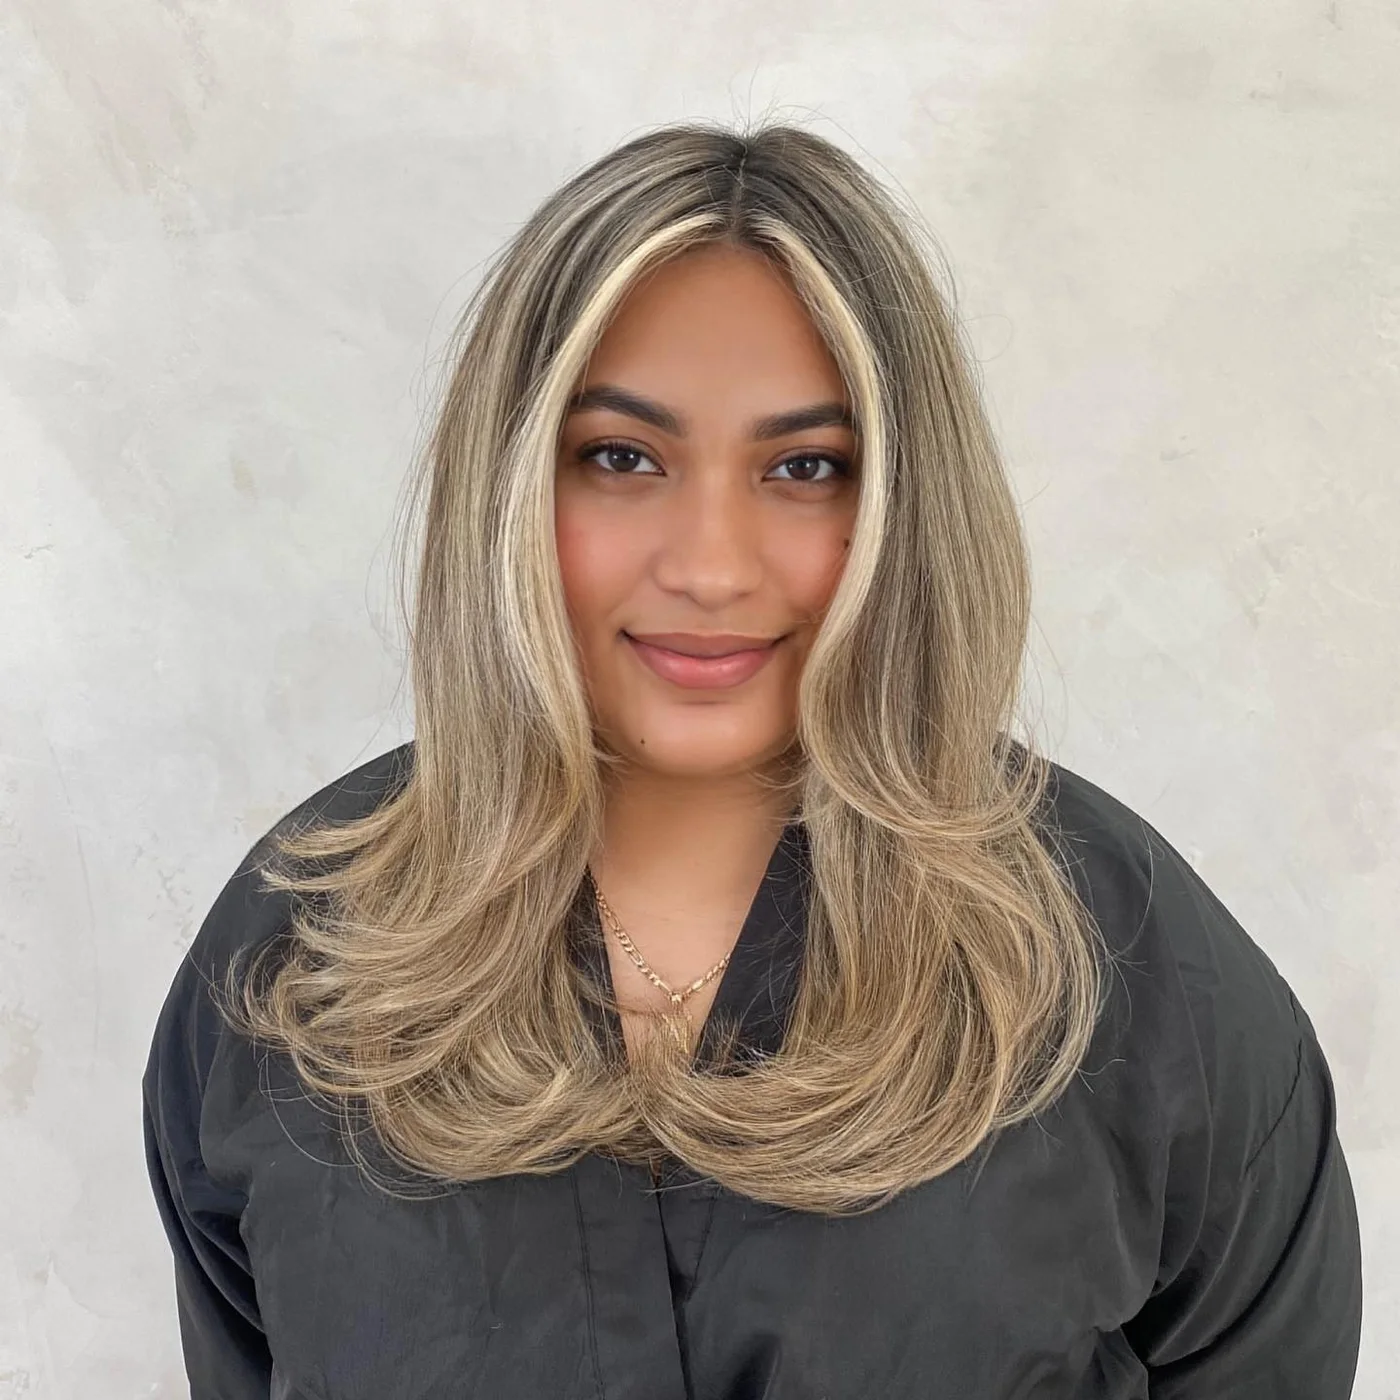
Description
Bright face-framing color and soft shoulder layers make this style look fuller from the front. The layers curve in without thinning the bottom too much.
Why it works
Dimension creates visual depth, and the rounded front pieces keep fine hair from lying flat against the face.
Best for
Highlighted fine hair, layered lobs, and fuller face-framing movement.
Maintenance
Keep purple shampoo occasional and use mousse before blow-drying.
Try it yourself for Dimensional Blonde Shoulder Layers
How to DIY
- Prep the ends of the dimensional blonde shoulder layers with a small amount of lightweight mousse before styling.
- Dry the ends of the dimensional blonde shoulder layers first so the shape has lift before the ends are finished.
- Keep product light through the dimensional blonde shoulder layers, because thin fine hair can collapse when it is coated.
- Shape the face-framing pieces of the dimensional blonde shoulder layers away from the face, then let them cool before brushing.
- Finish the dimensional blonde shoulder layers by checking that the bottom edge still looks full and not separated.
10. Side-Swept Layered Lob
Description
A side-swept front gives this layered lob a lifted, glamorous shape. The layers are soft enough to keep the shoulder length wearable.
Why it works
The side sweep hides sparse areas near the hairline and gives fine hair a fuller front profile.
Best for
Fine hair that needs a flattering part change and soft blowout movement.
Maintenance
Dry the side-swept section in the opposite direction first for extra lift.
Try it yourself for Side-Swept Layered Lob
How to DIY
- Prep the crown of the side-swept layered lob with a small amount of lightweight mousse before styling.
- Dry the crown of the side-swept layered lob first so the shape has lift before the ends are finished.
- Keep product light through the side-swept layered lob, because thin fine hair can collapse when it is coated.
- Shape the face-framing pieces of the side-swept layered lob away from the face, then let them cool before brushing.
- Finish the side-swept layered lob by checking that the bottom edge still looks full and not separated.
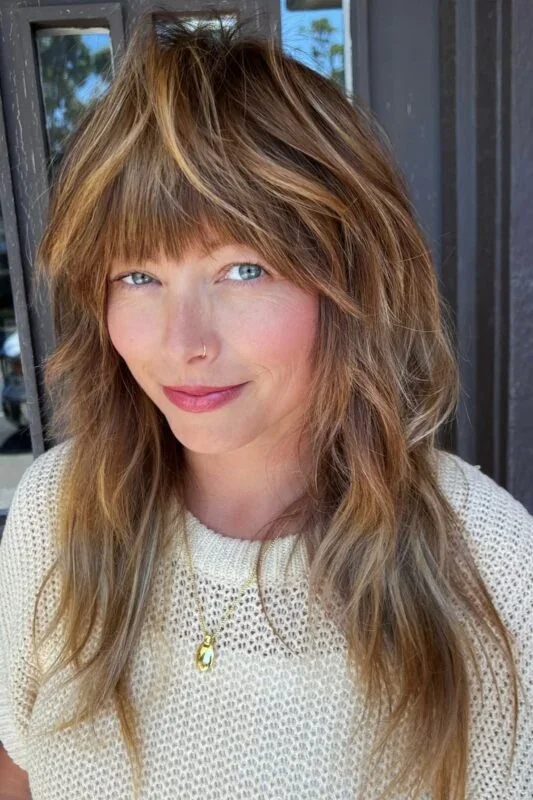
11. Feathered Blonde Lob with Wispy Bangs
Description
Feathered layers and wispy bangs make this blonde lob feel light but still full. The fringe adds softness without stealing too much density.
Why it works
Wispy bangs work well on fine hair when they blend into longer side pieces instead of forming a heavy block.
Best for
Fine blonde hair, curtain or wispy fringe, and soft shag-lob inspiration.
Maintenance
Dry the bangs first, then use texture spray through the middle layers.
Try it yourself for Feathered Blonde Lob with Wispy Bangs
How to DIY
- Prep the part line of the feathered blonde lob with wispy bangs with a small amount of dry shampoo before styling.
- Dry the part line of the feathered blonde lob with wispy bangs first so the shape has lift before the ends are finished.
- Keep product light through the feathered blonde lob with wispy bangs, because thin fine hair can collapse when it is coated.
- Shape the face-framing pieces of the feathered blonde lob with wispy bangs away from the face, then let them cool before brushing.
- Finish the feathered blonde lob with wispy bangs by checking that the bottom edge still looks full and not separated.
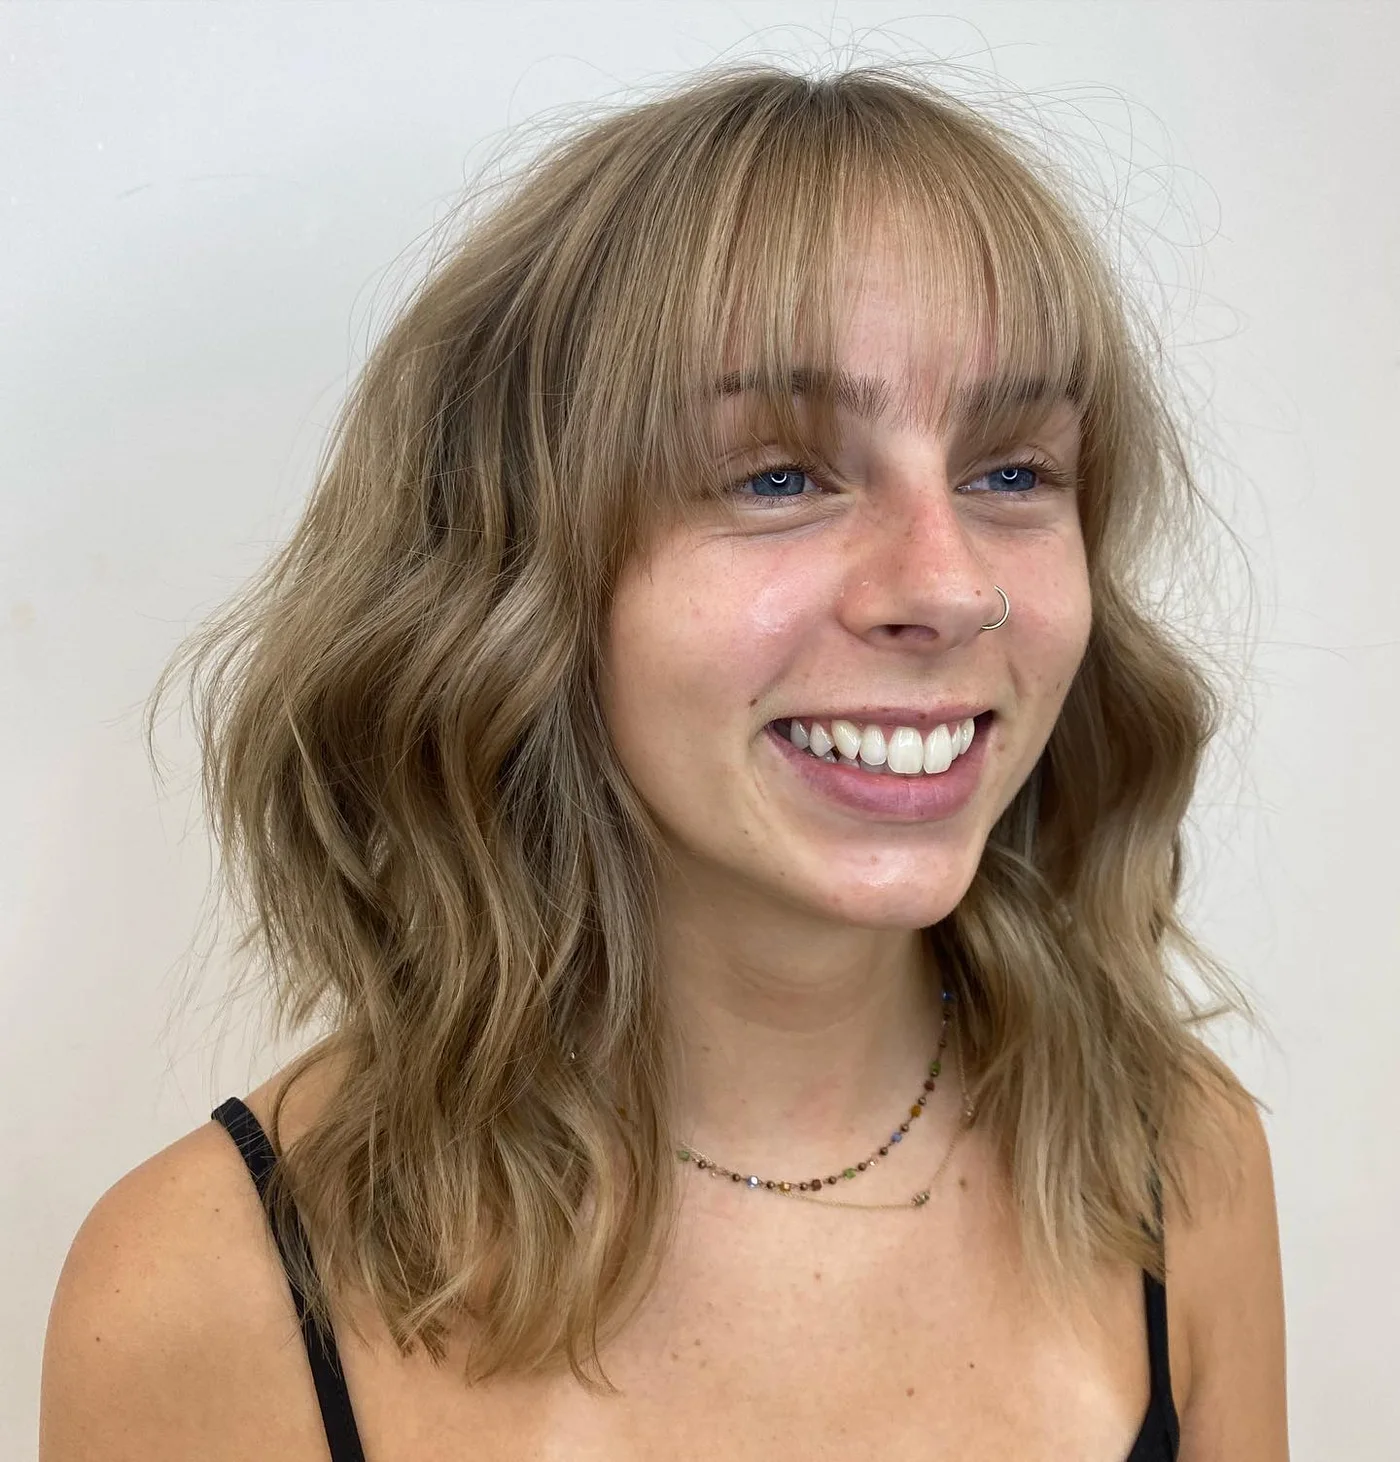
12. Wispy Curtain Bangs with Long Layers
Description
This shoulder length cut uses wispy curtain bangs and long layers for a soft, face-framing shape. The texture stays airy around the cheeks.
Why it works
Curtain bangs add a focal point while long layers keep the bottom from looking see-through.
Best for
Fine hair with natural wave, soft bangs, and low-pressure styling.
Maintenance
Refresh the bang bend with a small brush and keep cream away from the roots.
Try it yourself for Wispy Curtain Bangs with Long Layers
How to DIY
- Prep the mid-lengths of the wispy curtain bangs with long layers with a small amount of dry shampoo before styling.
- Dry the mid-lengths of the wispy curtain bangs with long layers first so the shape has lift before the ends are finished.
- Keep product light through the wispy curtain bangs with long layers, because thin fine hair can collapse when it is coated.
- Shape the face-framing pieces of the wispy curtain bangs with long layers away from the face, then let them cool before brushing.
- Finish the wispy curtain bangs with long layers by checking that the bottom edge still looks full and not separated.
13. Shaggy Shoulder Layers with Bangs
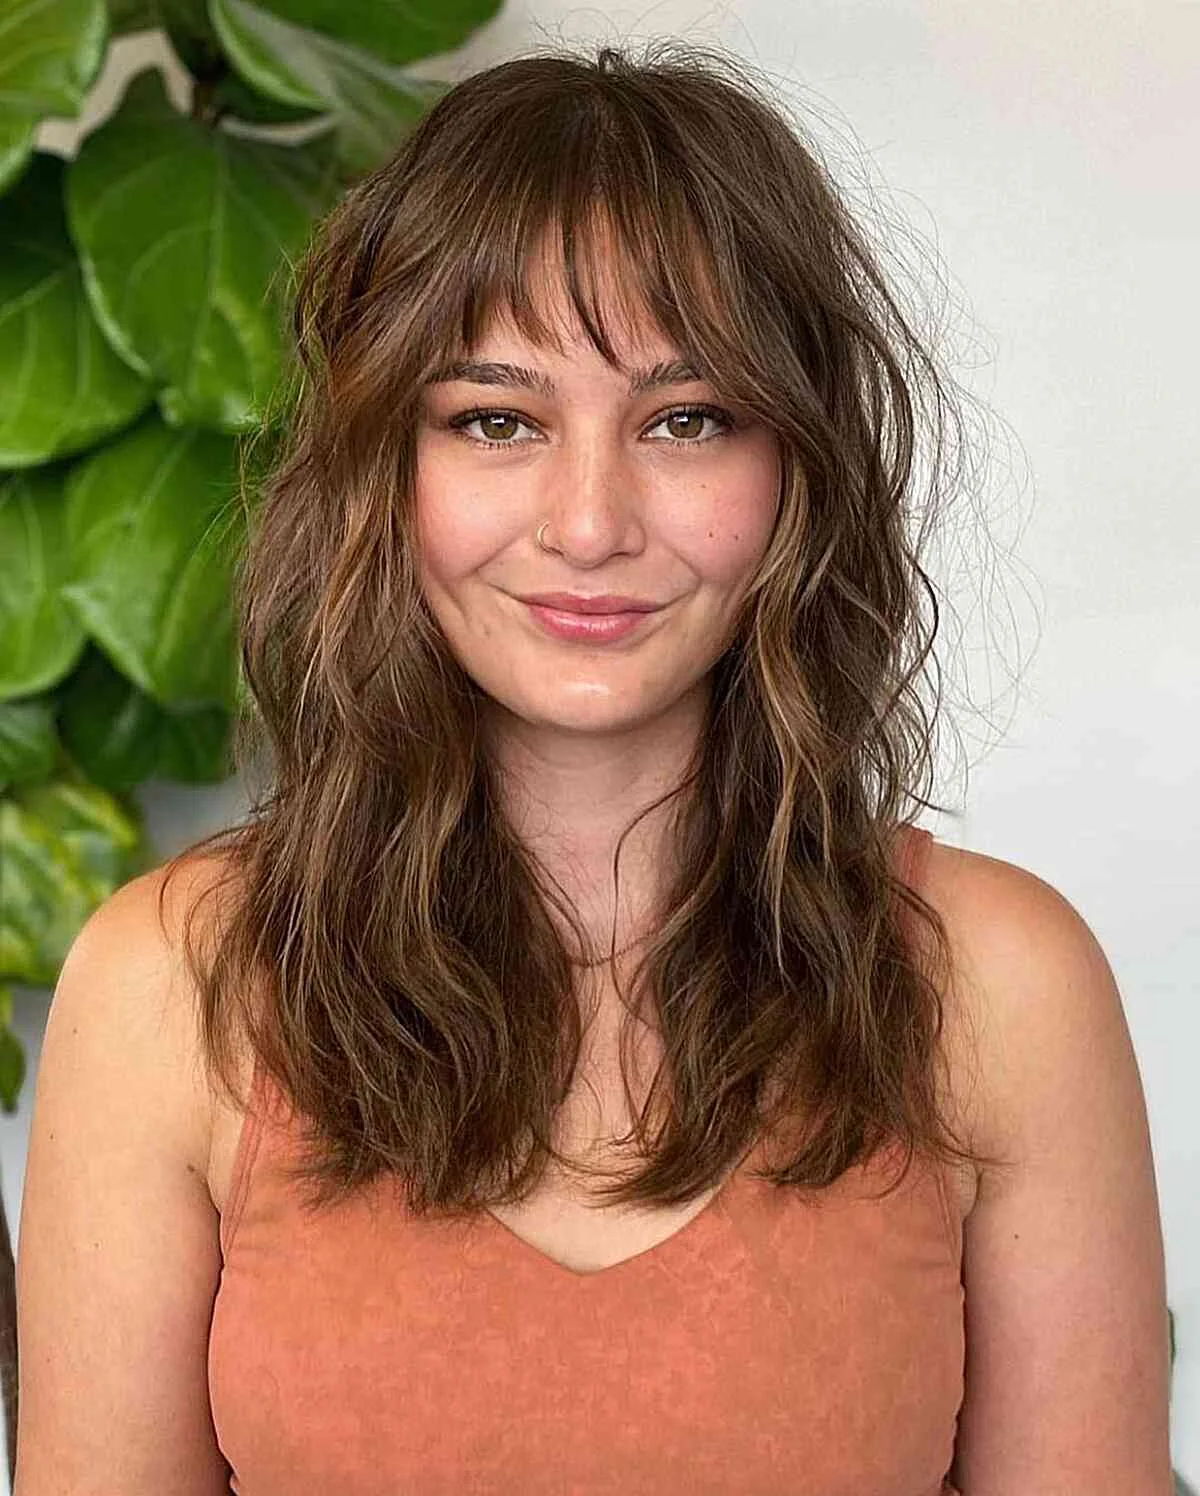
Description
Shaggy shoulder layers and soft bangs give this cut movement without making it too choppy. It has a lived-in shape that still frames the face.
Why it works
The shag effect adds fullness around the crown and cheeks while the ends stay long enough to look substantial.
Best for
Fine wavy hair, soft shags, and readers who want a casual shoulder length cut.
Maintenance
Scrunch mousse through damp layers and separate only the front pieces.
Try it yourself for Shaggy Shoulder Layers with Bangs
How to DIY
- Prep the roots of the shaggy shoulder layers with bangs with a small amount of dry shampoo before styling.
- Dry the roots of the shaggy shoulder layers with bangs first so the shape has lift before the ends are finished.
- Keep product light through the shaggy shoulder layers with bangs, because thin fine hair can collapse when it is coated.
- Shape the face-framing pieces of the shaggy shoulder layers with bangs away from the face, then let them cool before brushing.
- Finish the shaggy shoulder layers with bangs by checking that the bottom edge still looks full and not separated.
14. Polished Shoulder Blowout
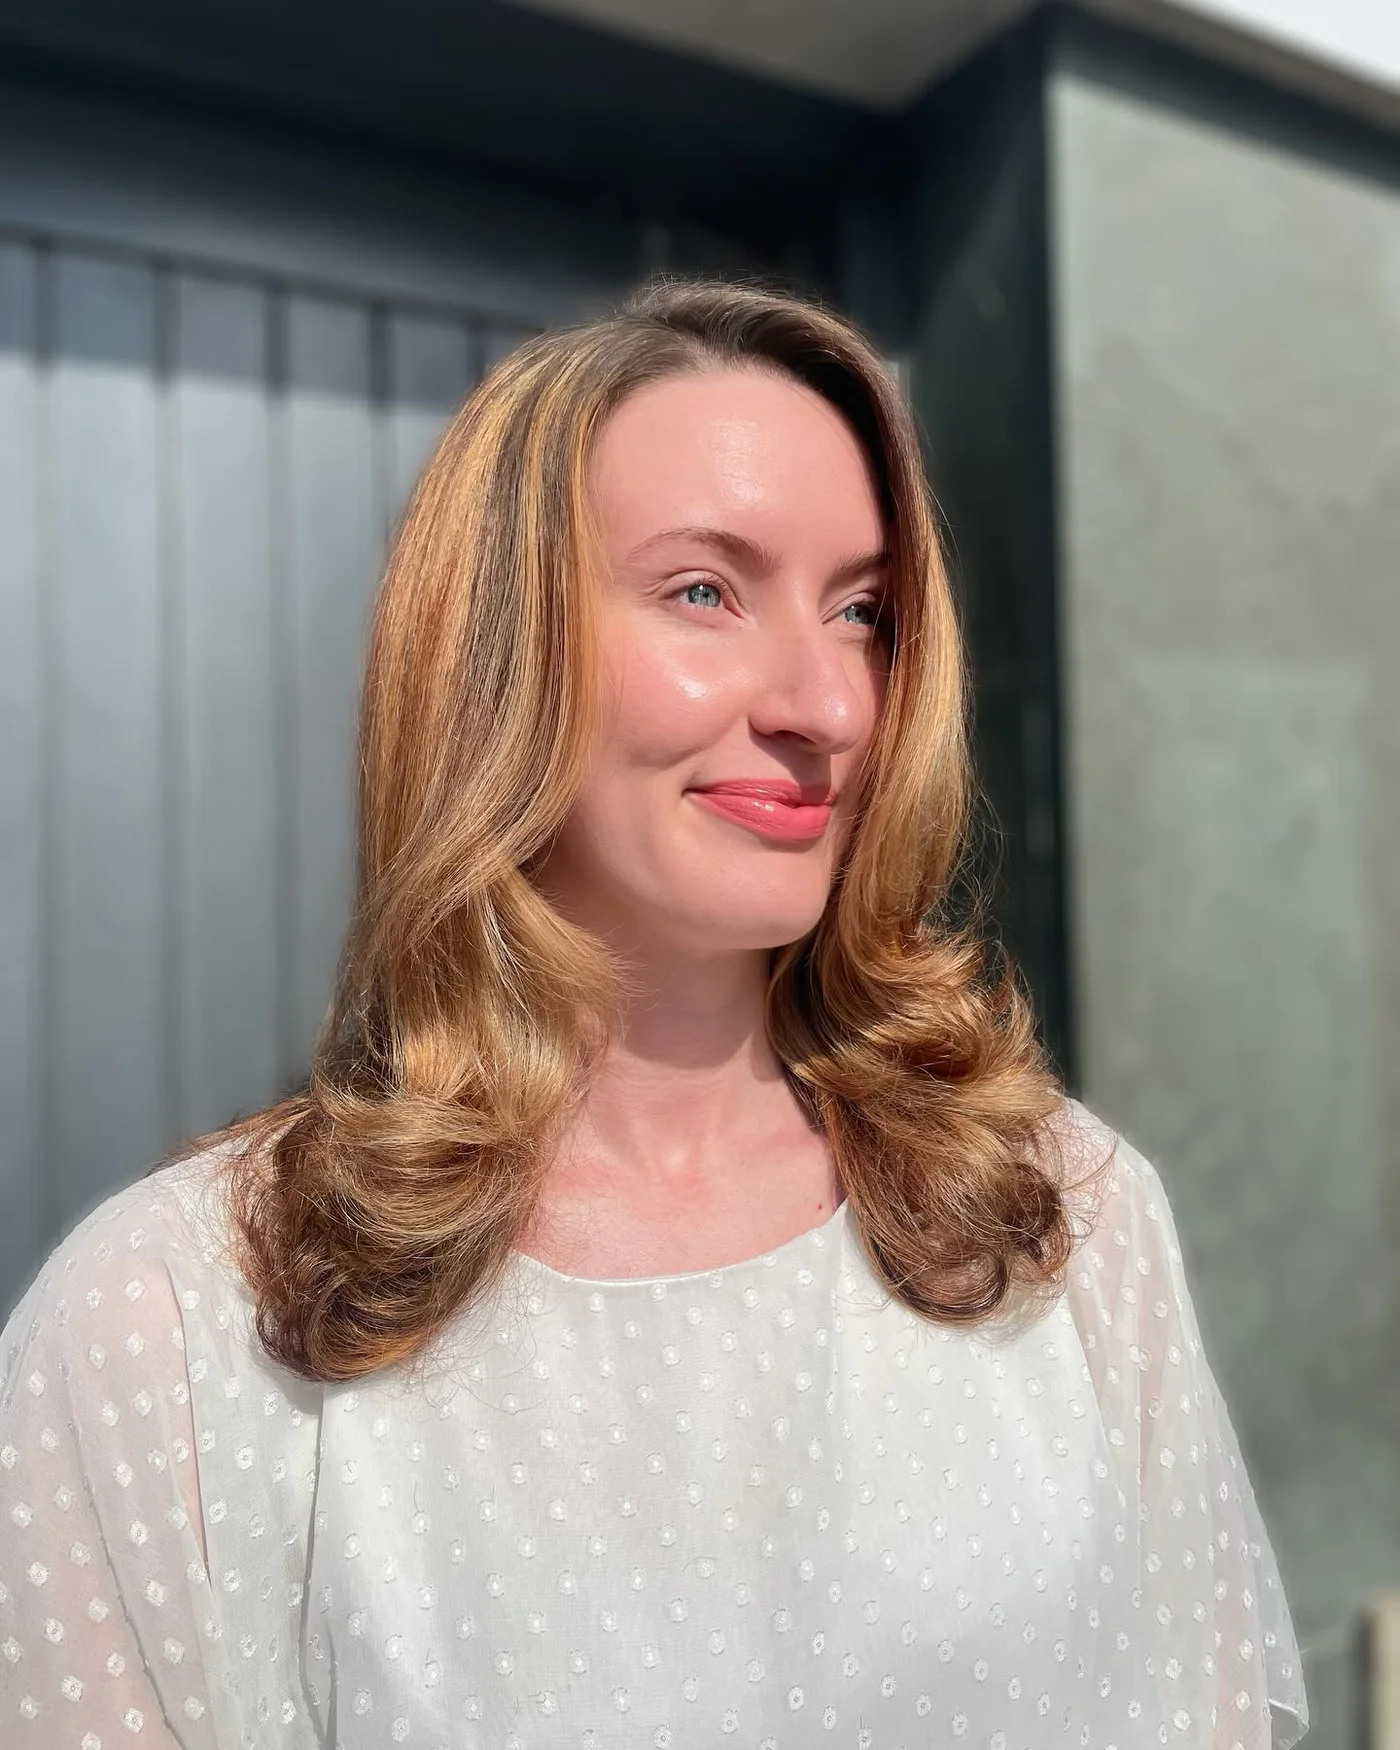
Description
A polished blowout gives this shoulder length style smooth volume and curled ends. It is classic, feminine, and easy to adapt for work or events.
Why it works
Fine hair looks fuller when the ends curve in one direction and the crown has gentle lift.
Best for
Fine hair that responds to a round brush and readers who want a polished medium style.
Maintenance
Use a light mousse before drying and finish with flexible spray.
Try it yourself for Polished Shoulder Blowout
How to DIY
- Prep the front pieces of the polished shoulder blowout with a small amount of lightweight mousse before styling.
- Dry the front pieces of the polished shoulder blowout first so the shape has lift before the ends are finished.
- Keep product light through the polished shoulder blowout, because thin fine hair can collapse when it is coated.
- Shape the face-framing pieces of the polished shoulder blowout away from the face, then let them cool before brushing.
- Finish the polished shoulder blowout by checking that the bottom edge still looks full and not separated.
15. Smooth Side-Swept Shoulder Cut
Description
This smooth shoulder cut uses a deep side sweep and long face framing. The finish is sleek while still keeping movement at the ends.
Why it works
The side-swept shape gives fine hair more presence around the face without relying on lots of layers.
Best for
Straight fine hair, sleek lobs, and styles that need a quick polished routine.
Maintenance
Use heat protectant, then smooth the front section only once to preserve root lift.
Try it yourself for Smooth Side-Swept Shoulder Cut
How to DIY
- Prep the ends of the smooth side-swept shoulder cut with a small amount of heat protectant before styling.
- Dry the ends of the smooth side-swept shoulder cut first so the shape has lift before the ends are finished.
- Keep product light through the smooth side-swept shoulder cut, because thin fine hair can collapse when it is coated.
- Shape the face-framing pieces of the smooth side-swept shoulder cut away from the face, then let them cool before brushing.
- Finish the smooth side-swept shoulder cut by checking that the bottom edge still looks full and not separated.
16. Rounded Lob with Curtain Bangs
Description
A rounded lob and curtain bangs create a full, face-framing outline. The ends curve softly, which makes the hair look thicker at shoulder length.
Why it works
The curtain bang gives height near the part while the rounded lower shape keeps fine ends together.
Best for
Fine hair, round-brush styling, curtain bangs, and soft medium cuts.
Maintenance
Round-brush the bangs away from the face and keep the lower edge trimmed.
Try it yourself for Rounded Lob with Curtain Bangs
How to DIY
- Prep the crown of the rounded lob with curtain bangs with a small amount of dry shampoo before styling.
- Dry the crown of the rounded lob with curtain bangs first so the shape has lift before the ends are finished.
- Keep product light through the rounded lob with curtain bangs, because thin fine hair can collapse when it is coated.
- Shape the face-framing pieces of the rounded lob with curtain bangs away from the face, then let them cool before brushing.
- Finish the rounded lob with curtain bangs by checking that the bottom edge still looks full and not separated.
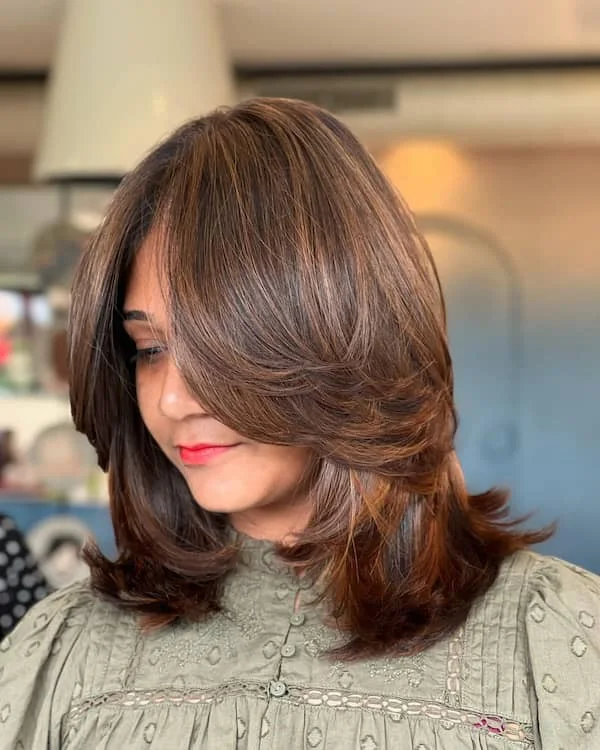
17. Face-Framing Medium Layers

Description
These medium layers frame the face and build a soft shape through the shoulders. The finish has body but does not look stiff.
Why it works
Layering starts low enough to protect density while still adding lift around the face.
Best for
Fine hair that needs movement around the cheeks and a natural blowout finish.
Maintenance
Use a large round brush on the front layers and let the ends cool before brushing.
Try it yourself for Face-Framing Medium Layers
How to DIY
- Prep the part line of the face-framing medium layers with a small amount of lightweight mousse before styling.
- Dry the part line of the face-framing medium layers first so the shape has lift before the ends are finished.
- Keep product light through the face-framing medium layers, because thin fine hair can collapse when it is coated.
- Shape the face-framing pieces of the face-framing medium layers away from the face, then let them cool before brushing.
- Finish the face-framing medium layers by checking that the bottom edge still looks full and not separated.
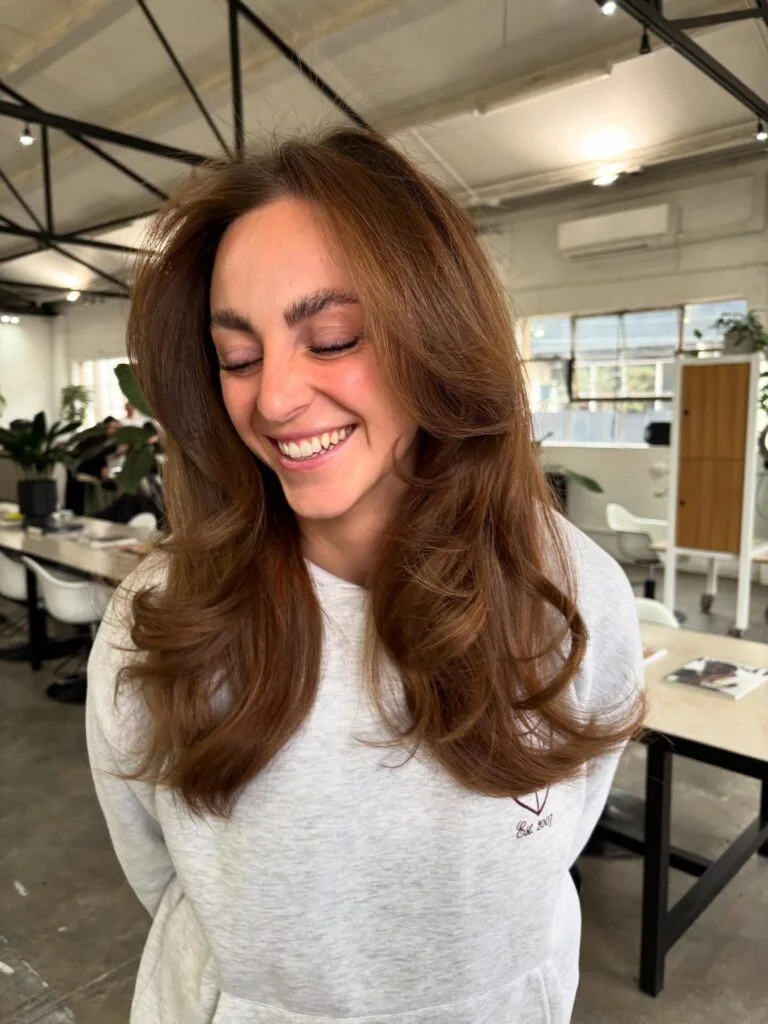
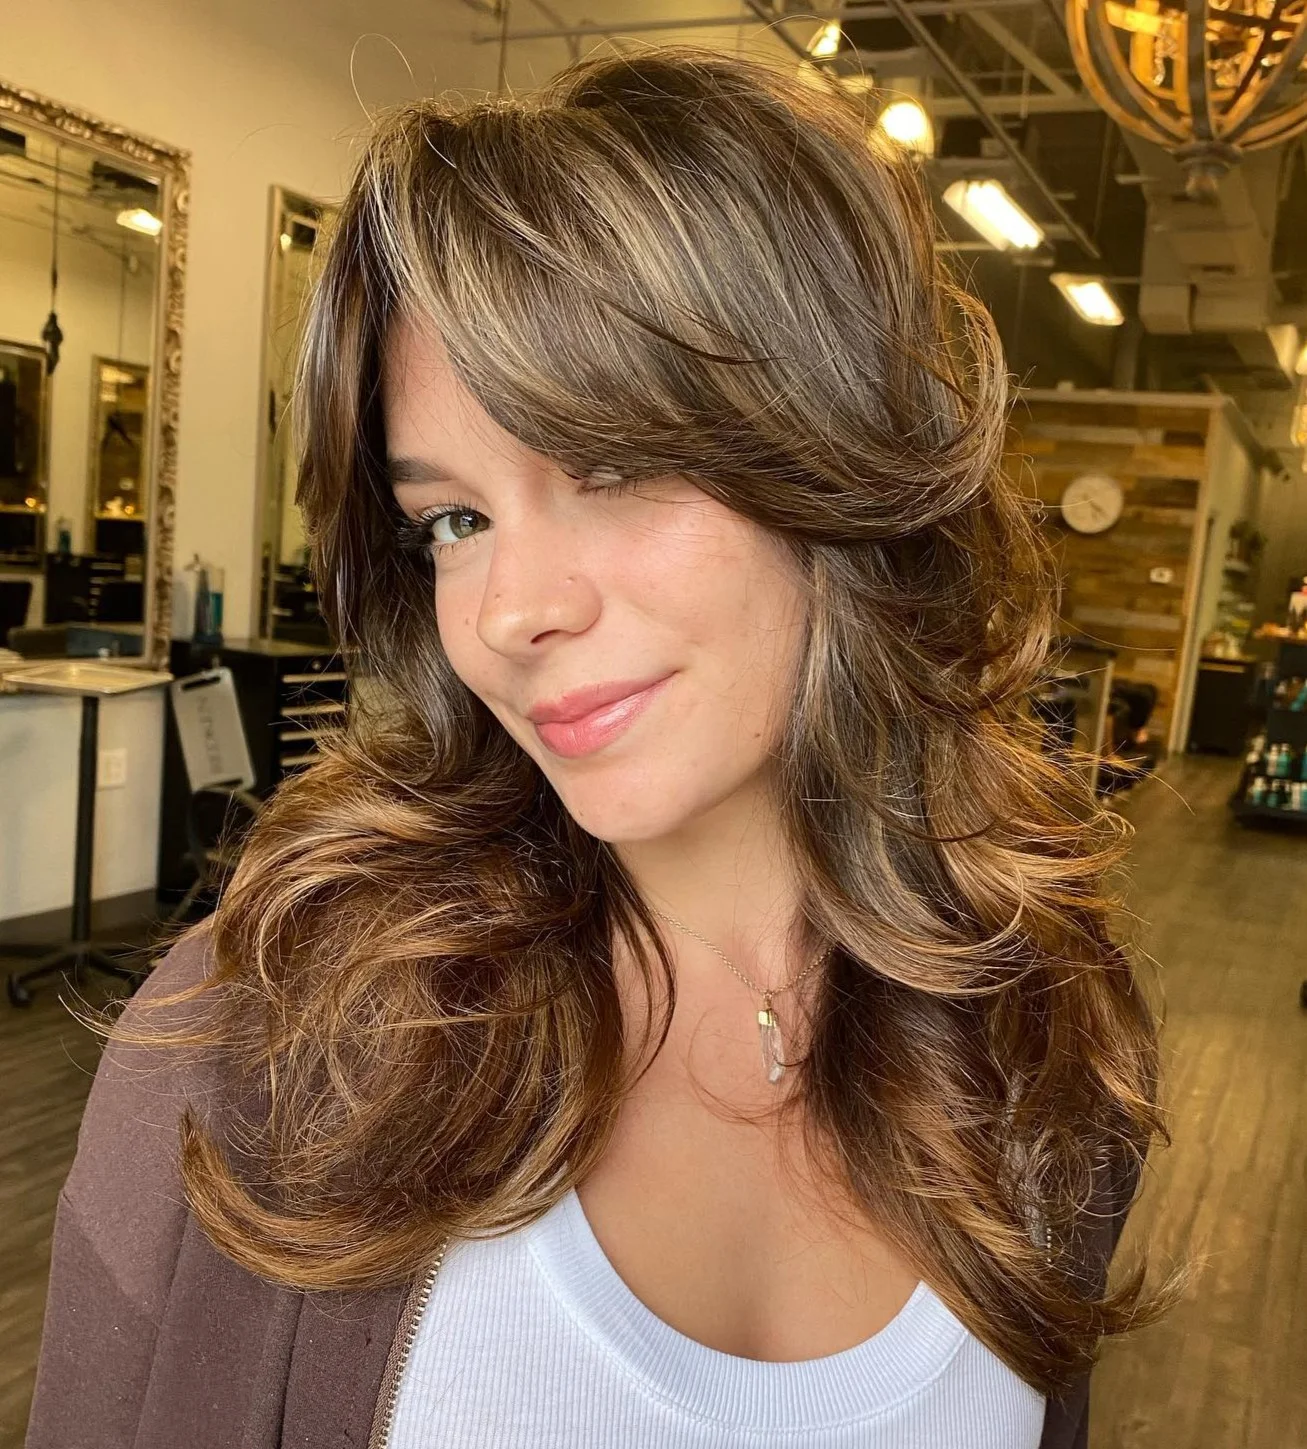
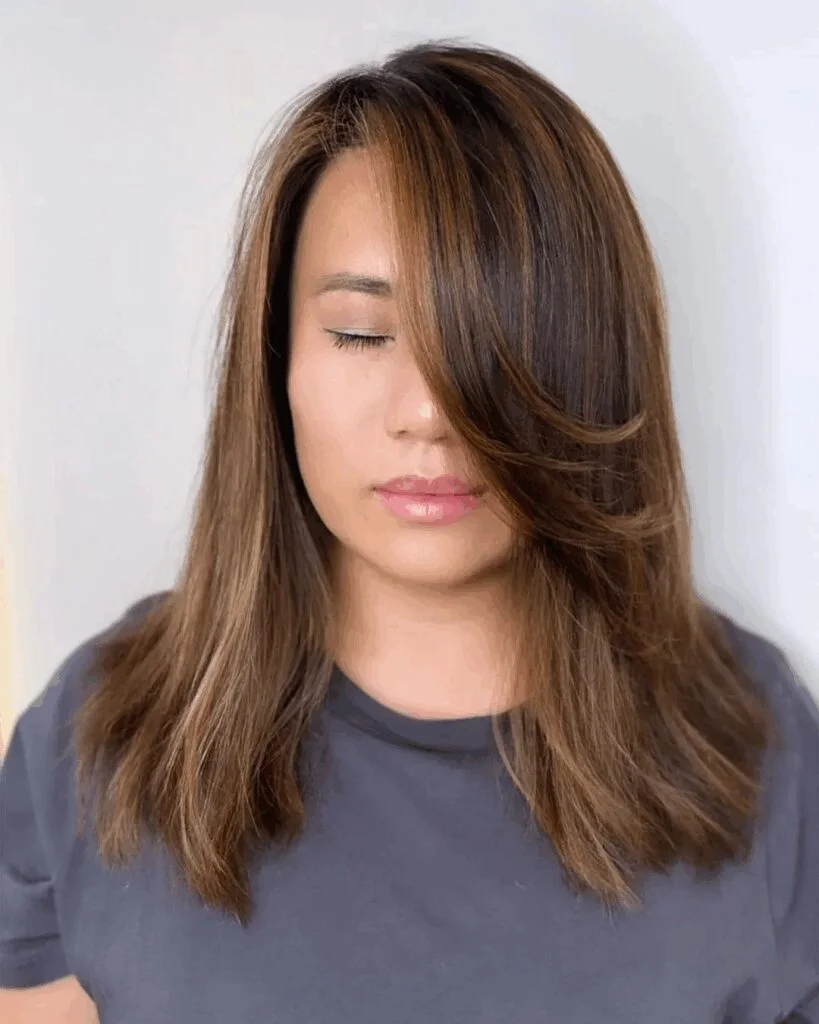
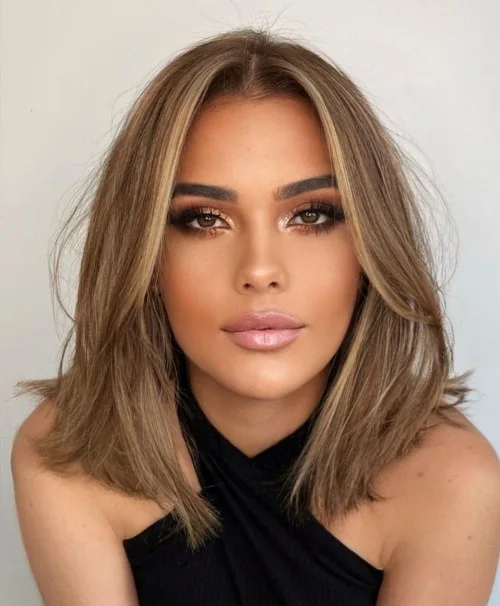
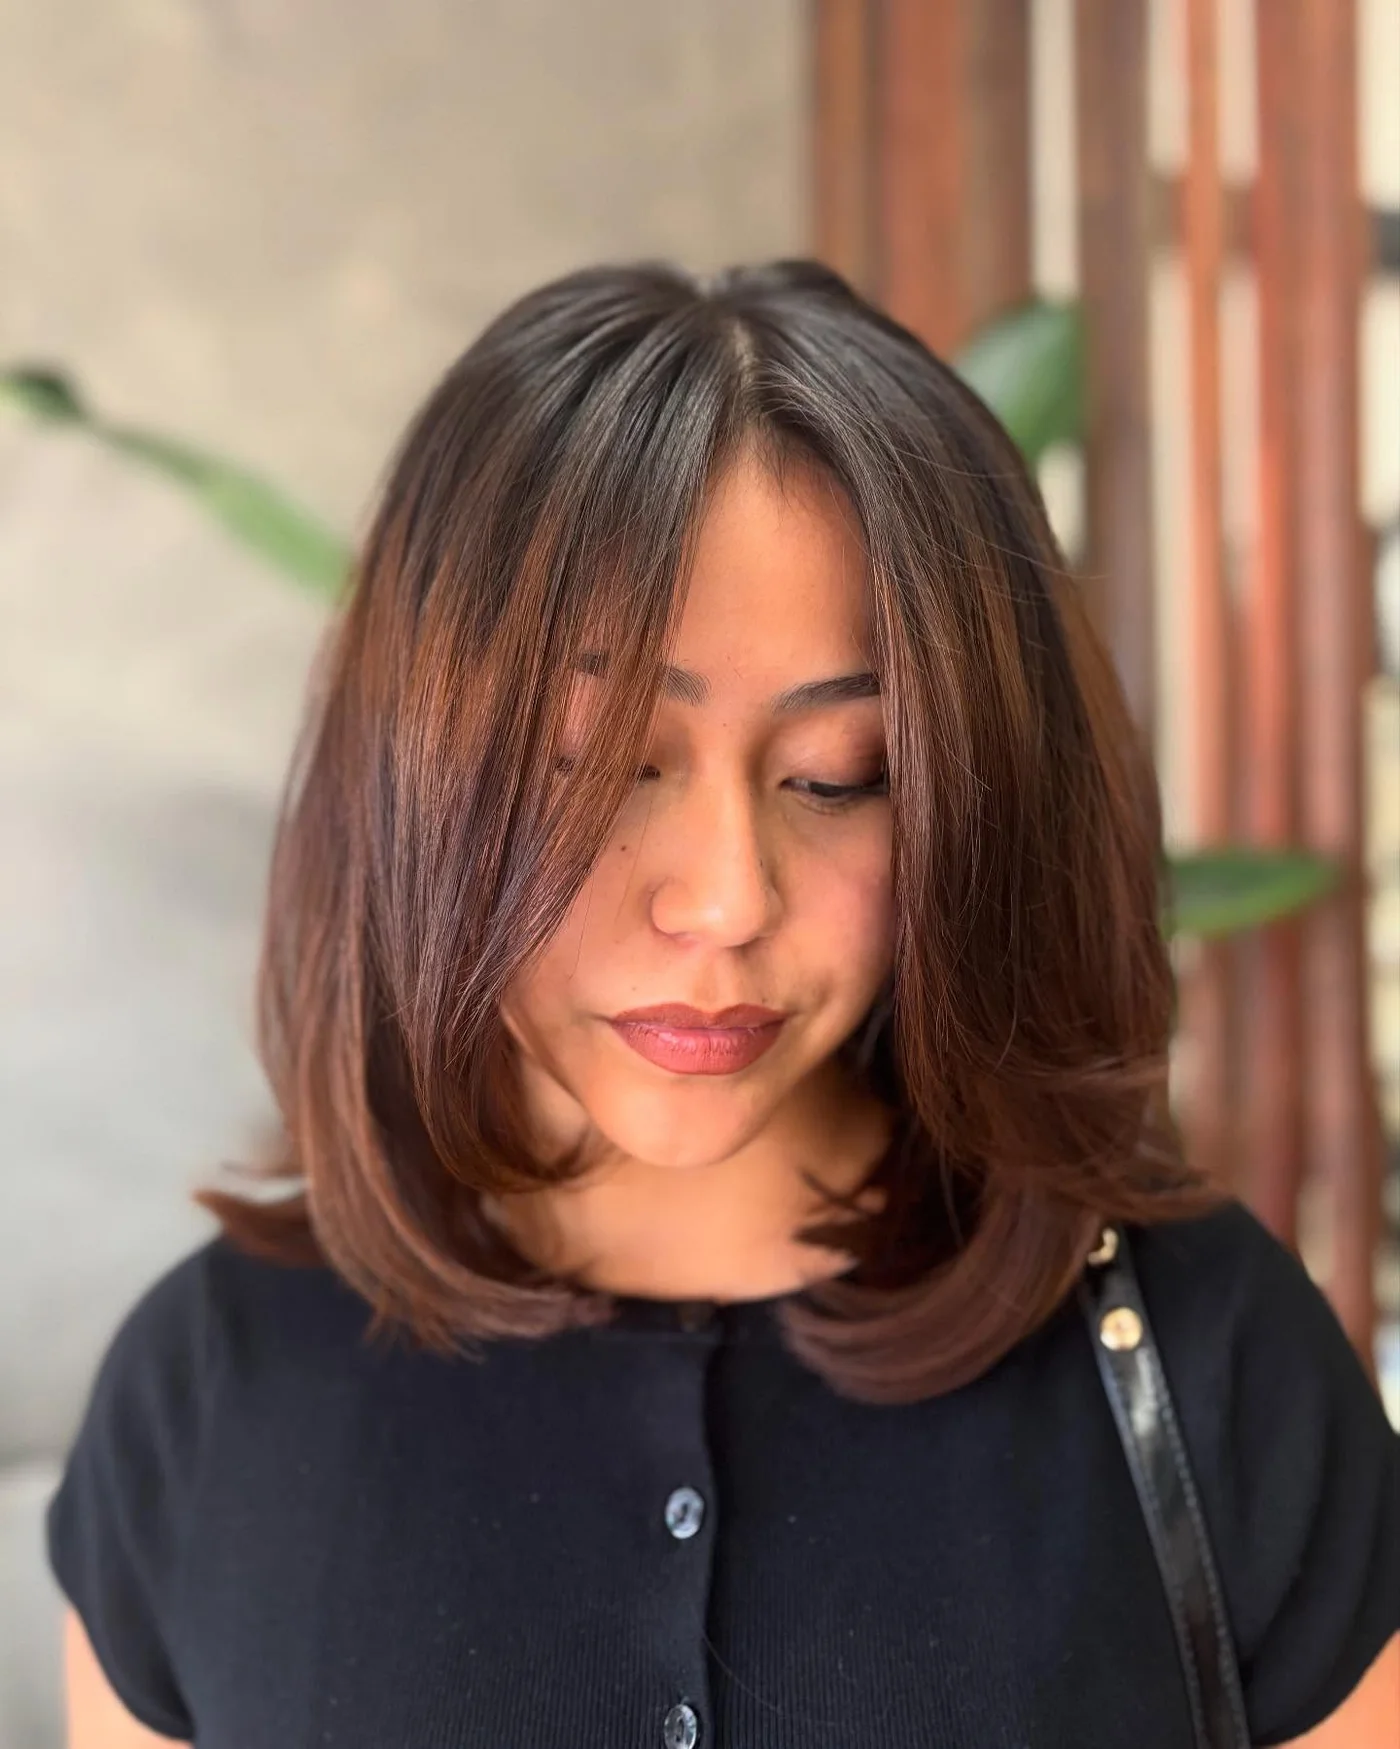
18. Side-Swept Layers for Fine Hair

Description
Side-swept layers give this shoulder length style lift and softness. The warm brunette tone makes the movement easy to see.
Why it works
The diagonal front adds volume near the hairline, which helps fine hair look less flat.
Best for
Fine hair with a side part, soft layers, and everyday styling.
Maintenance
Dry the roots upward at the part before turning the ends under.
Try it yourself for Side-Swept Layers for Fine Hair
How to DIY
- Prep the mid-lengths of the side-swept layers for fine hair with a small amount of lightweight mousse before styling.
- Dry the mid-lengths of the side-swept layers for fine hair first so the shape has lift before the ends are finished.
- Keep product light through the side-swept layers for fine hair, because thin fine hair can collapse when it is coated.
- Shape the face-framing pieces of the side-swept layers for fine hair away from the face, then let them cool before brushing.
- Finish the side-swept layers for fine hair by checking that the bottom edge still looks full and not separated.
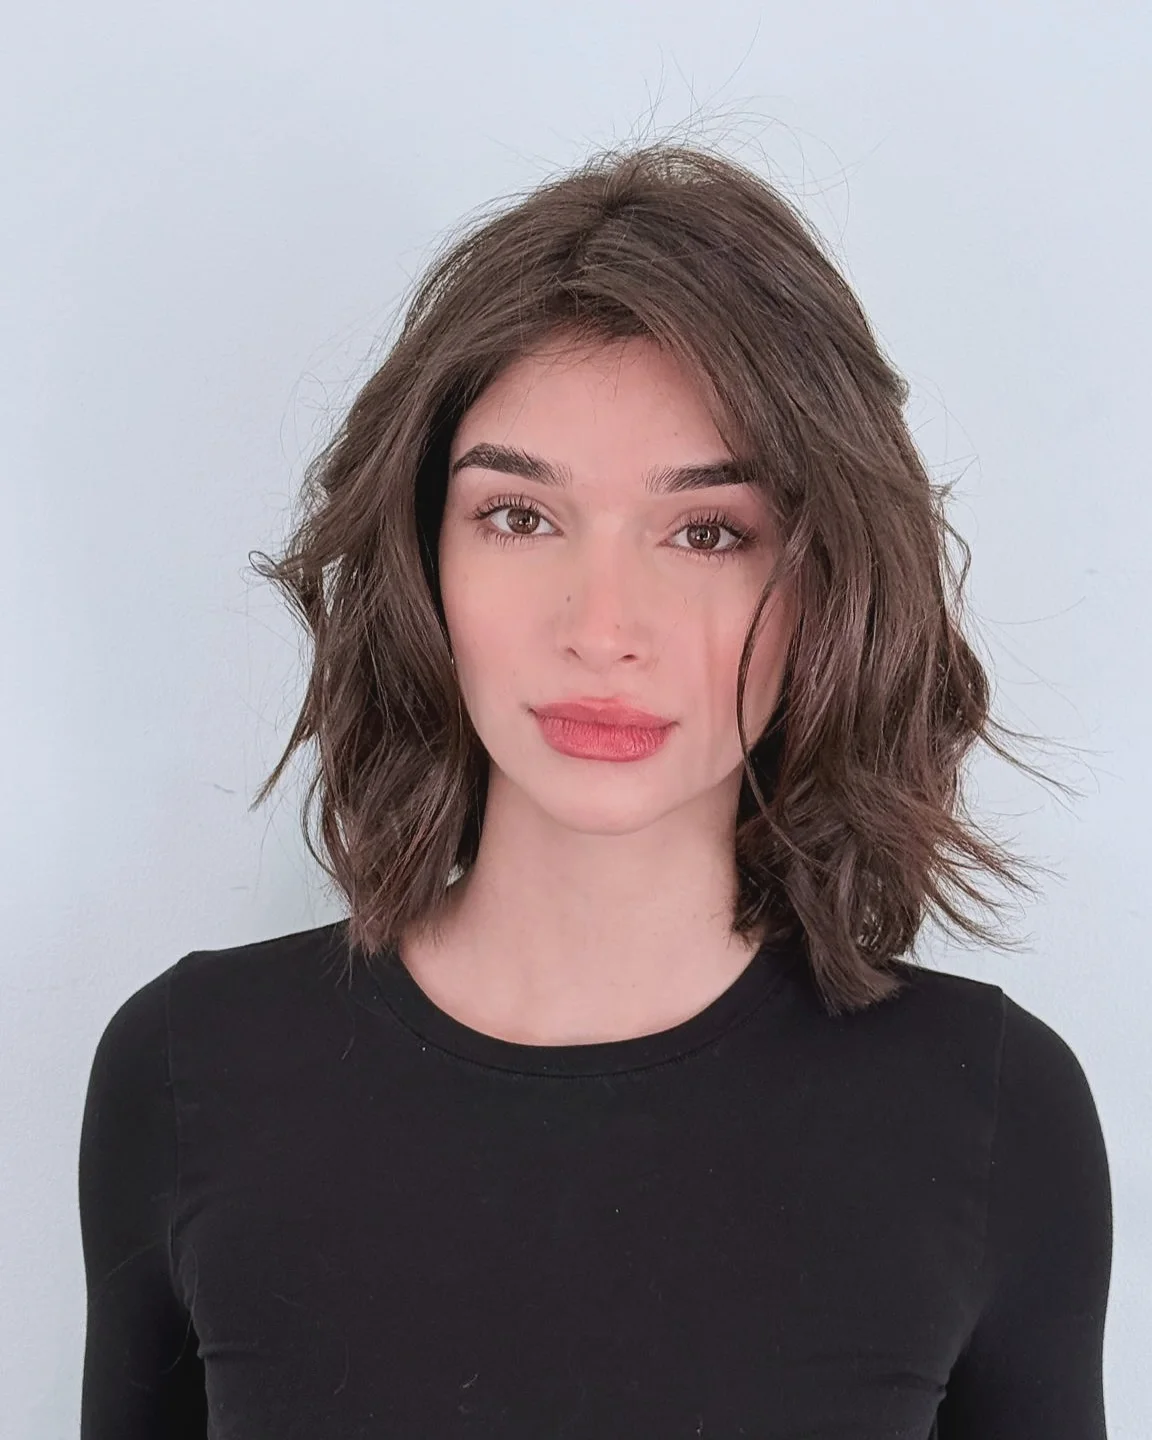
19. Soft Black Lob with Rounded Ends
Description
This black lob has rounded ends and a smooth shoulder length line. It is simple, flattering, and keeps the hair looking dense.
Why it works
A clean rounded edge gives fine hair a thicker finish than heavily thinned layers would.
Best for
Straight fine hair, sleek dark lobs, and readers who want easy daily styling.
Maintenance
Smooth the ends with a paddle brush and avoid oil at the scalp.
Try it yourself for Soft Black Lob with Rounded Ends
How to DIY
- Prep the roots of the soft black lob with rounded ends with a small amount of heat protectant before styling.
- Dry the roots of the soft black lob with rounded ends first so the shape has lift before the ends are finished.
- Keep product light through the soft black lob with rounded ends, because thin fine hair can collapse when it is coated.
- Shape the face-framing pieces of the soft black lob with rounded ends away from the face, then let them cool before brushing.
- Finish the soft black lob with rounded ends by checking that the bottom edge still looks full and not separated.
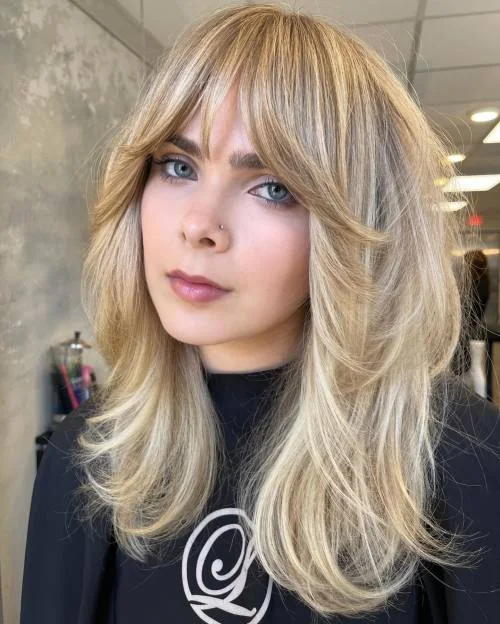
20. Sleek Lob with Full Bangs
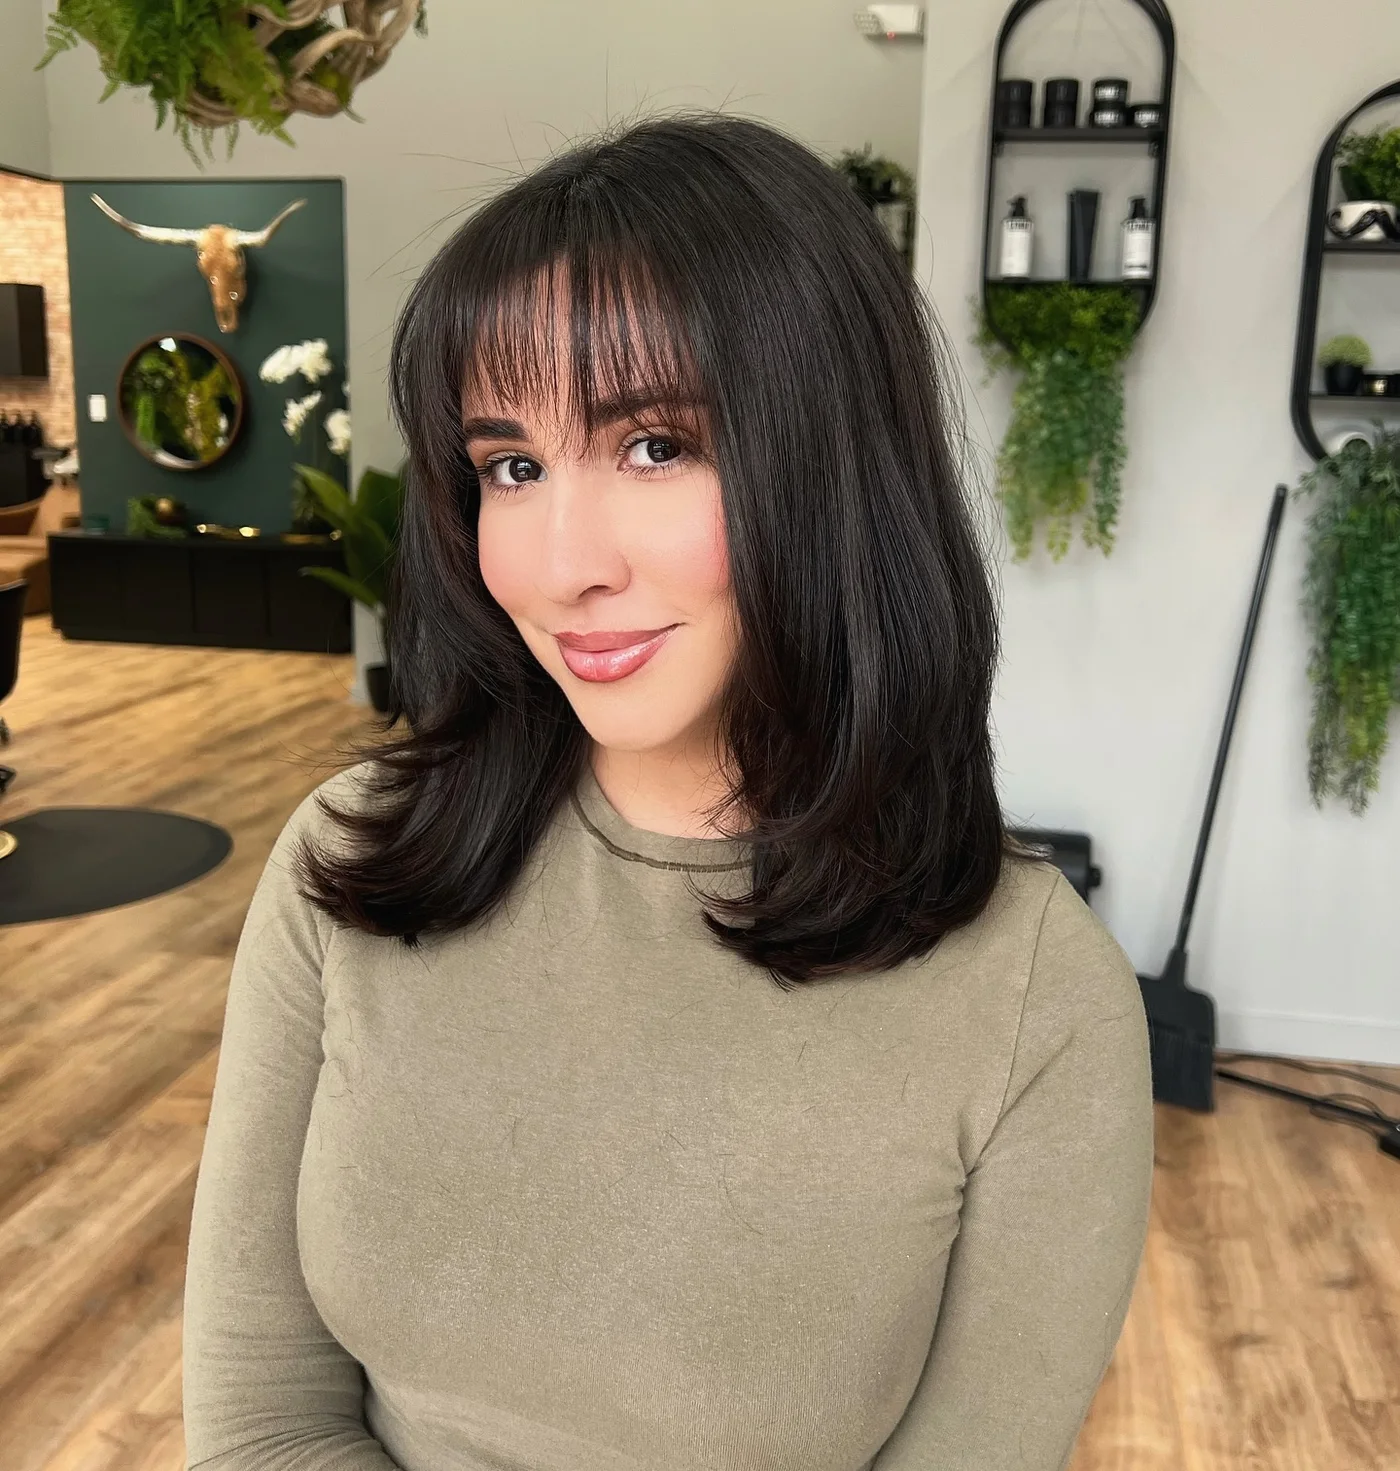
Description
Full soft bangs and a sleek lob create a strong frame without making the hair look heavy. The shoulder length keeps the shape practical.
Why it works
The bang area adds visual density at the front while the lob keeps the sides clean.
Best for
Fine straight hair, full bangs, and readers who like a polished salon shape.
Maintenance
Dry the bangs before they air-dry and use dry shampoo underneath on day two.
Try it yourself for Sleek Lob with Full Bangs
How to DIY
- Prep the front pieces of the sleek lob with full bangs with a small amount of dry shampoo before styling.
- Dry the front pieces of the sleek lob with full bangs first so the shape has lift before the ends are finished.
- Keep product light through the sleek lob with full bangs, because thin fine hair can collapse when it is coated.
- Shape the face-framing pieces of the sleek lob with full bangs away from the face, then let them cool before brushing.
- Finish the sleek lob with full bangs by checking that the bottom edge still looks full and not separated.
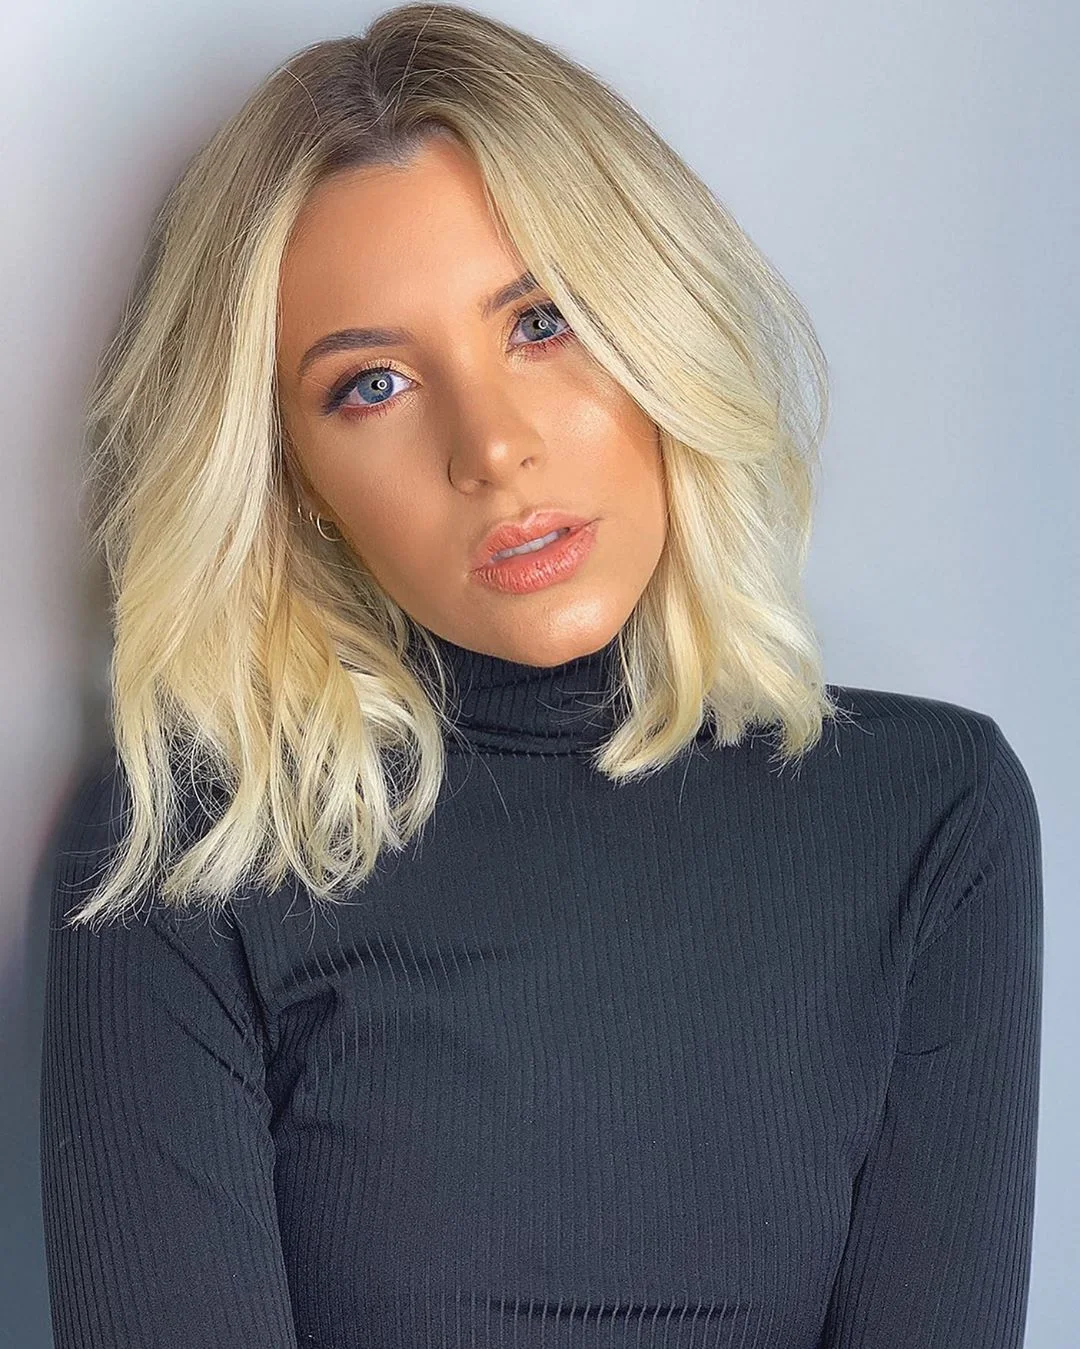
21. Beachy Blonde Shoulder Waves
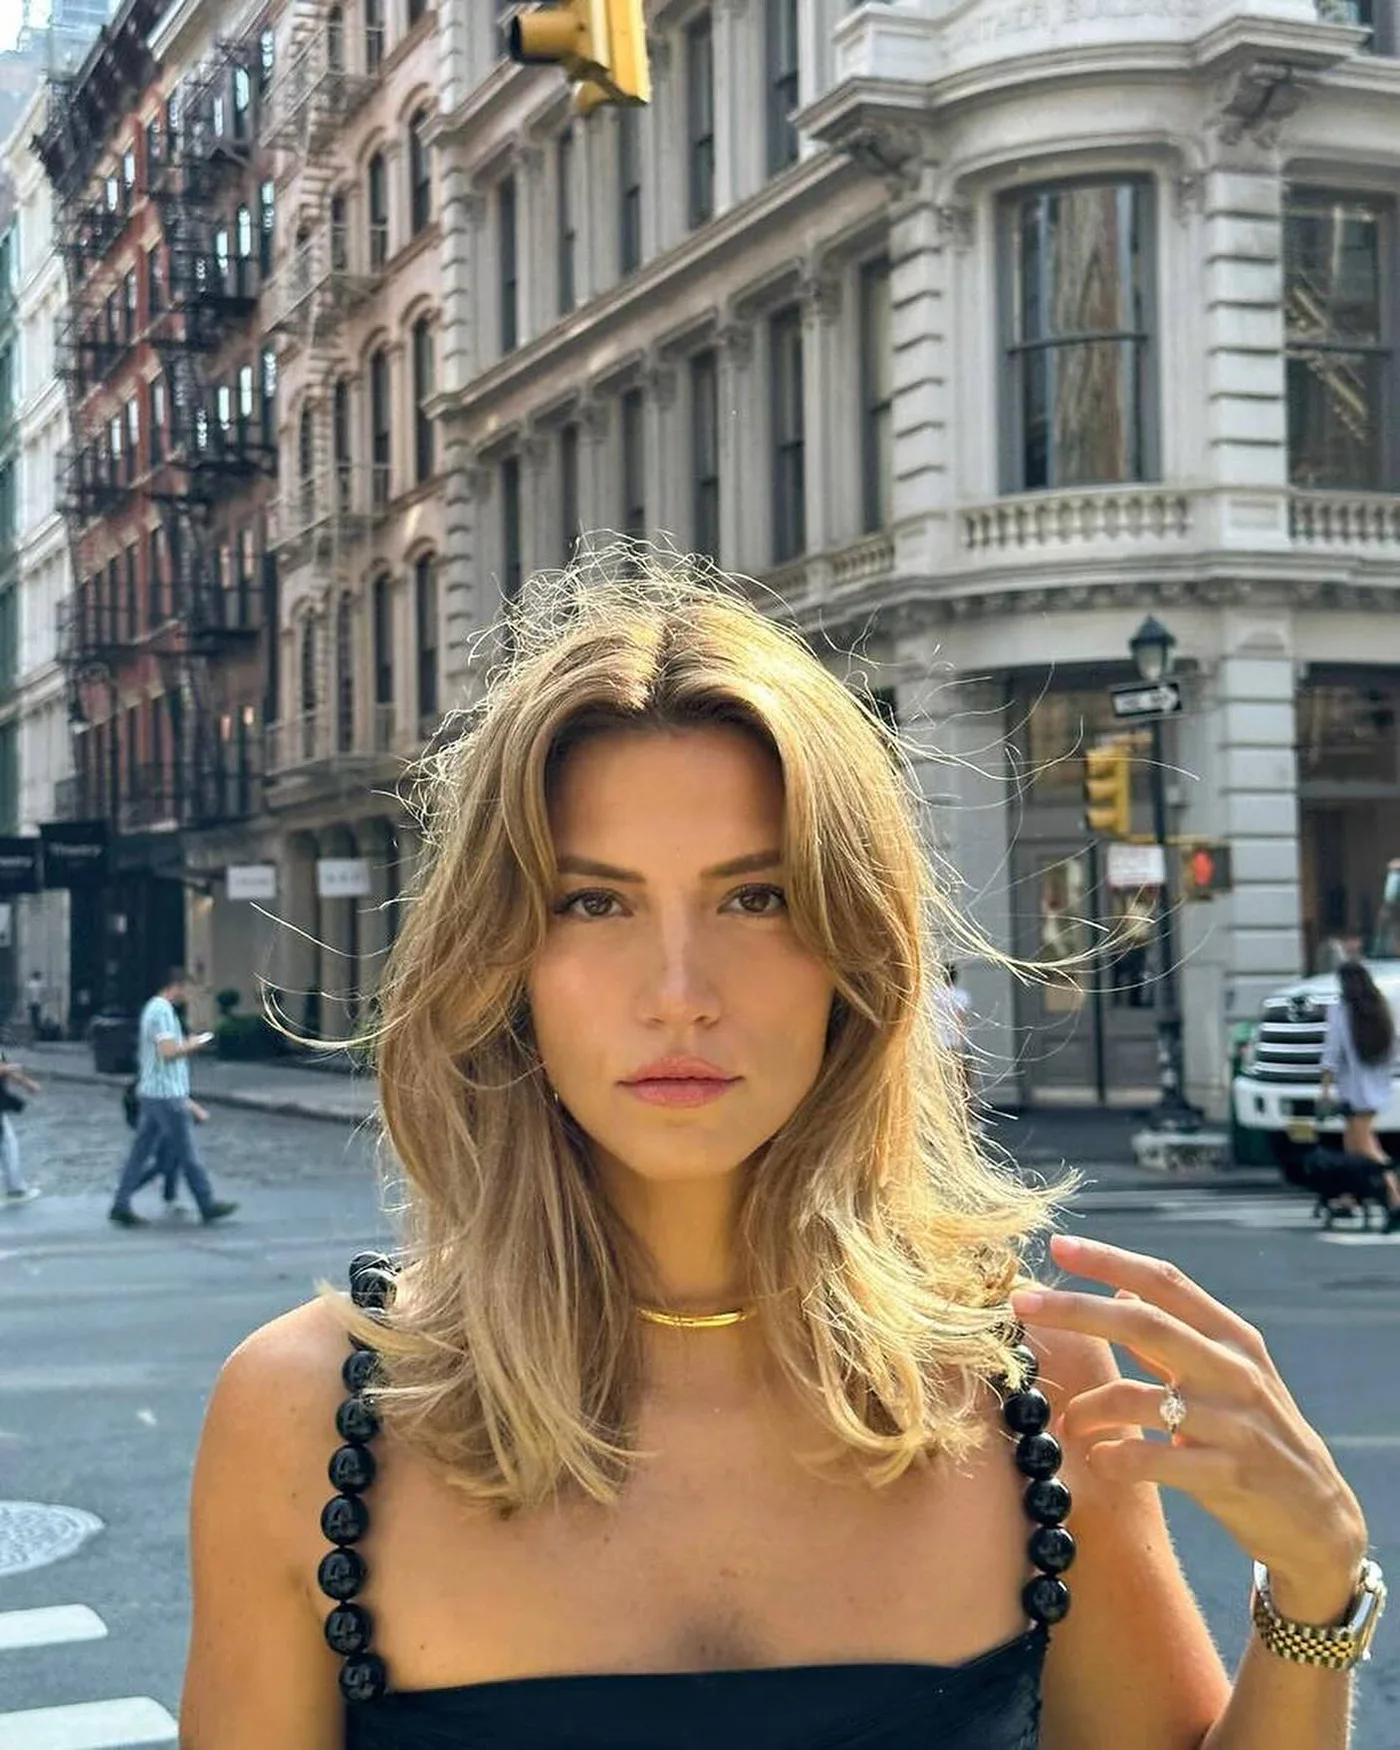
Description
Beachy bends give this blonde shoulder style a fuller, breezy shape. The ends stay loose instead of looking over-curled.
Why it works
Alternating waves make fine hair look wider through the middle, where shoulder styles often need support.
Best for
Fine blonde hair, beach waves, and relaxed weekend styling.
Maintenance
Curl away from the face, then break up the waves with dry texture spray.
Try it yourself for Beachy Blonde Shoulder Waves
How to DIY
- Prep the ends of the beachy blonde shoulder waves with a small amount of dry texture spray before styling.
- Dry the ends of the beachy blonde shoulder waves first so the shape has lift before the ends are finished.
- Keep product light through the beachy blonde shoulder waves, because thin fine hair can collapse when it is coated.
- Shape the face-framing pieces of the beachy blonde shoulder waves away from the face, then let them cool before brushing.
- Finish the beachy blonde shoulder waves by checking that the bottom edge still looks full and not separated.
22. Textured Bronde Lob
Description
This bronde lob uses soft texture and a shoulder-grazing length for an easy fuller look. The piecey finish keeps it modern.
Why it works
Bronde dimension and loose texture help fine hair look less flat without heavy product.
Best for
Fine hair, lived-in color, and tousled shoulder length styles.
Maintenance
Use root lift before drying and add texture spray only after the hair is fully dry.
Try it yourself for Textured Bronde Lob
How to DIY
- Prep the crown of the textured bronde lob with a small amount of dry texture spray before styling.
- Dry the crown of the textured bronde lob first so the shape has lift before the ends are finished.
- Keep product light through the textured bronde lob, because thin fine hair can collapse when it is coated.
- Shape the face-framing pieces of the textured bronde lob away from the face, then let them cool before brushing.
- Finish the textured bronde lob by checking that the bottom edge still looks full and not separated.
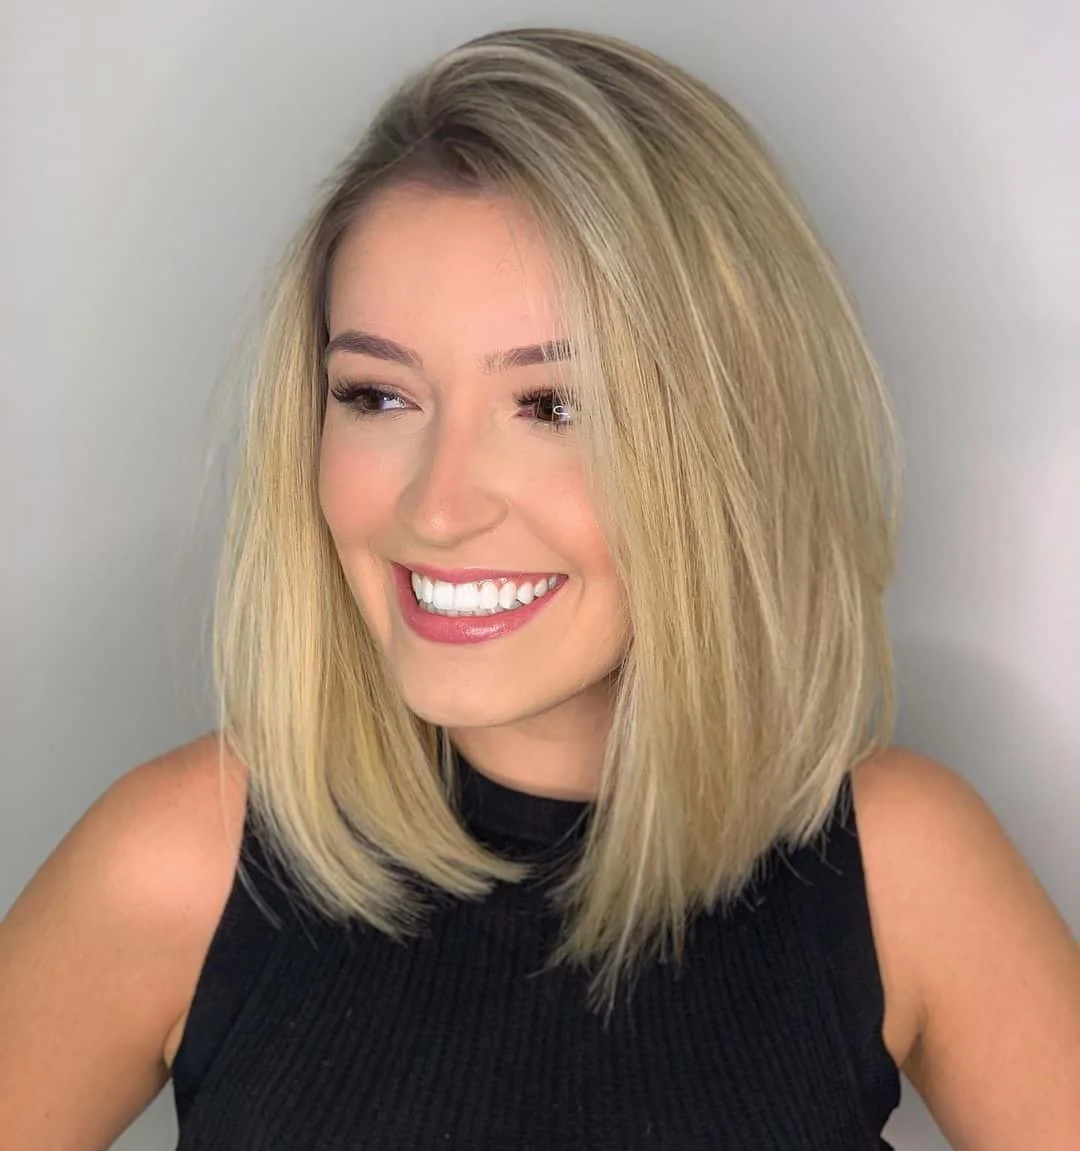
23. Smooth Blonde Angled Lob
Description
A smooth angled lob gives fine hair a crisp shape with soft side volume. The blonde color shows the clean line clearly.
Why it works
The angled front makes the style look fuller and more designed than a one-length cut that hangs flat.
Best for
Fine straight hair, angled lobs, and a polished medium-length haircut.
Maintenance
Flat-wrap the roots while drying, then bevel the ends lightly.
Try it yourself for Smooth Blonde Angled Lob
How to DIY
- Prep the part line of the smooth blonde angled lob with a small amount of heat protectant before styling.
- Dry the part line of the smooth blonde angled lob first so the shape has lift before the ends are finished.
- Keep product light through the smooth blonde angled lob, because thin fine hair can collapse when it is coated.
- Shape the face-framing pieces of the smooth blonde angled lob away from the face, then let them cool before brushing.
- Finish the smooth blonde angled lob by checking that the bottom edge still looks full and not separated.
24. Soft Blonde Blunt Lob
Description
This soft blonde blunt lob keeps the edge compact and full. The shape is especially useful when fine ends tend to separate.
Why it works
A blunt lower line protects density, which is often the most important detail for thin fine hair.
Best for
Straight fine hair, minimal layers, and clean shoulder length cuts.
Maintenance
Keep the trim sharp and use a light volumizing product before blow-drying.
Try it yourself for Soft Blonde Blunt Lob
How to DIY
- Prep the mid-lengths of the soft blonde blunt lob with a small amount of volumizing mousse before styling.
- Dry the mid-lengths of the soft blonde blunt lob first so the shape has lift before the ends are finished.
- Keep product light through the soft blonde blunt lob, because thin fine hair can collapse when it is coated.
- Shape the face-framing pieces of the soft blonde blunt lob away from the face, then let them cool before brushing.
- Finish the soft blonde blunt lob by checking that the bottom edge still looks full and not separated.
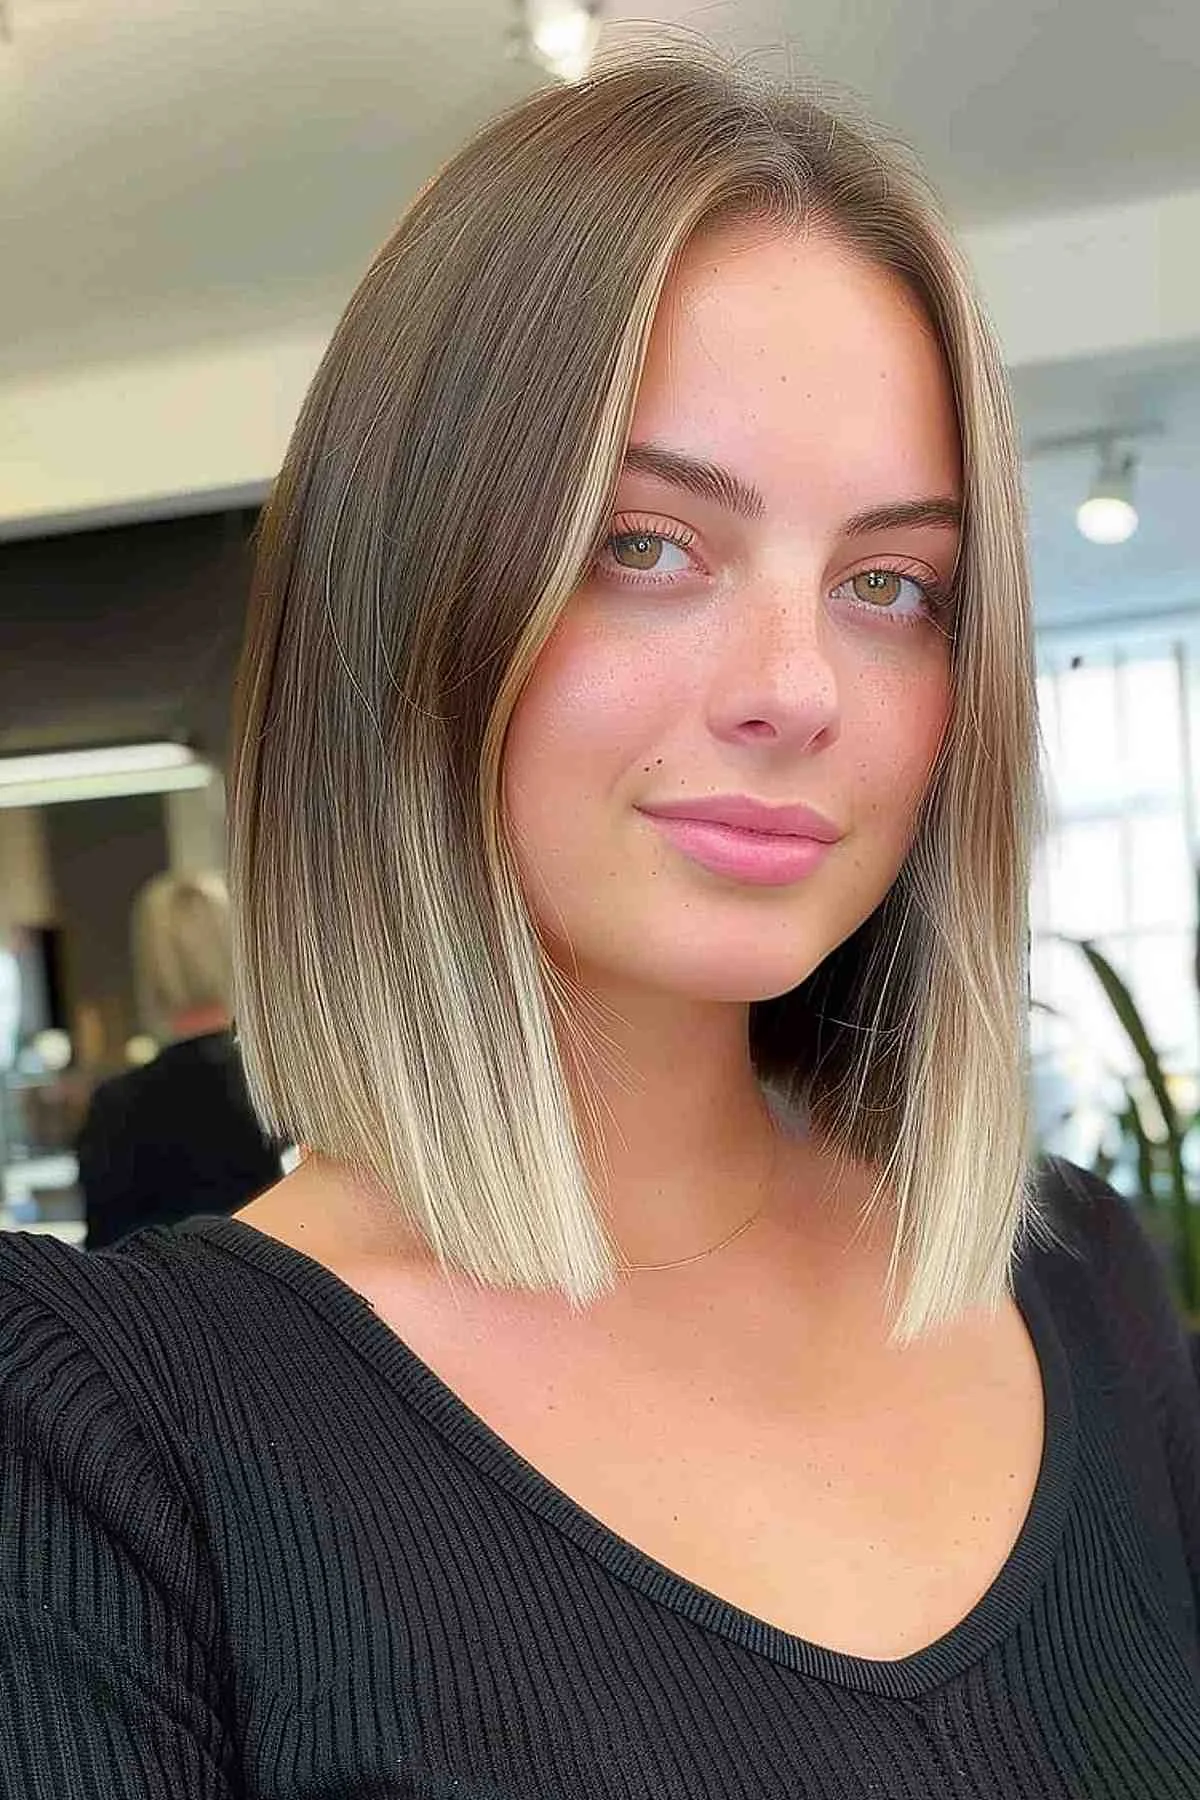
25. Straight Blonde Lob with Dark Root
Description
A dark root and straight blonde lob create contrast and depth. The full lower edge helps the shoulder length look intentional.
Why it works
Root shadow adds dimension while the one-length finish keeps fine hair from looking stringy.
Best for
Fine straight hair, blonde lobs, and simple salon maintenance.
Maintenance
Use a paddle brush for smoothness and keep finishing spray flexible.
Try it yourself for Straight Blonde Lob with Dark Root
How to DIY
- Prep the roots of the straight blonde lob with dark root with a small amount of volumizing mousse before styling.
- Dry the roots of the straight blonde lob with dark root first so the shape has lift before the ends are finished.
- Keep product light through the straight blonde lob with dark root, because thin fine hair can collapse when it is coated.
- Shape the face-framing pieces of the straight blonde lob with dark root away from the face, then let them cool before brushing.
- Finish the straight blonde lob with dark root by checking that the bottom edge still looks full and not separated.
26. Layered Blonde Lob with Piecey Ends
Description
Piecey blonde ends and light layering give this lob a relaxed shape. The length stays near the shoulders, so the ends still look healthy.
Why it works
Light texture creates movement, but the layers are controlled enough to avoid a see-through bottom.
Best for
Fine blonde hair, loose bends, and low-maintenance texture.
Maintenance
Apply texture spray from the mid-lengths down and skip heavy shine oil.
Try it yourself for Layered Blonde Lob with Piecey Ends
How to DIY
- Prep the front pieces of the layered blonde lob with piecey ends with a small amount of dry texture spray before styling.
- Dry the front pieces of the layered blonde lob with piecey ends first so the shape has lift before the ends are finished.
- Keep product light through the layered blonde lob with piecey ends, because thin fine hair can collapse when it is coated.
- Shape the face-framing pieces of the layered blonde lob with piecey ends away from the face, then let them cool before brushing.
- Finish the layered blonde lob with piecey ends by checking that the bottom edge still looks full and not separated.
27. One-Length Blonde Lob
Description
This one-length blonde lob is simple and dense-looking. It is a strong option when fine hair does not benefit from many layers.
Why it works
Keeping the shape one length makes the ends look thicker and gives the style a clean salon finish.
Best for
Very fine hair, straight textures, and readers who prefer minimal styling.
Maintenance
Book regular dusting trims and use mousse only at the roots.
Try it yourself for One-Length Blonde Lob
How to DIY
- Prep the ends of the one-length blonde lob with a small amount of volumizing mousse before styling.
- Dry the ends of the one-length blonde lob first so the shape has lift before the ends are finished.
- Keep product light through the one-length blonde lob, because thin fine hair can collapse when it is coated.
- Shape the face-framing pieces of the one-length blonde lob away from the face, then let them cool before brushing.
- Finish the one-length blonde lob by checking that the bottom edge still looks full and not separated.
28. Shaggy Blonde Lob with Curtain Bangs
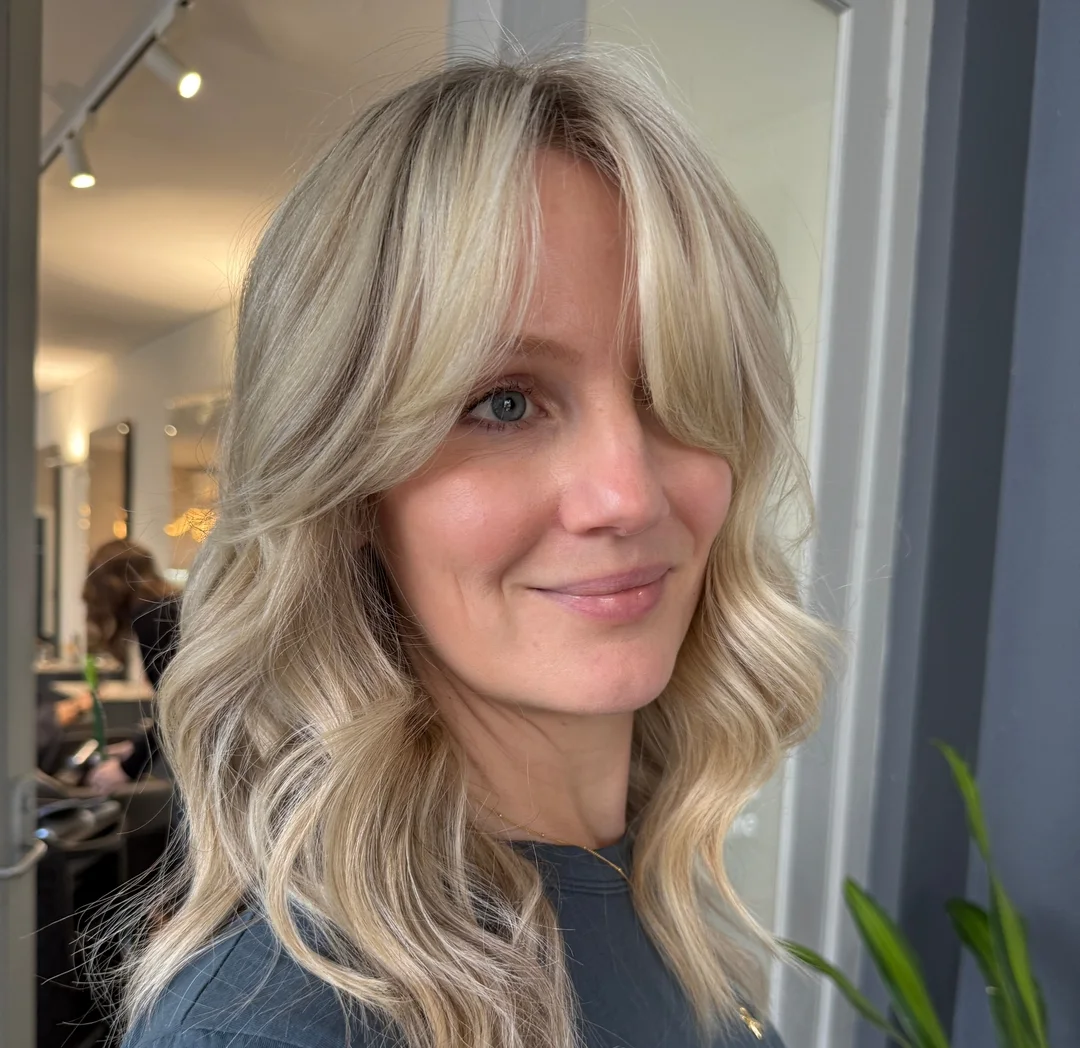
Description
This shaggy blonde lob adds curtain bangs and light bends for a fuller, more relaxed shape. The layers stay soft around the shoulders.
Why it works
Curtain bangs lift the front while shaggy movement adds texture without removing too much length.
Best for
Fine wavy hair, shaggy lobs, curtain bangs, and soft blonde color.
Maintenance
Style the curtain pieces first, then scrunch texture into the sides.
Try it yourself for Shaggy Blonde Lob with Curtain Bangs
How to DIY
- Prep the crown of the shaggy blonde lob with curtain bangs with a small amount of dry shampoo before styling.
- Dry the crown of the shaggy blonde lob with curtain bangs first so the shape has lift before the ends are finished.
- Keep product light through the shaggy blonde lob with curtain bangs, because thin fine hair can collapse when it is coated.
- Shape the face-framing pieces of the shaggy blonde lob with curtain bangs away from the face, then let them cool before brushing.
- Finish the shaggy blonde lob with curtain bangs by checking that the bottom edge still looks full and not separated.
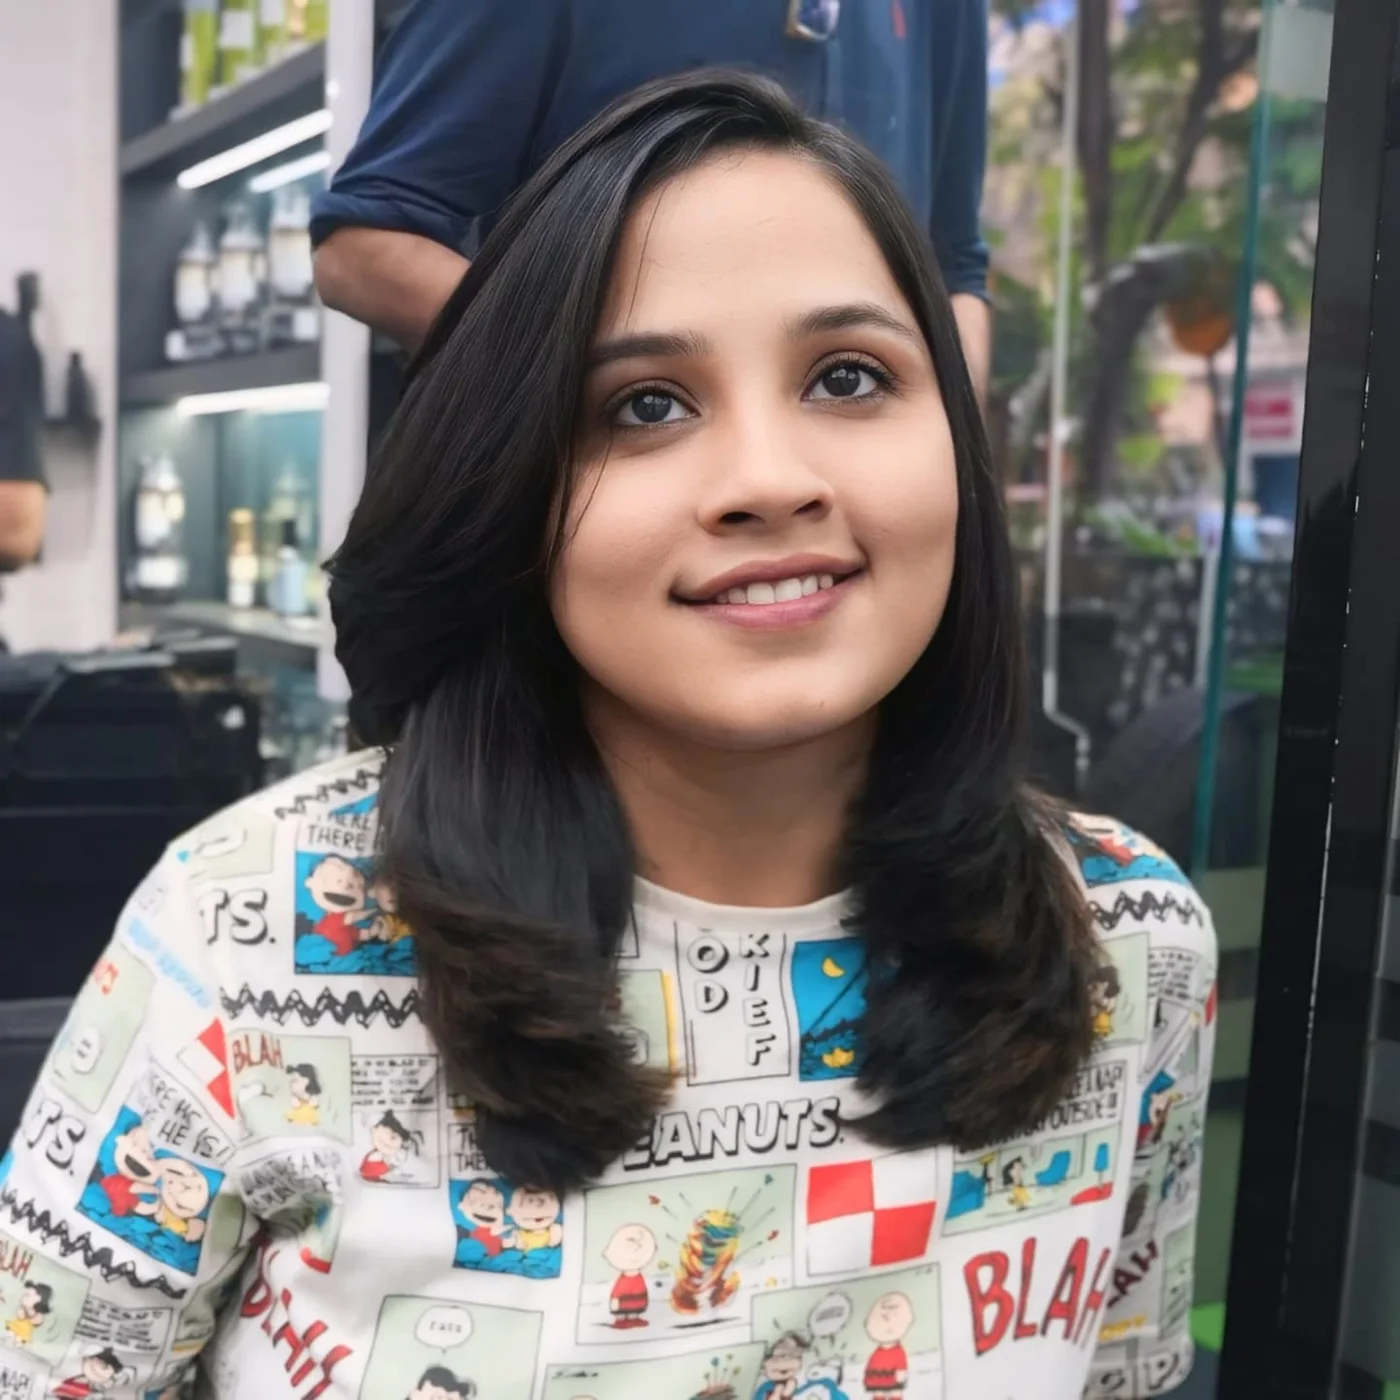
29. Brunette Curtain-Bang Lob
Description
A brunette lob with curtain bangs gives fine hair a soft frame and a clean lower line. The ends sit together for a fuller look.
Why it works
Curtain bangs add face shape while the straight lower edge keeps the hair from looking sparse.
Best for
Fine straight hair, curtain bangs, and medium cuts that need more movement at the front.
Maintenance
Use a small brush on the bangs and smooth the ends with light tension.
Try it yourself for Brunette Curtain-Bang Lob
How to DIY
- Prep the part line of the brunette curtain-bang lob with a small amount of dry shampoo before styling.
- Dry the part line of the brunette curtain-bang lob first so the shape has lift before the ends are finished.
- Keep product light through the brunette curtain-bang lob, because thin fine hair can collapse when it is coated.
- Shape the face-framing pieces of the brunette curtain-bang lob away from the face, then let them cool before brushing.
- Finish the brunette curtain-bang lob by checking that the bottom edge still looks full and not separated.
30. Wavy Collarbone Lob with Curtain Bangs
Description
This wavy collarbone lob has curtain bangs and soft texture through the sides. It is relaxed but still clearly shaped.
Why it works
The collarbone length keeps fine hair light, and the waves add enough width to make the style feel fuller.
Best for
Fine hair with natural wave, curtain bangs, and casual shoulder length styling.
Maintenance
Diffuse lightly or air-dry with mousse, then define only the face-framing pieces.
Try it yourself for Wavy Collarbone Lob with Curtain Bangs
How to DIY
- Prep the mid-lengths of the wavy collarbone lob with curtain bangs with a small amount of dry texture spray before styling.
- Dry the mid-lengths of the wavy collarbone lob with curtain bangs first so the shape has lift before the ends are finished.
- Keep product light through the wavy collarbone lob with curtain bangs, because thin fine hair can collapse when it is coated.
- Shape the face-framing pieces of the wavy collarbone lob with curtain bangs away from the face, then let them cool before brushing.
- Finish the wavy collarbone lob with curtain bangs by checking that the bottom edge still looks full and not separated.
What shoulder length cut makes fine hair look thicker
A shoulder length cut makes fine hair look thicker when the bottom edge stays strong. Blunt lobs, lightly angled lobs, and soft collarbone cuts are usually better than heavily thinned layers.
That does not mean every style has to be one length. Face-framing pieces, curtain bangs, and low layers can add movement as long as the lower edge still looks full.
Best layers and bangs for thin fine hair
Choose layers that start around the cheekbones or lower if your ends are thin. This keeps the cut moving without sacrificing the density that makes shoulder length hair look healthy.
Curtain bangs, wispy bangs, and side-swept bangs are the easiest fringe options for fine hair. They give the front a shape while using less hair than a heavy blunt bang.
How to style shoulder length fine hair
Start with root lift or mousse near the scalp, then style the front pieces, then finish the ends. Fine hair often looks better with targeted product placement than with product spread everywhere.
For waves, curl only the middle lengths and leave the ends softly finished. For sleek lobs, protect the hair from heat and avoid flattening the crown while smoothing the outside.

About the author
Bella Ross
Bella Ross is the hairstyle editor behind Latest Easy Hairstyles. She curates practical haircut, braid, color, and styling ideas with a focus on looks that are easy to browse, realistic to recreate, and useful for everyday hair decisions.