Age-aware guide
30 Short Pixie Haircuts for Older Women With Easy Shape
Updated June 13, 2026
A photo-first guide to short pixie haircuts for older women, from silver crops and side-swept pixies to textured tops, soft bangs, and tapered napes.
Short pixie haircuts for older women with shape and softness
Short pixie haircuts for older women can feel polished, soft, bold, or low-maintenance depending on the shape. The most flattering versions keep the top lifted, the nape neat, and the front pieces light around the eyes.
If you are comparing age-friendly short cuts more broadly, start with short haircuts for women over 60. If bangs are the main detail you want to compare, hairstyles with bangs for older women is the closest next guide.
30 Short Pixie Haircuts for Older Women With Easy Shape photo ideas
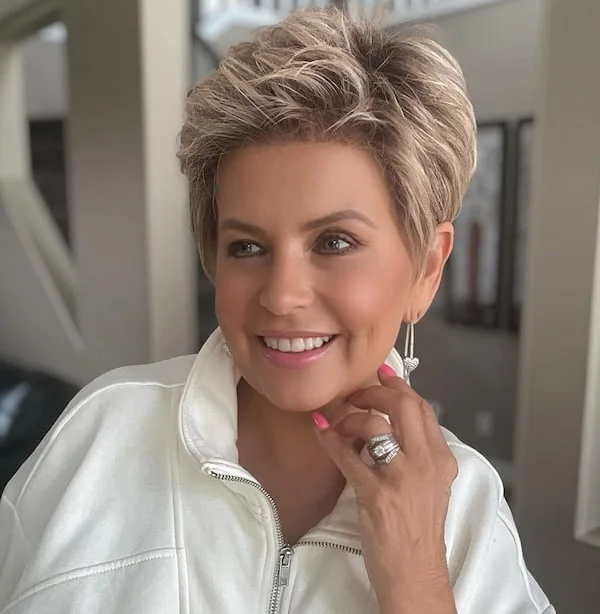
1. Lifted Blonde Pixie with Glasses

Description
This lifted blonde pixie has height through the top, neat sides, and a polished glasses-friendly shape.
Why it works
The volume sits above the frames, so the face stays open while the short sides keep the haircut clean.
Best for
Older women with glasses, fine to medium hair, and a pixie that needs crown height.
Maintenance
Keep the sides tidy and refresh the top with a tiny amount of paste.
Try it yourself for Lifted Blonde Pixie with Glasses
How to DIY
- Prep the crown of the lifted blonde pixie with glasses with a small amount of root lift spray.
- Dry the lifted blonde pixie with glasses from the roots first so the short shape does not collapse.
- Shape the crown of the lifted blonde pixie with glasses before touching the rest of the haircut.
- Use fingertips to place the visible pieces of the lifted blonde pixie with glasses, keeping product light near the scalp.
- Check the lifted blonde pixie with glasses from the side so the pixie still looks neat around the ears and nape.
2. Blonde Fauxhawk Pixie with Red Glasses

Description
A blonde fauxhawk pixie with close sides, lifted center volume, and bold red glasses.
Why it works
The lifted strip gives short hair personality while the sides stay easy to manage.
Best for
Older women who like expressive short hair, glasses, and strong top volume.
Maintenance
Use root lift at the center and keep the side panels brushed close.
Try it yourself for Blonde Fauxhawk Pixie with Red Glasses
How to DIY
- Prep the fringe of the blonde fauxhawk pixie with red glasses with a small amount of root lift spray.
- Dry the blonde fauxhawk pixie with red glasses from the roots first so the short shape does not collapse.
- Shape the fringe of the blonde fauxhawk pixie with red glasses before touching the rest of the haircut.
- Use fingertips to place the visible pieces of the blonde fauxhawk pixie with red glasses, keeping product light near the scalp.
- Check the blonde fauxhawk pixie with red glasses from the side so the pixie still looks neat around the ears and nape.
3. Copper Lifted Pixie
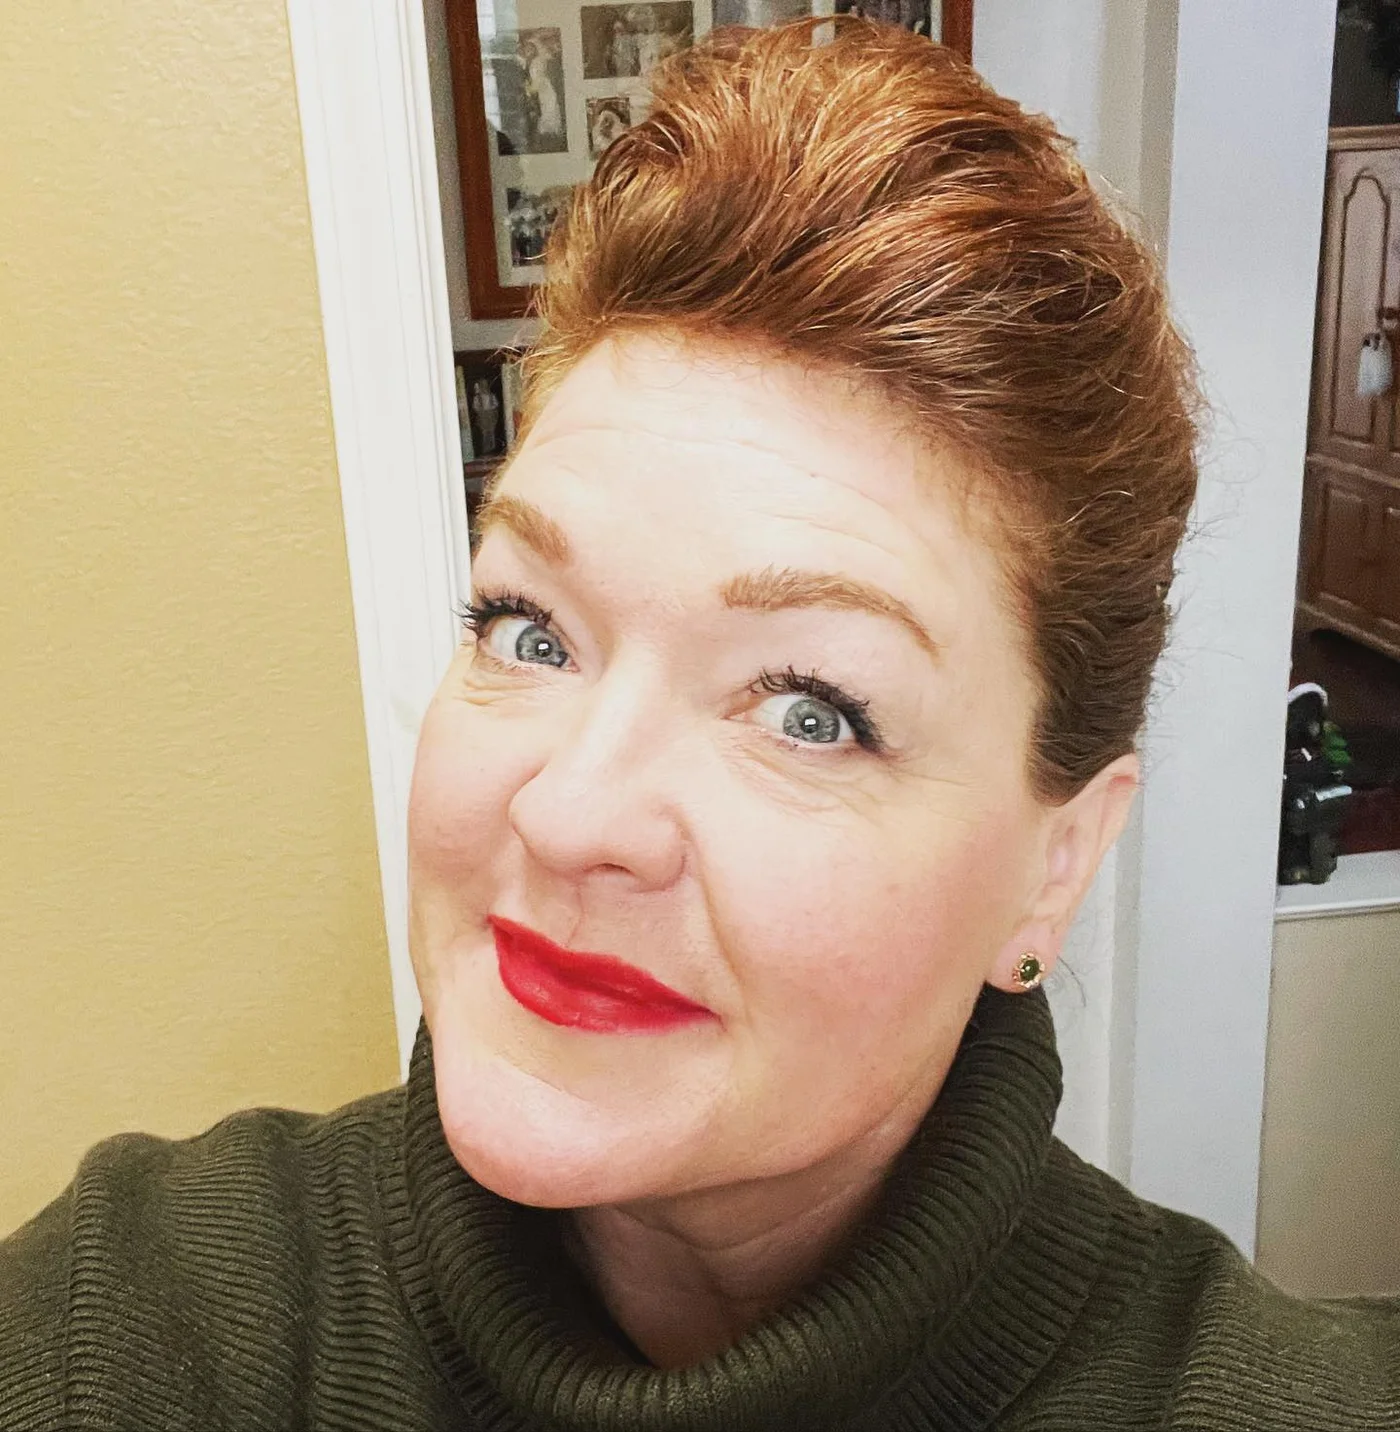
Description
This copper pixie has warm color, lifted texture, and a short face-opening outline.
Why it works
Warm color adds dimension, and the lifted crown makes fine or mature hair look more intentional.
Best for
Older women who want a bright pixie with height and a soft front.
Maintenance
Shape the top while damp and use paste only on the pieces that need hold.
Try it yourself for Copper Lifted Pixie
How to DIY
- Prep the nape of the copper lifted pixie with a small amount of root lift spray.
- Dry the copper lifted pixie from the roots first so the short shape does not collapse.
- Shape the nape of the copper lifted pixie before touching the rest of the haircut.
- Use fingertips to place the visible pieces of the copper lifted pixie, keeping product light near the scalp.
- Check the copper lifted pixie from the side so the pixie still looks neat around the ears and nape.
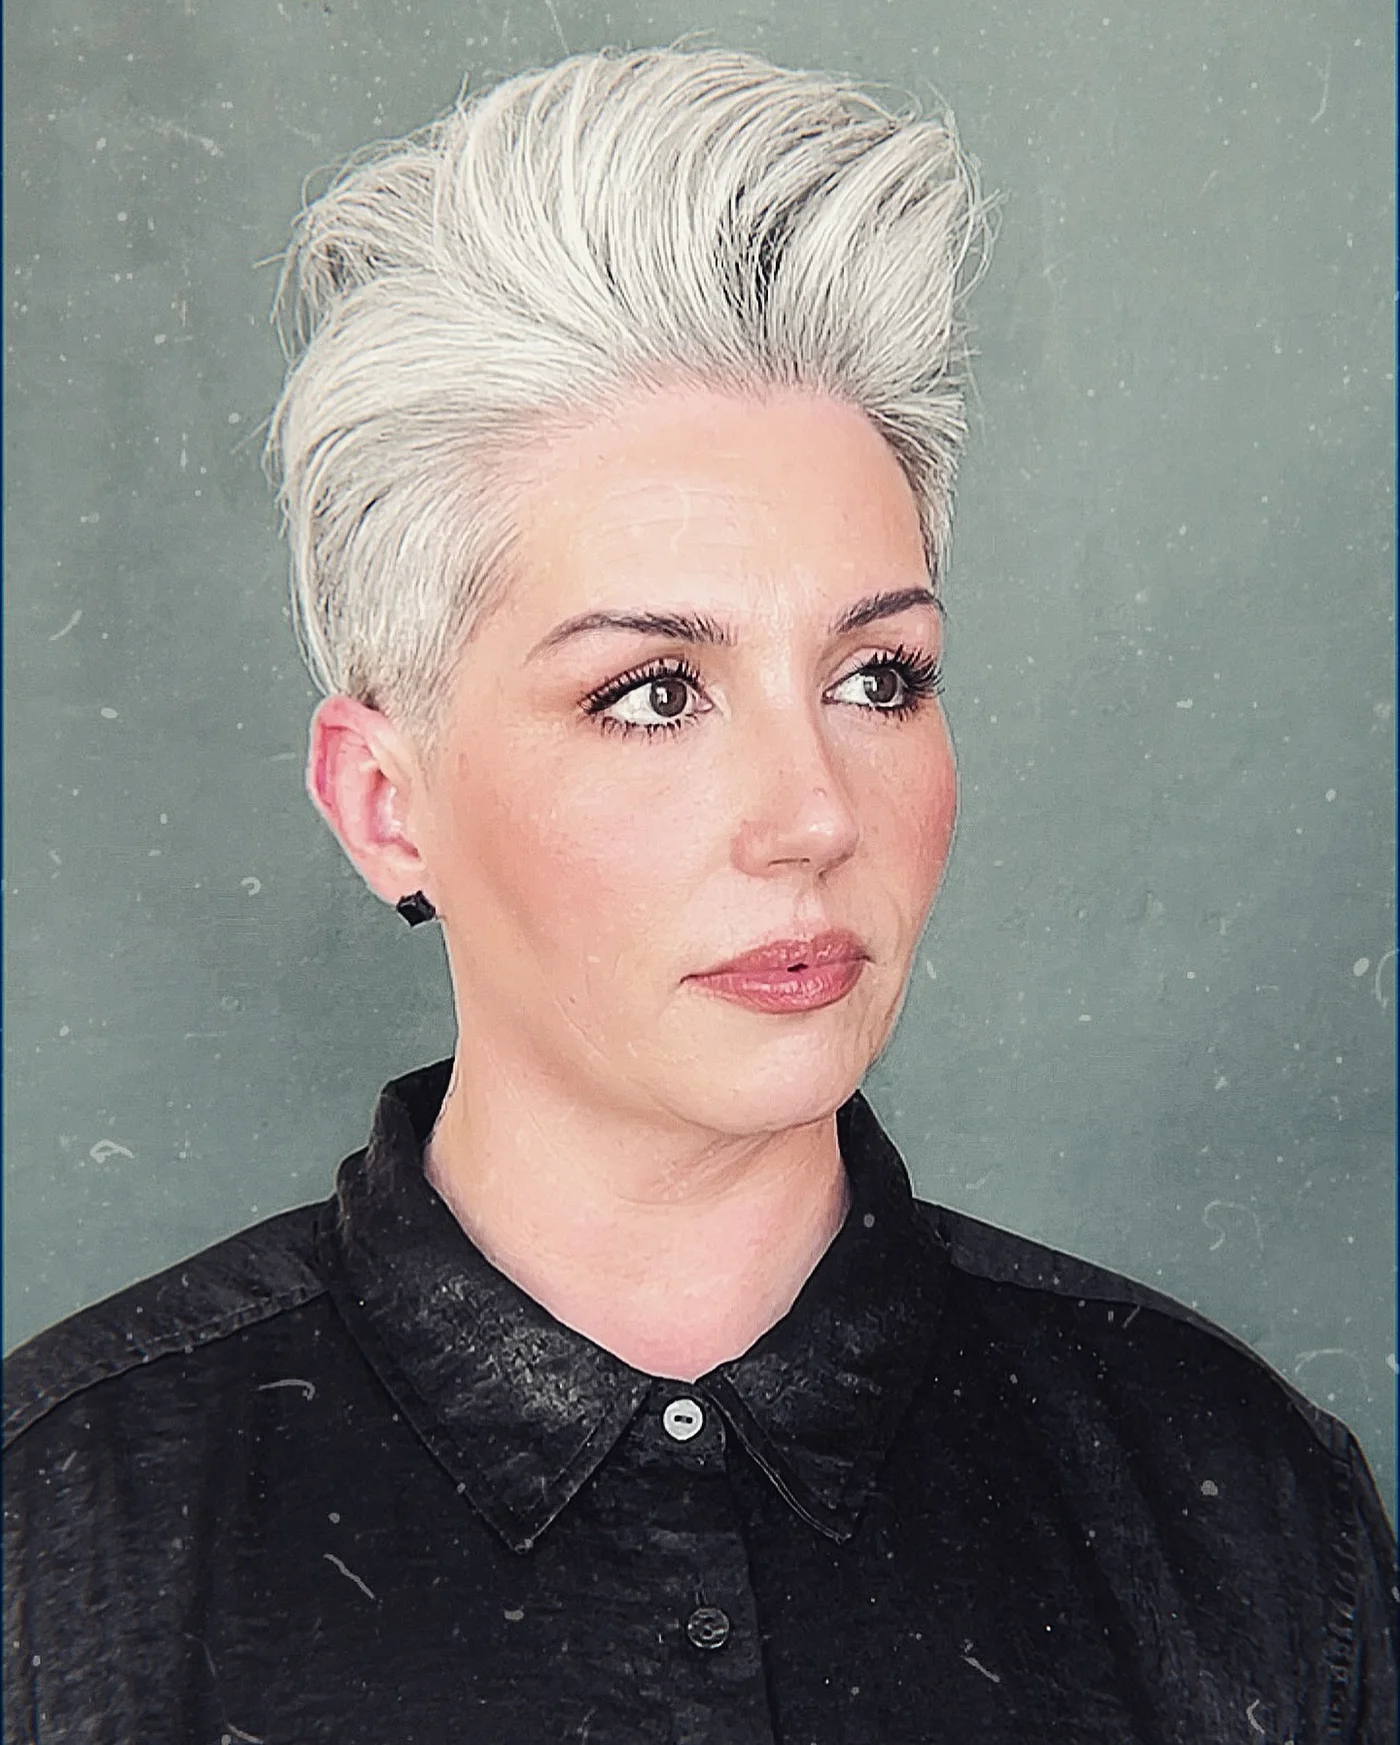
4. Platinum Pompadour Pixie

Description
A platinum pompadour pixie with a high swept top, close sides, and a confident short shape.
Why it works
The high front gives older short hair instant lift while the cropped sides keep the style controlled.
Best for
Thicker short hair, bold pixie styling, and women who like a dressed-up crop.
Maintenance
Lift the front first, let it cool, then lock only the top with light spray.
Try it yourself for Platinum Pompadour Pixie
How to DIY
- Prep the side pieces of the platinum pompadour pixie with a small amount of root lift spray.
- Dry the platinum pompadour pixie from the roots first so the short shape does not collapse.
- Shape the side pieces of the platinum pompadour pixie before touching the rest of the haircut.
- Use fingertips to place the visible pieces of the platinum pompadour pixie, keeping product light near the scalp.
- Check the platinum pompadour pixie from the side so the pixie still looks neat around the ears and nape.
5. White Textured Crop
Description
This white textured crop has a lifted top, close sides, and a soft modern finish.
Why it works
The pale color shows the texture clearly, and the short outline keeps the shape fresh.
Best for
White or silver hair, straight texture, and older women who want a chic cropped pixie.
Maintenance
Use light paste at the top and avoid heavy shine products near the roots.
Try it yourself for White Textured Crop
How to DIY
- Prep the ear area of the white textured crop with a small amount of root lift spray.
- Dry the white textured crop from the roots first so the short shape does not collapse.
- Shape the ear area of the white textured crop before touching the rest of the haircut.
- Use fingertips to place the visible pieces of the white textured crop, keeping product light near the scalp.
- Check the white textured crop from the side so the pixie still looks neat around the ears and nape.
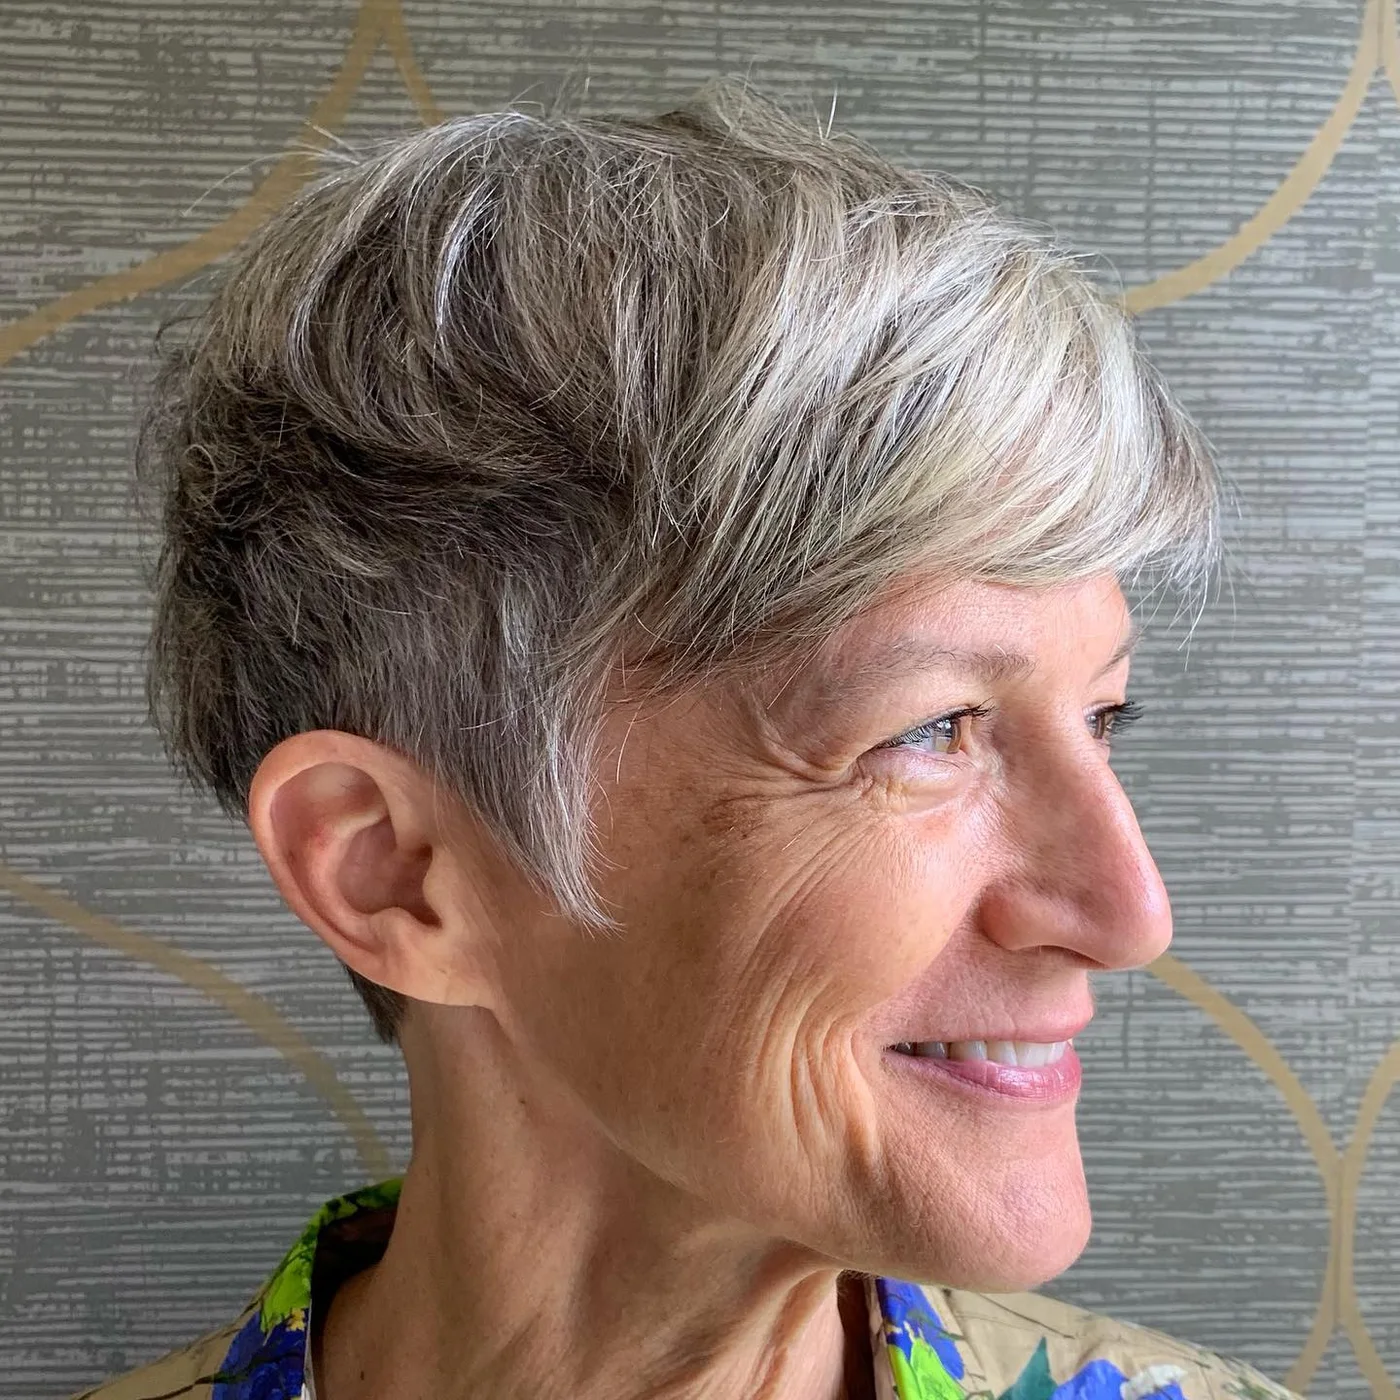
6. Soft Gray Pixie Side View
Description
A soft gray pixie shown from the side with a neat ear-length shape and gentle fringe.
Why it works
The side view shows how a short pixie can stay tidy around the ear without looking severe.
Best for
Gray hair, simple short cuts, and older women comparing pixie profiles.
Maintenance
Keep the ear area trimmed and hydrate gray ends so they stay soft.
Try it yourself for Soft Gray Pixie Side View
How to DIY
- Prep the part line of the soft gray pixie side view with a small amount of texture cream.
- Dry the soft gray pixie side view from the roots first so the short shape does not collapse.
- Shape the part line of the soft gray pixie side view before touching the rest of the haircut.
- Use fingertips to place the visible pieces of the soft gray pixie side view, keeping product light near the scalp.
- Check the soft gray pixie side view from the side so the pixie still looks neat around the ears and nape.
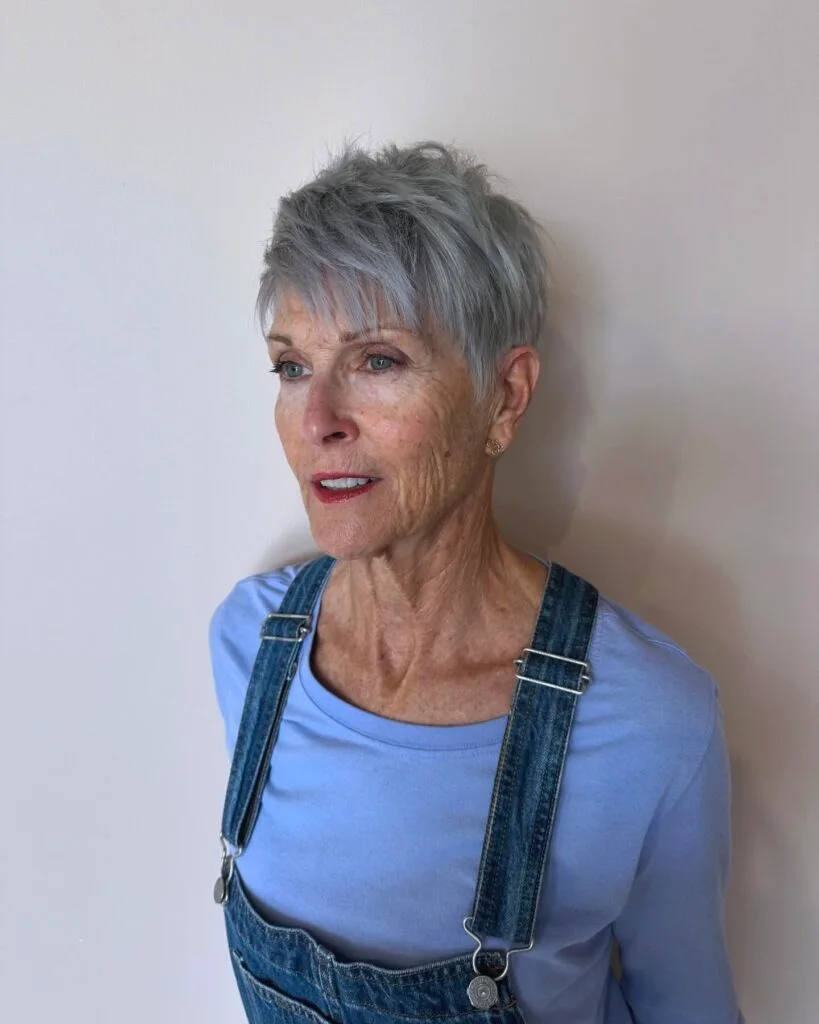
7. Tapered Silver Pixie
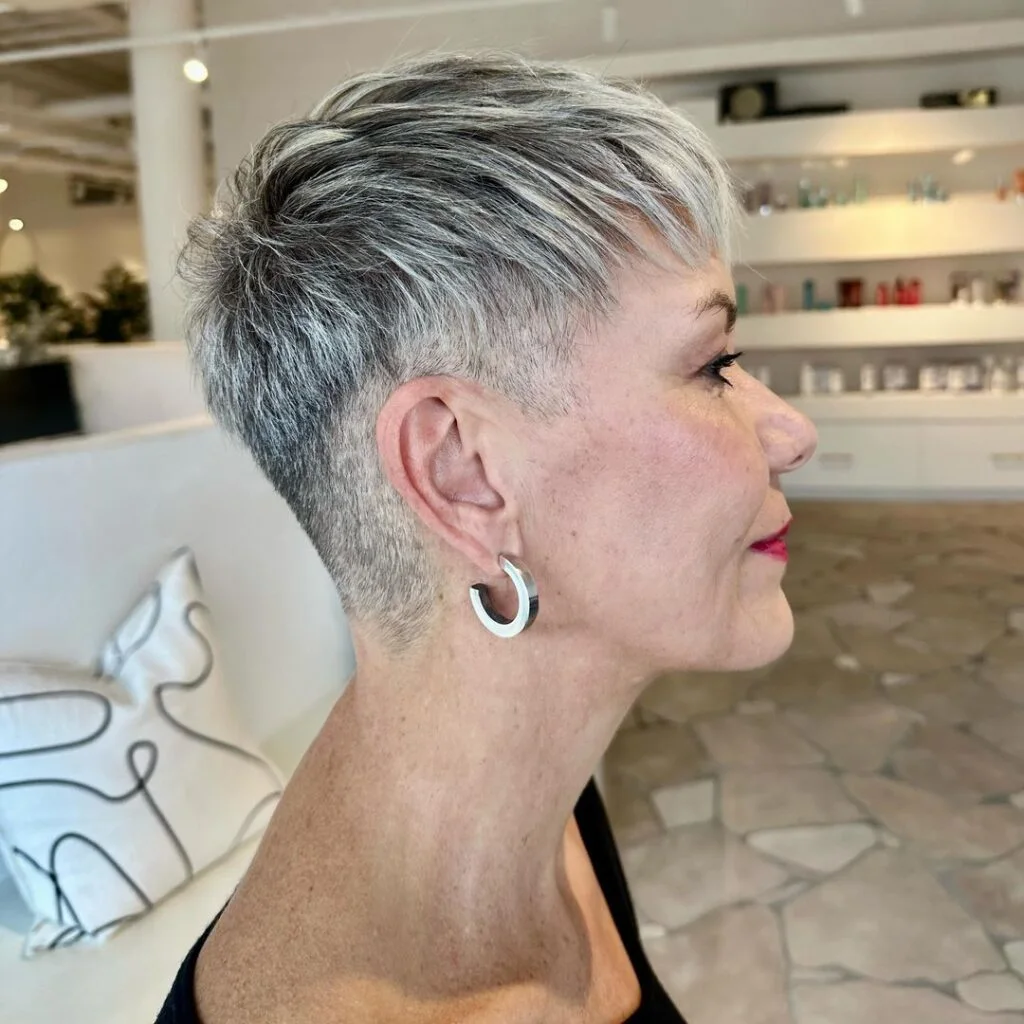
Description
This tapered silver pixie has close sides, a clean neckline, and light top movement.
Why it works
The taper removes bulk while the top texture keeps silver hair from looking flat.
Best for
Older women with gray hair, strong side profiles, and low-bulk pixie cuts.
Maintenance
Ask for regular nape cleanup and use texture cream only at the top.
Try it yourself for Tapered Silver Pixie
How to DIY
- Prep the crown of the tapered silver pixie with a small amount of texture cream.
- Dry the tapered silver pixie from the roots first so the short shape does not collapse.
- Shape the crown of the tapered silver pixie before touching the rest of the haircut.
- Use fingertips to place the visible pieces of the tapered silver pixie, keeping product light near the scalp.
- Check the tapered silver pixie from the side so the pixie still looks neat around the ears and nape.
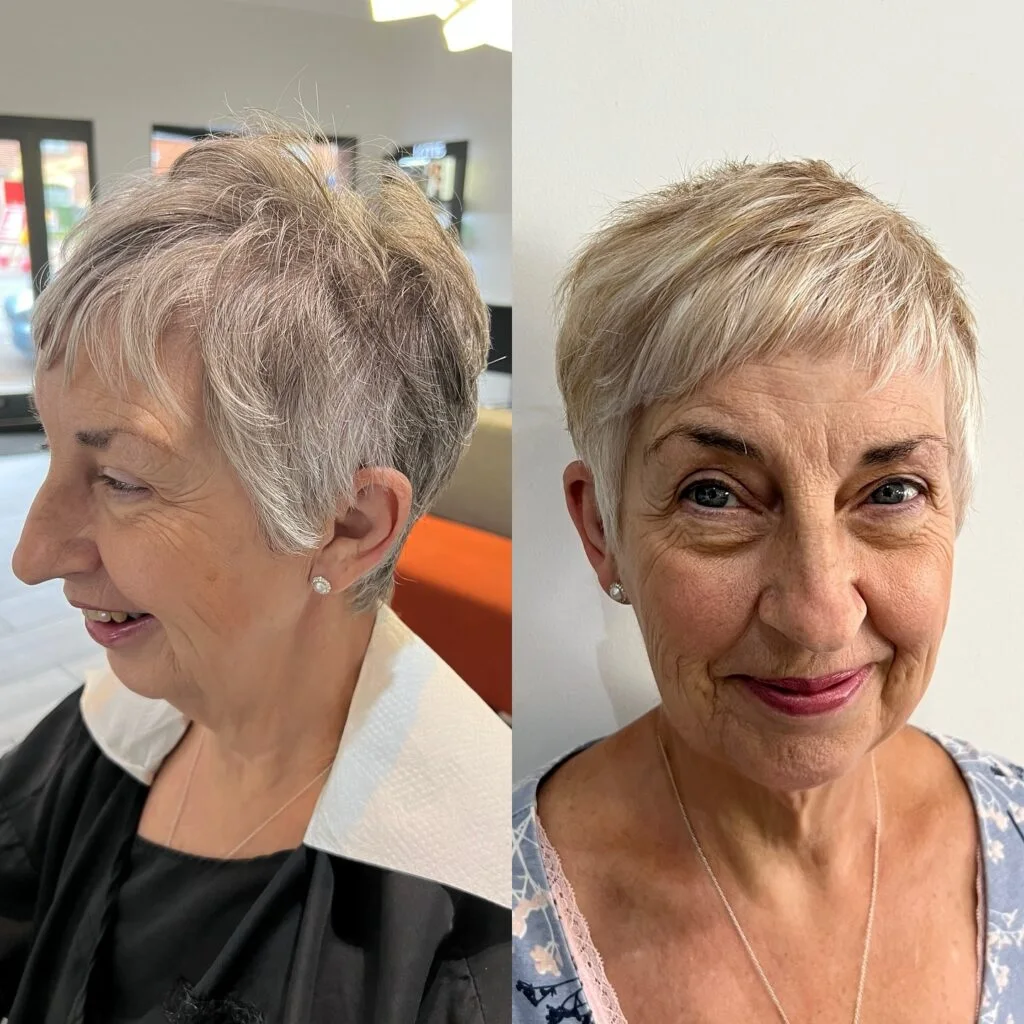
8. Feathered Gray Pixie
Description
A feathered gray pixie with light crown texture and soft movement around the temples.
Why it works
Feathering adds motion without making mature hair look thin or overworked.
Best for
Gray hair, fine to medium density, and older women who want softness in a short cut.
Maintenance
Dry the crown upward and keep the front pieces touchable.
Try it yourself for Feathered Gray Pixie
How to DIY
- Prep the fringe of the feathered gray pixie with a small amount of texture cream.
- Dry the feathered gray pixie from the roots first so the short shape does not collapse.
- Shape the fringe of the feathered gray pixie before touching the rest of the haircut.
- Use fingertips to place the visible pieces of the feathered gray pixie, keeping product light near the scalp.
- Check the feathered gray pixie from the side so the pixie still looks neat around the ears and nape.
9. Spiky Silver Pixie
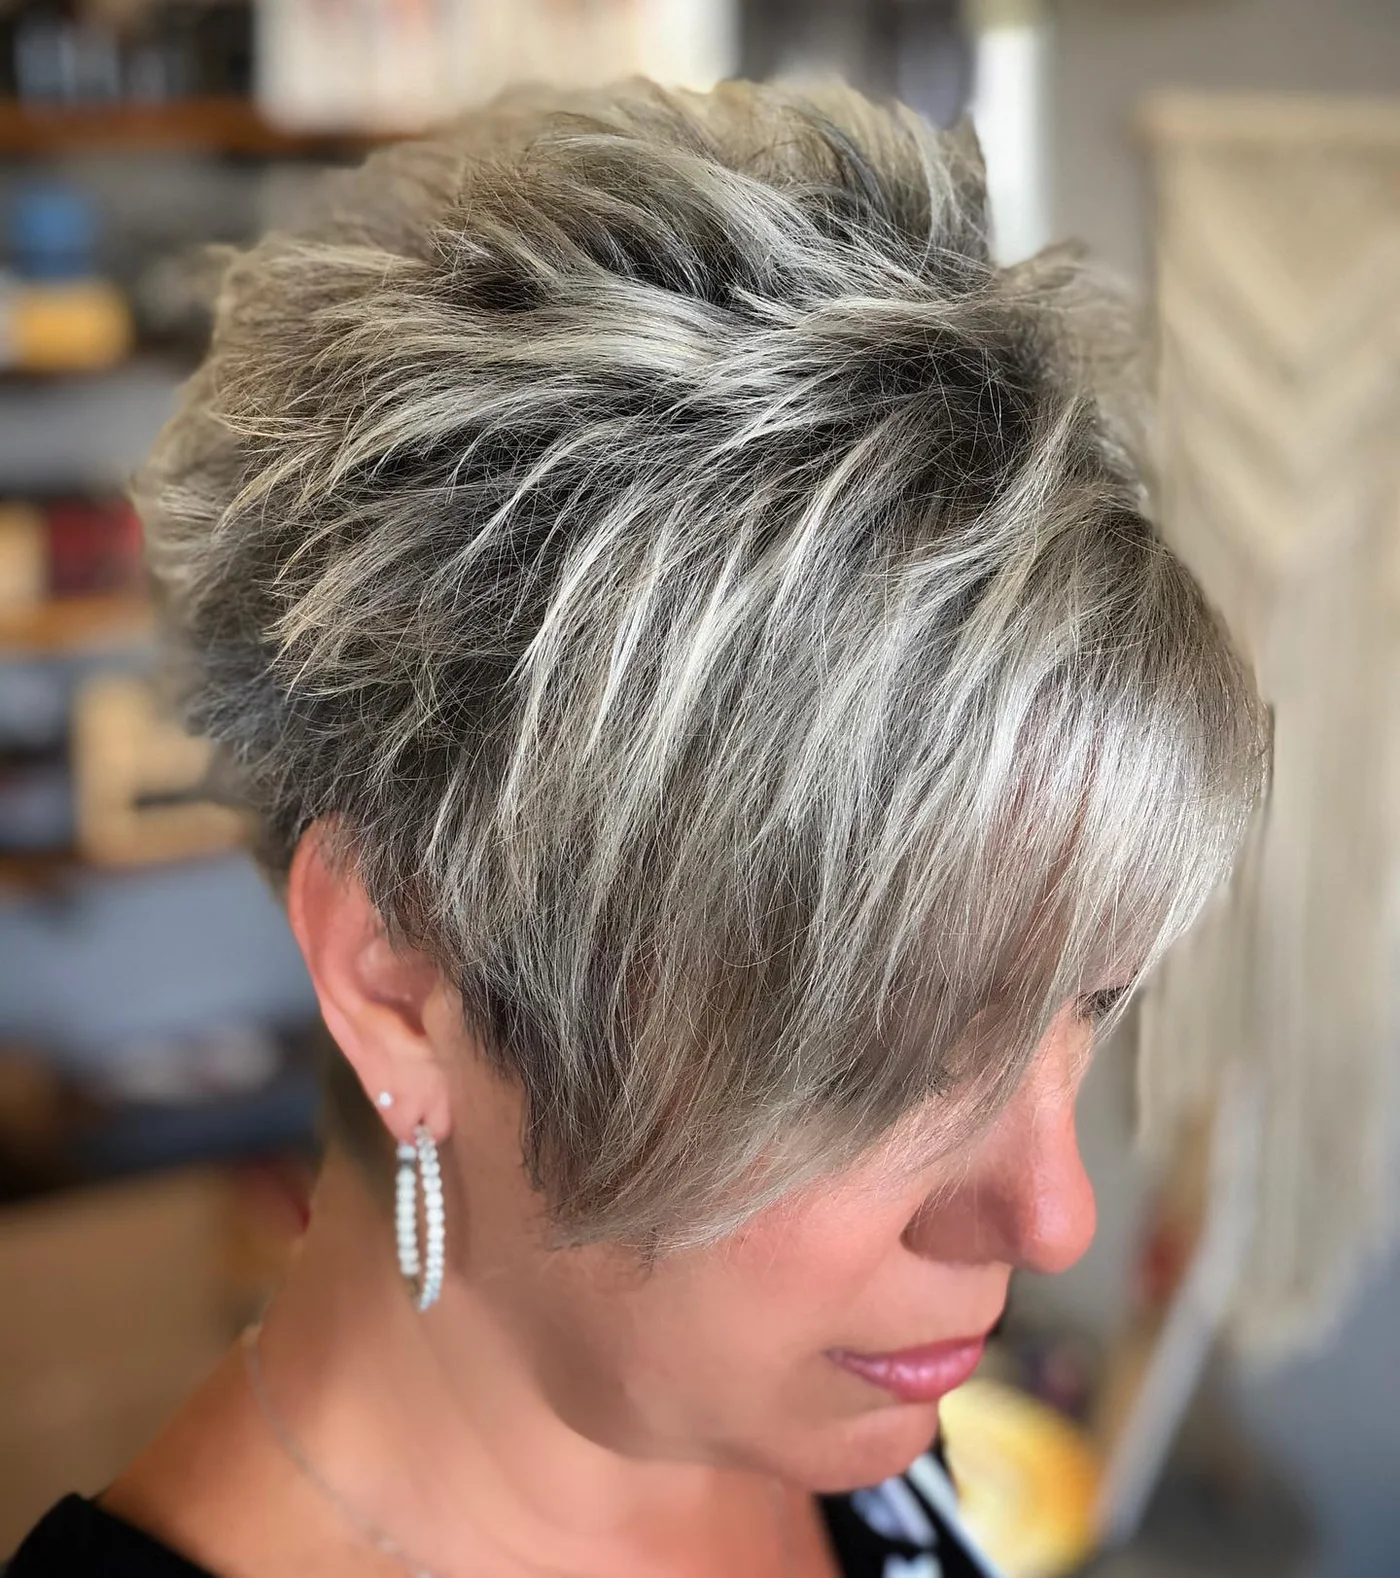
Description
This spiky silver pixie has piecey height through the crown and a short tapered outline.
Why it works
Piecey lift makes gray hair look energetic while the cut stays easy to refresh.
Best for
Straight gray hair, casual texture, and older women who like a playful pixie.
Maintenance
Pinch paste into the top pieces only and leave the sides clean.
Try it yourself for Spiky Silver Pixie
How to DIY
- Prep the nape of the spiky silver pixie with a small amount of root lift spray.
- Dry the spiky silver pixie from the roots first so the short shape does not collapse.
- Shape the nape of the spiky silver pixie before touching the rest of the haircut.
- Use fingertips to place the visible pieces of the spiky silver pixie, keeping product light near the scalp.
- Check the spiky silver pixie from the side so the pixie still looks neat around the ears and nape.
10. Side-Swept Gray Pixie
Description
A side-swept gray pixie with soft fringe, neat ears, and gentle crown shape.
Why it works
The side fringe softens the forehead while the short ear area keeps the haircut light.
Best for
Gray hair, softer pixies, and older women who want face-framing without a bob.
Maintenance
Comb the fringe while damp and refresh the crown with a small amount of cream.
Try it yourself for Side-Swept Gray Pixie
How to DIY
- Prep the side pieces of the side-swept gray pixie with a small amount of texture cream.
- Dry the side-swept gray pixie from the roots first so the short shape does not collapse.
- Shape the side pieces of the side-swept gray pixie before touching the rest of the haircut.
- Use fingertips to place the visible pieces of the side-swept gray pixie, keeping product light near the scalp.
- Check the side-swept gray pixie from the side so the pixie still looks neat around the ears and nape.
11. Taupe Blonde Volumized Pixie
Description
This taupe blonde pixie has rounded volume, neat sides, and a polished salon finish.
Why it works
The rounded shape creates fullness without needing long layers around the face.
Best for
Fine to medium hair, polished pixies, and older women who like soft volume.
Maintenance
Use a small round brush at the crown and finish with light hold.
Try it yourself for Taupe Blonde Volumized Pixie
How to DIY
- Prep the ear area of the taupe blonde volumized pixie with a small amount of heat protectant.
- Dry the taupe blonde volumized pixie from the roots first so the short shape does not collapse.
- Shape the ear area of the taupe blonde volumized pixie before touching the rest of the haircut.
- Use fingertips to place the visible pieces of the taupe blonde volumized pixie, keeping product light near the scalp.
- Check the taupe blonde volumized pixie from the side so the pixie still looks neat around the ears and nape.
12. Creamy Blonde Side Pixie

Description
A creamy blonde pixie with a smooth side-swept front and short clean sides.
Why it works
The side sweep adds polish while the cropped length keeps the haircut easy to manage.
Best for
Straight hair, blonde pixies, and older women who want a neat feminine crop.
Maintenance
Smooth the front once, then stop before the crown loses lift.
Try it yourself for Creamy Blonde Side Pixie
How to DIY
- Prep the part line of the creamy blonde side pixie with a small amount of heat protectant.
- Dry the creamy blonde side pixie from the roots first so the short shape does not collapse.
- Shape the part line of the creamy blonde side pixie before touching the rest of the haircut.
- Use fingertips to place the visible pieces of the creamy blonde side pixie, keeping product light near the scalp.
- Check the creamy blonde side pixie from the side so the pixie still looks neat around the ears and nape.
13. Soft White Pixie Bob
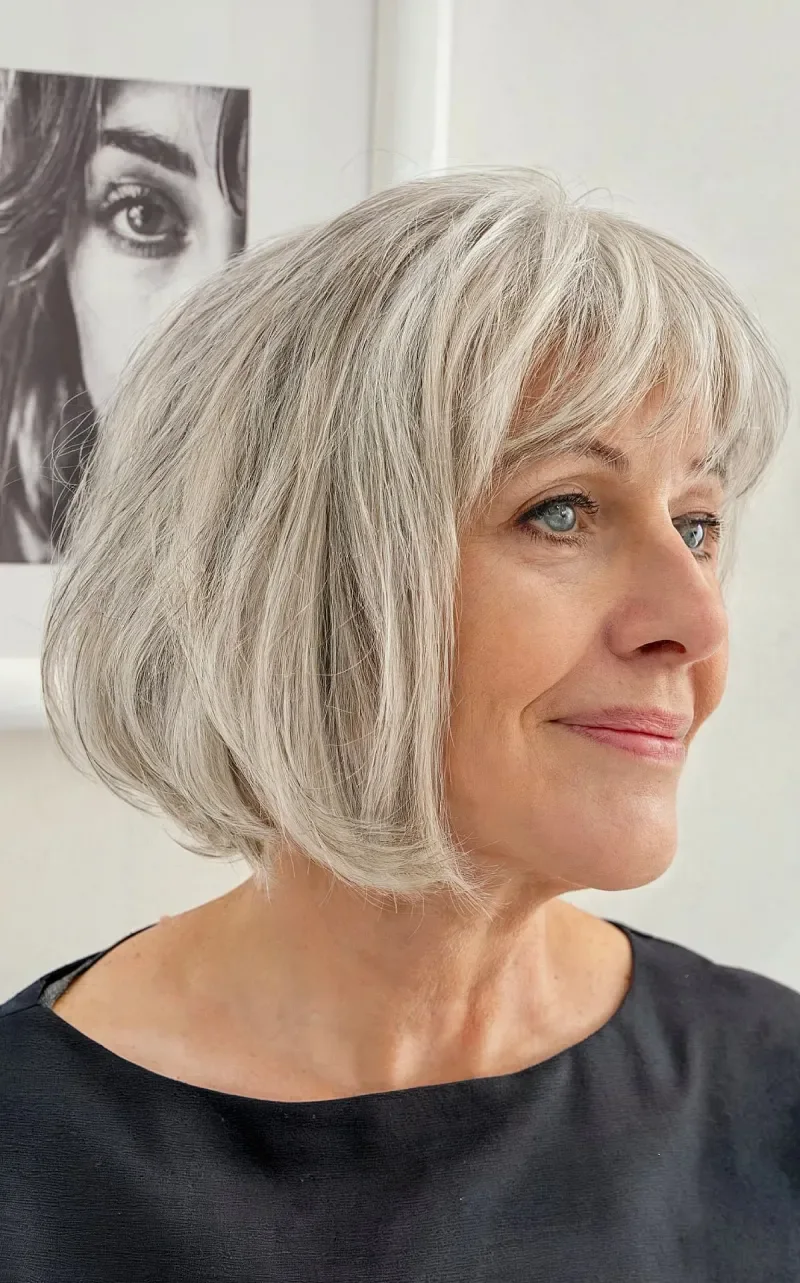
Description
This soft white pixie bob has short layers, gentle side coverage, and a rounded outline.
Why it works
The extra side softness flatters the face while the cropped back keeps it easier than a bob.
Best for
Older women who want a pixie with more softness around the cheeks.
Maintenance
Keep the neckline tidy and condition the white ends lightly.
Try it yourself for Soft White Pixie Bob
How to DIY
- Prep the crown of the soft white pixie bob with a small amount of texture cream.
- Dry the soft white pixie bob from the roots first so the short shape does not collapse.
- Shape the crown of the soft white pixie bob before touching the rest of the haircut.
- Use fingertips to place the visible pieces of the soft white pixie bob, keeping product light near the scalp.
- Check the soft white pixie bob from the side so the pixie still looks neat around the ears and nape.
14. Rounded Gray Pixie Back View
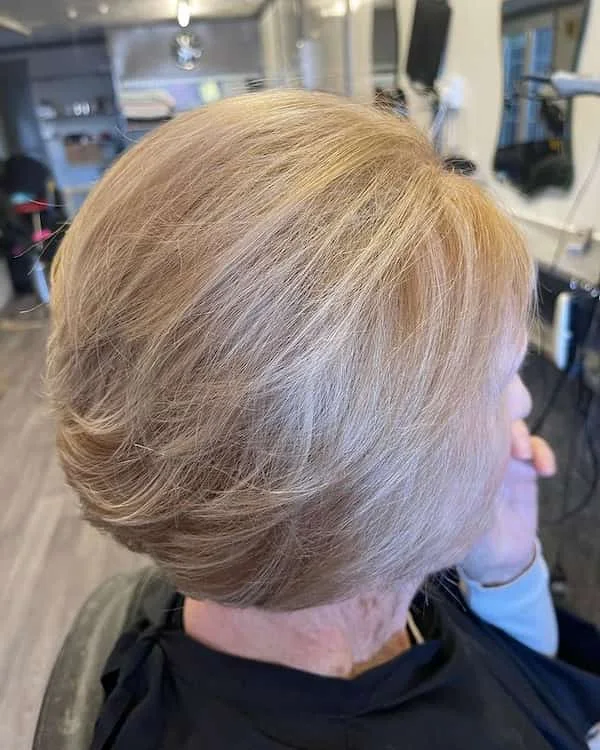
Description
A rounded gray pixie shown from the back with a soft stacked shape and clean nape.
Why it works
The back view shows how a pixie can build shape at the crown without extra length.
Best for
Gray hair, salon reference photos, and women who want a tidy back shape.
Maintenance
Dry the nape first and ask for trims before the back loses its curve.
Try it yourself for Rounded Gray Pixie Back View
How to DIY
- Prep the fringe of the rounded gray pixie back view with a small amount of texture cream.
- Dry the rounded gray pixie back view from the roots first so the short shape does not collapse.
- Shape the fringe of the rounded gray pixie back view before touching the rest of the haircut.
- Use fingertips to place the visible pieces of the rounded gray pixie back view, keeping product light near the scalp.
- Check the rounded gray pixie back view from the side so the pixie still looks neat around the ears and nape.
15. Silver Textured Crop

Description
A silver textured crop with lifted layers, short sides, and a bright confident finish.
Why it works
The texture creates lift where short mature hair can fall flat.
Best for
Silver hair, short crops, and older women who want easy crown volume.
Maintenance
Dry the top upward and separate only a few visible pieces.
Try it yourself for Silver Textured Crop
How to DIY
- Prep the nape of the silver textured crop with a small amount of root lift spray.
- Dry the silver textured crop from the roots first so the short shape does not collapse.
- Shape the nape of the silver textured crop before touching the rest of the haircut.
- Use fingertips to place the visible pieces of the silver textured crop, keeping product light near the scalp.
- Check the silver textured crop from the side so the pixie still looks neat around the ears and nape.
16. Blonde Side-Swept Pixie

Description
This blonde pixie has a long side-swept fringe and a clean short outline.
Why it works
The sweeping front adds movement while the short sides keep the haircut from feeling heavy.
Best for
Older women with straight hair who want softness near the eyes.
Maintenance
Blow-dry the fringe diagonally and keep product light near the part.
Try it yourself for Blonde Side-Swept Pixie
How to DIY
- Prep the side pieces of the blonde side-swept pixie with a small amount of heat protectant.
- Dry the blonde side-swept pixie from the roots first so the short shape does not collapse.
- Shape the side pieces of the blonde side-swept pixie before touching the rest of the haircut.
- Use fingertips to place the visible pieces of the blonde side-swept pixie, keeping product light near the scalp.
- Check the blonde side-swept pixie from the side so the pixie still looks neat around the ears and nape.
17. Soft Brunette Pixie
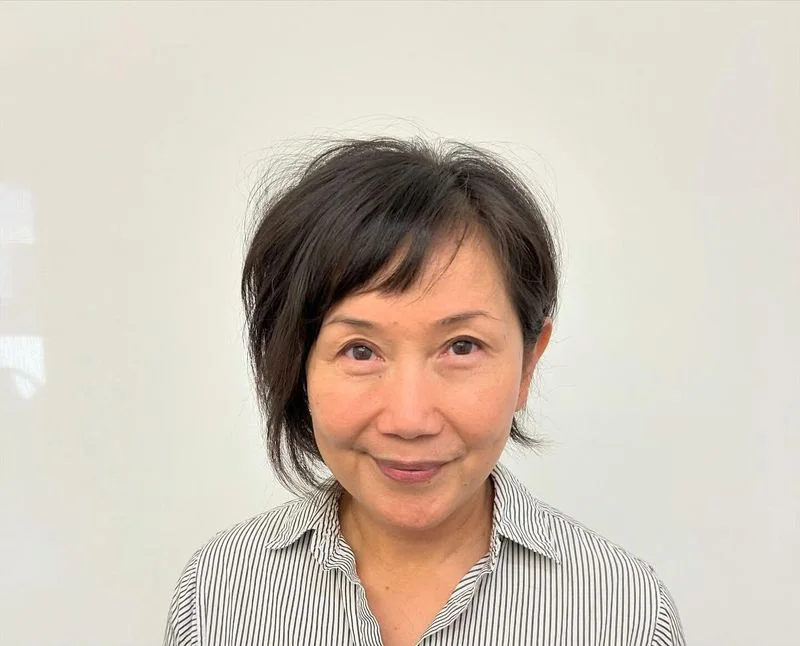
Description
A soft brunette pixie with light bangs, gentle side coverage, and an easy rounded shape.
Why it works
The fringe softens the front while the short length keeps mature hair lifted.
Best for
Older women with dark hair, soft bangs, and a simple everyday pixie.
Maintenance
Dry the bangs first and use light spray only where the hair separates.
Try it yourself for Soft Brunette Pixie
How to DIY
- Prep the ear area of the soft brunette pixie with a small amount of heat protectant.
- Dry the soft brunette pixie from the roots first so the short shape does not collapse.
- Shape the ear area of the soft brunette pixie before touching the rest of the haircut.
- Use fingertips to place the visible pieces of the soft brunette pixie, keeping product light near the scalp.
- Check the soft brunette pixie from the side so the pixie still looks neat around the ears and nape.
18. Red Side Pixie
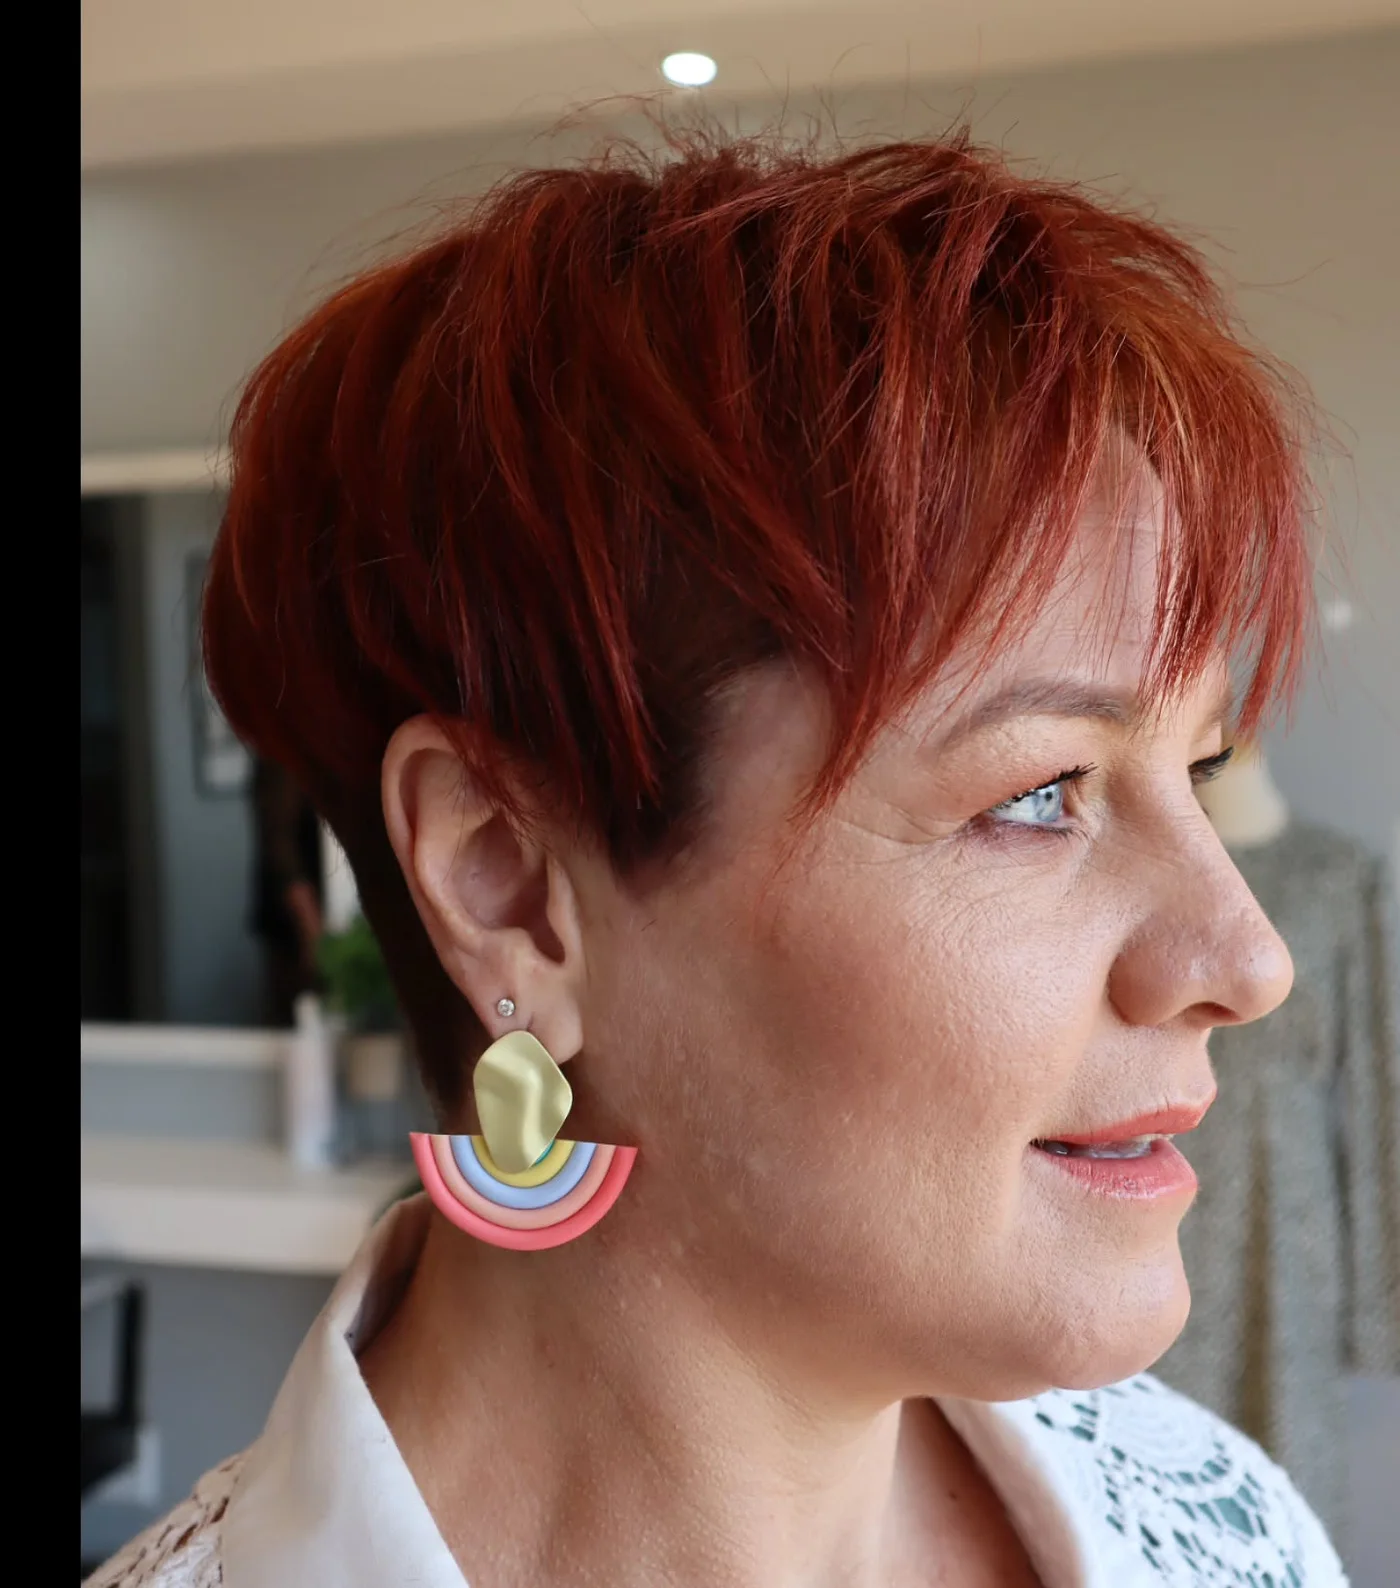
Description
This red pixie has a side-swept front, neat ear area, and warm color that brightens the crop.
Why it works
The color adds dimension and the side shape gives the short cut a clear direction.
Best for
Older women who like warm color and a short side-swept silhouette.
Maintenance
Protect the color with gentle products and keep the sideburn area shaped.
Try it yourself for Red Side Pixie
How to DIY
- Prep the part line of the red side pixie with a small amount of heat protectant.
- Dry the red side pixie from the roots first so the short shape does not collapse.
- Shape the part line of the red side pixie before touching the rest of the haircut.
- Use fingertips to place the visible pieces of the red side pixie, keeping product light near the scalp.
- Check the red side pixie from the side so the pixie still looks neat around the ears and nape.
19. Brunette Side Profile Pixie
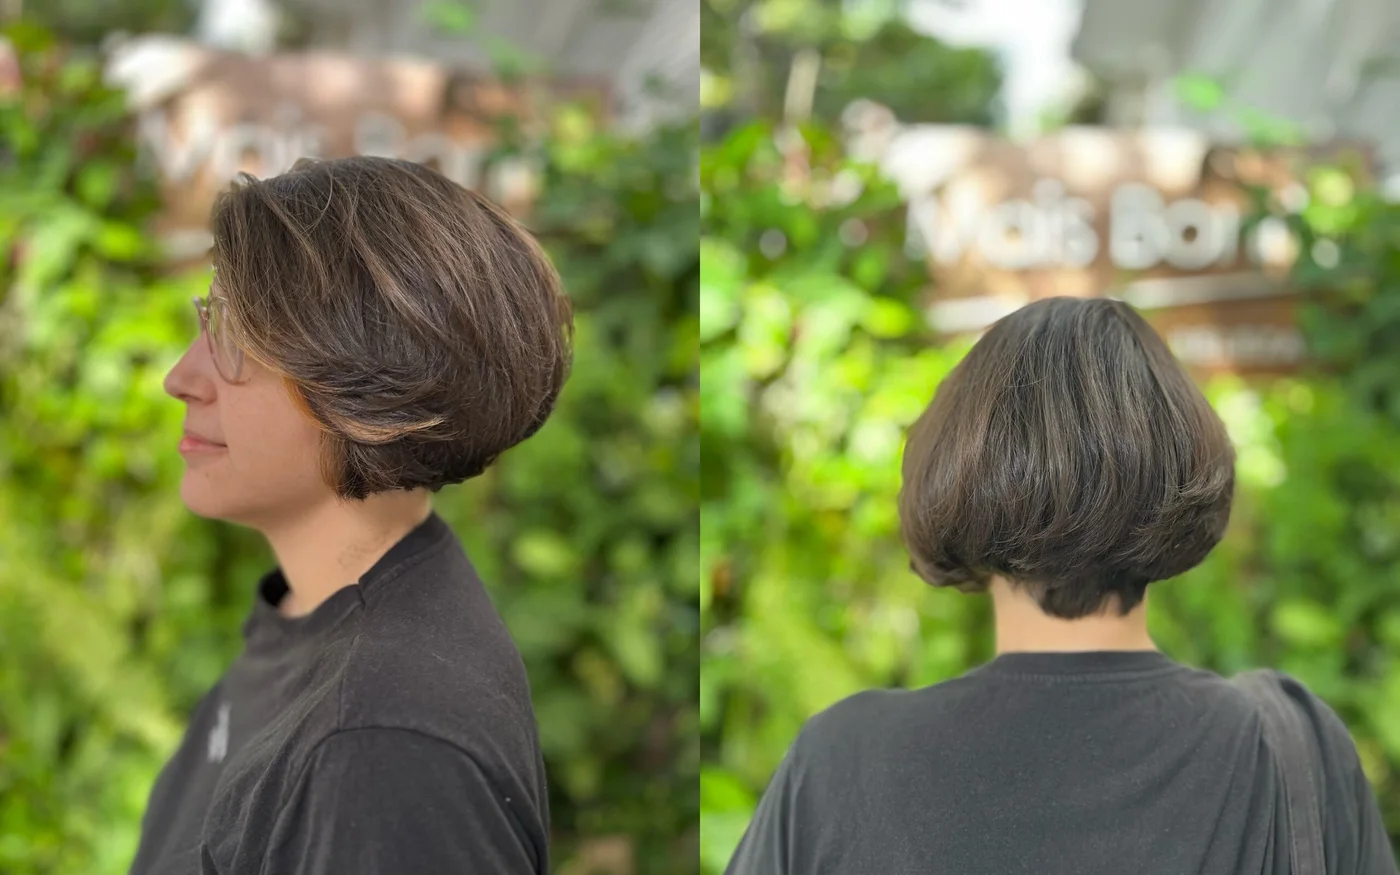
Description
A brunette pixie shown from the side with soft layering and a relaxed natural finish.
Why it works
The profile shows enough side softness while the short back keeps the haircut practical.
Best for
Older women who want a low-fuss brunette pixie with natural movement.
Maintenance
Brush the side pieces into place and use cream only on flyaways.
Try it yourself for Brunette Side Profile Pixie
How to DIY
- Prep the crown of the brunette side profile pixie with a small amount of heat protectant.
- Dry the brunette side profile pixie from the roots first so the short shape does not collapse.
- Shape the crown of the brunette side profile pixie before touching the rest of the haircut.
- Use fingertips to place the visible pieces of the brunette side profile pixie, keeping product light near the scalp.
- Check the brunette side profile pixie from the side so the pixie still looks neat around the ears and nape.
20. Platinum Close Crop
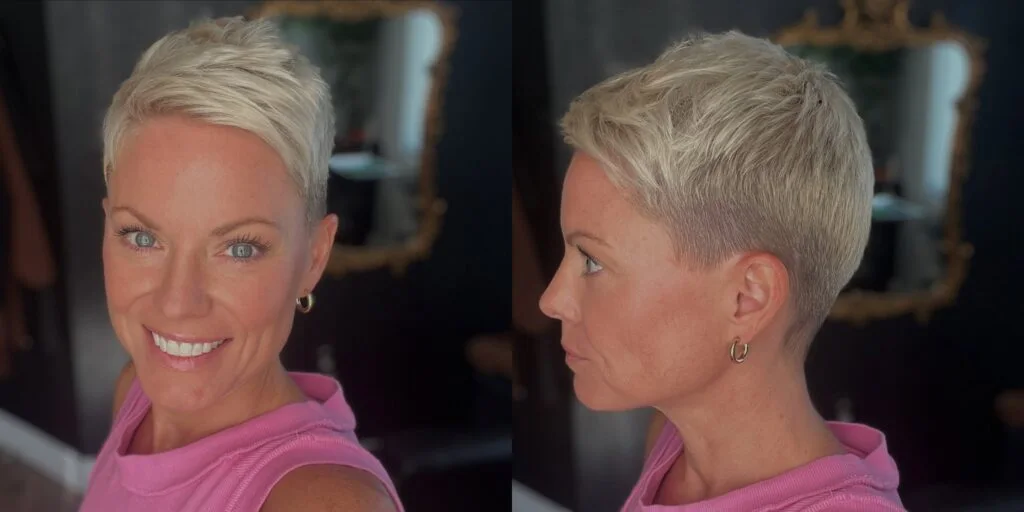
Description
A platinum close crop with short sides, lifted top texture, and a bright clean finish.
Why it works
The cropped sides keep the style tidy, while the top lift gives the pixie shape.
Best for
Older women who prefer very short, confident, low-bulk haircuts.
Maintenance
Schedule frequent trims and use paste only at the front.
Try it yourself for Platinum Close Crop
How to DIY
- Prep the fringe of the platinum close crop with a small amount of root lift spray.
- Dry the platinum close crop from the roots first so the short shape does not collapse.
- Shape the fringe of the platinum close crop before touching the rest of the haircut.
- Use fingertips to place the visible pieces of the platinum close crop, keeping product light near the scalp.
- Check the platinum close crop from the side so the pixie still looks neat around the ears and nape.
21. Back View Brunette Pixie

Description
A back view of a brunette pixie with soft layers and a clean tapered nape.
Why it works
The back shape shows how a pixie can stay neat without looking too severe.
Best for
Salon reference photos, brunette hair, and older women choosing a tapered nape.
Maintenance
Keep the nape trimmed and smooth the back with a small brush.
Try it yourself for Back View Brunette Pixie
How to DIY
- Prep the nape of the back view brunette pixie with a small amount of heat protectant.
- Dry the back view brunette pixie from the roots first so the short shape does not collapse.
- Shape the nape of the back view brunette pixie before touching the rest of the haircut.
- Use fingertips to place the visible pieces of the back view brunette pixie, keeping product light near the scalp.
- Check the back view brunette pixie from the side so the pixie still looks neat around the ears and nape.
22. Soft Blonde Event Pixie
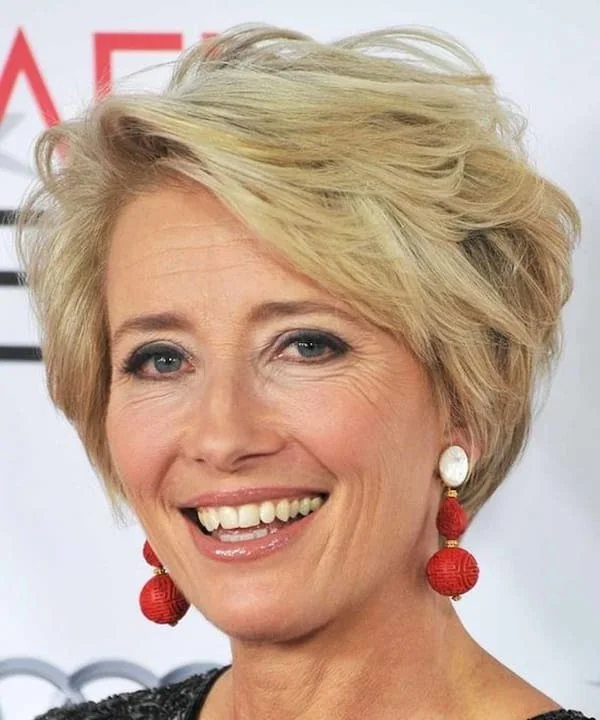
Description
This soft blonde pixie has lifted front pieces and a polished event-ready finish.
Why it works
The light front lift adds height without needing a longer layered haircut.
Best for
Older women who want a dressier pixie for events or polished everyday wear.
Maintenance
Set the front first and finish with flexible hold.
Try it yourself for Soft Blonde Event Pixie
How to DIY
- Prep the side pieces of the soft blonde event pixie with a small amount of root lift spray.
- Dry the soft blonde event pixie from the roots first so the short shape does not collapse.
- Shape the side pieces of the soft blonde event pixie before touching the rest of the haircut.
- Use fingertips to place the visible pieces of the soft blonde event pixie, keeping product light near the scalp.
- Check the soft blonde event pixie from the side so the pixie still looks neat around the ears and nape.
23. Soft Brunette Pixie Shag
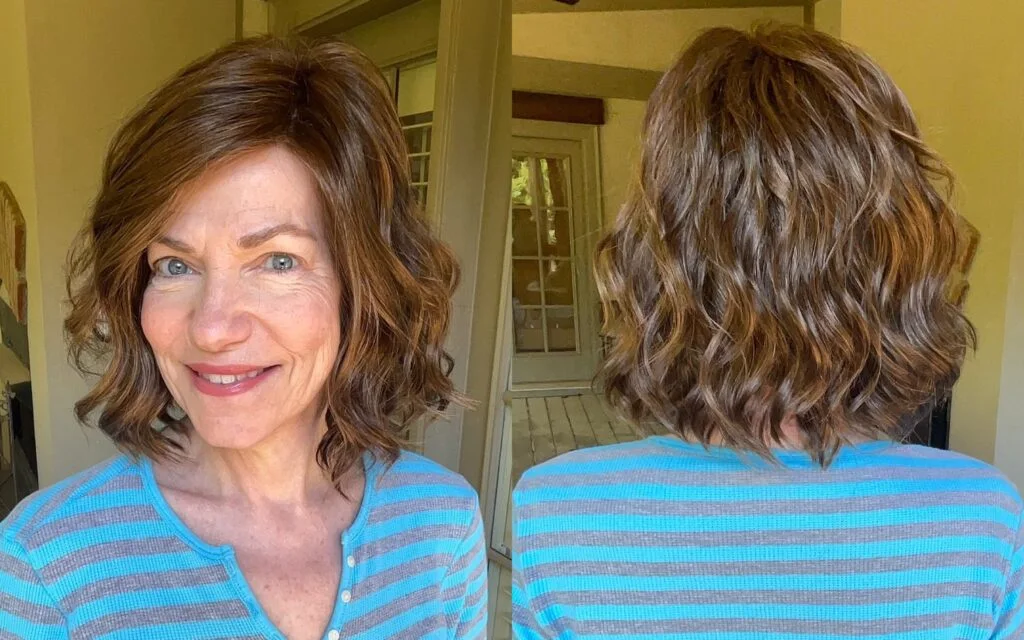
Description
A soft brunette pixie shag with relaxed texture, gentle layers, and a casual finish.
Why it works
The shaggy movement adds volume without leaving too much length around the neck.
Best for
Older women who want a softer pixie with a little undone texture.
Maintenance
Lift the crown with fingers and leave the side pieces loose.
Try it yourself for Soft Brunette Pixie Shag
How to DIY
- Prep the ear area of the soft brunette pixie shag with a small amount of root lift spray.
- Dry the soft brunette pixie shag from the roots first so the short shape does not collapse.
- Shape the ear area of the soft brunette pixie shag before touching the rest of the haircut.
- Use fingertips to place the visible pieces of the soft brunette pixie shag, keeping product light near the scalp.
- Check the soft brunette pixie shag from the side so the pixie still looks neat around the ears and nape.
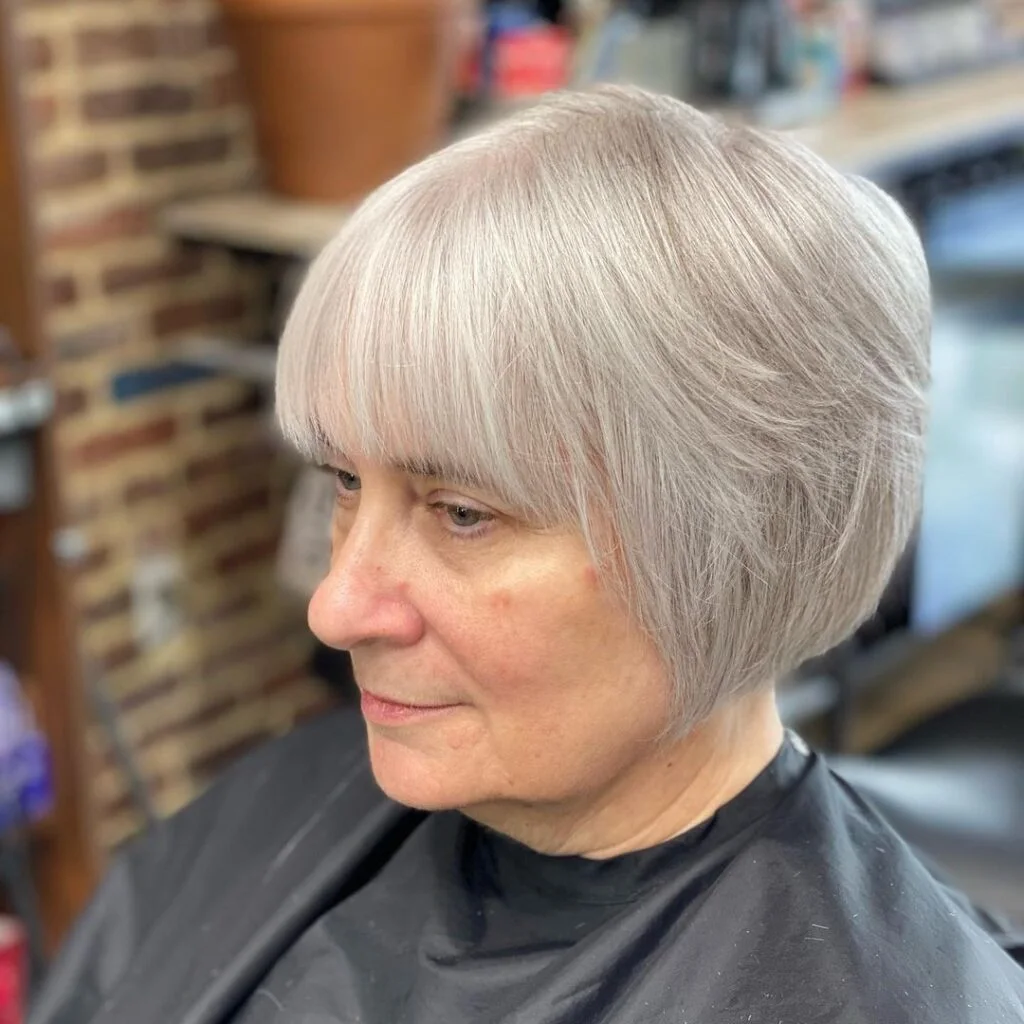
24. White Bowl Pixie
Description
This white bowl pixie has a smooth rounded shape, full fringe, and clean ear-length outline.
Why it works
The strong rounded line makes fine white hair look more substantial.
Best for
White hair, straight texture, and older women who like a clean graphic pixie.
Maintenance
Use purple shampoo occasionally and smooth the fringe while damp.
Try it yourself for White Bowl Pixie
How to DIY
- Prep the part line of the white bowl pixie with a small amount of texture cream.
- Dry the white bowl pixie from the roots first so the short shape does not collapse.
- Shape the part line of the white bowl pixie before touching the rest of the haircut.
- Use fingertips to place the visible pieces of the white bowl pixie, keeping product light near the scalp.
- Check the white bowl pixie from the side so the pixie still looks neat around the ears and nape.
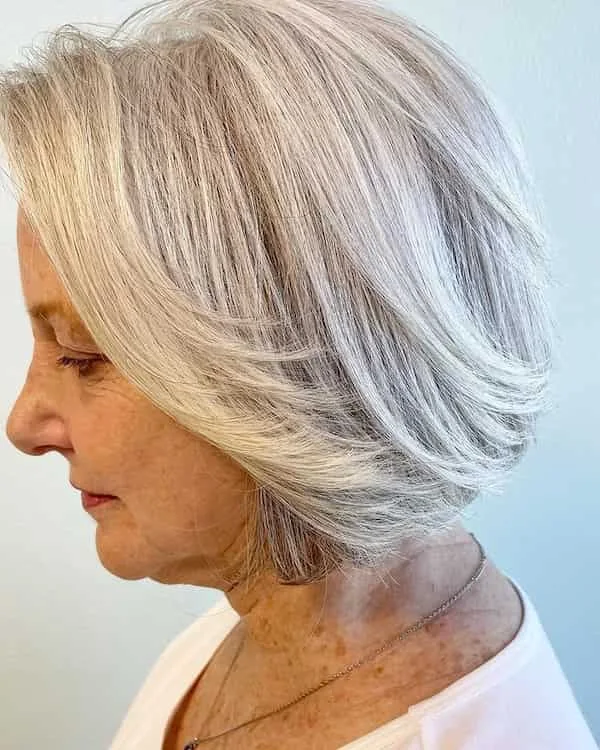
25. Layered Silver Pixie Bob
Description
A layered silver pixie bob with soft side volume and a short lifted back.
Why it works
The shape gives more coverage than a crop while still keeping the haircut short and easy.
Best for
Older women who want a pixie-bob balance with gray or silver hair.
Maintenance
Round-brush the side layers and keep the back light.
Try it yourself for Layered Silver Pixie Bob
How to DIY
- Prep the crown of the layered silver pixie bob with a small amount of texture cream.
- Dry the layered silver pixie bob from the roots first so the short shape does not collapse.
- Shape the crown of the layered silver pixie bob before touching the rest of the haircut.
- Use fingertips to place the visible pieces of the layered silver pixie bob, keeping product light near the scalp.
- Check the layered silver pixie bob from the side so the pixie still looks neat around the ears and nape.
26. Curly Brunette Pixie

Description
This curly brunette pixie has rounded volume, short sides, and natural movement through the top.
Why it works
Curls create fullness in a short shape when the layers are kept compact.
Best for
Older women with natural curl or wave who want a short rounded crop.
Maintenance
Use curl mousse on damp hair and avoid brushing once dry.
Try it yourself for Curly Brunette Pixie
How to DIY
- Prep the fringe of the curly brunette pixie with a small amount of curl mousse.
- Dry the curly brunette pixie from the roots first so the short shape does not collapse.
- Shape the fringe of the curly brunette pixie before touching the rest of the haircut.
- Use fingertips to place the visible pieces of the curly brunette pixie, keeping product light near the scalp.
- Check the curly brunette pixie from the side so the pixie still looks neat around the ears and nape.
27. Gray Pixie with Round Glasses

Description
A gray pixie with round glasses, soft side-swept fringe, and a clean short outline.
Why it works
The fringe sits above the frames and keeps the face open without losing softness.
Best for
Older women with glasses, gray hair, and easy everyday pixie styling.
Maintenance
Brush the fringe away from the frames and refresh the crown lightly.
Try it yourself for Gray Pixie with Round Glasses
How to DIY
- Prep the nape of the gray pixie with round glasses with a small amount of texture cream.
- Dry the gray pixie with round glasses from the roots first so the short shape does not collapse.
- Shape the nape of the gray pixie with round glasses before touching the rest of the haircut.
- Use fingertips to place the visible pieces of the gray pixie with round glasses, keeping product light near the scalp.
- Check the gray pixie with round glasses from the side so the pixie still looks neat around the ears and nape.
28. Round Glasses Pixie

Description
This short pixie has round glasses, soft bangs, and a practical cropped shape.
Why it works
The bangs stay light, so they frame the glasses instead of crowding the face.
Best for
Older women with glasses, fine hair, and a low-maintenance pixie.
Maintenance
Dry the bang area first and keep product away from the frames.
Try it yourself for Round Glasses Pixie
How to DIY
- Prep the side pieces of the round glasses pixie with a small amount of dry shampoo.
- Dry the round glasses pixie from the roots first so the short shape does not collapse.
- Shape the side pieces of the round glasses pixie before touching the rest of the haircut.
- Use fingertips to place the visible pieces of the round glasses pixie, keeping product light near the scalp.
- Check the round glasses pixie from the side so the pixie still looks neat around the ears and nape.
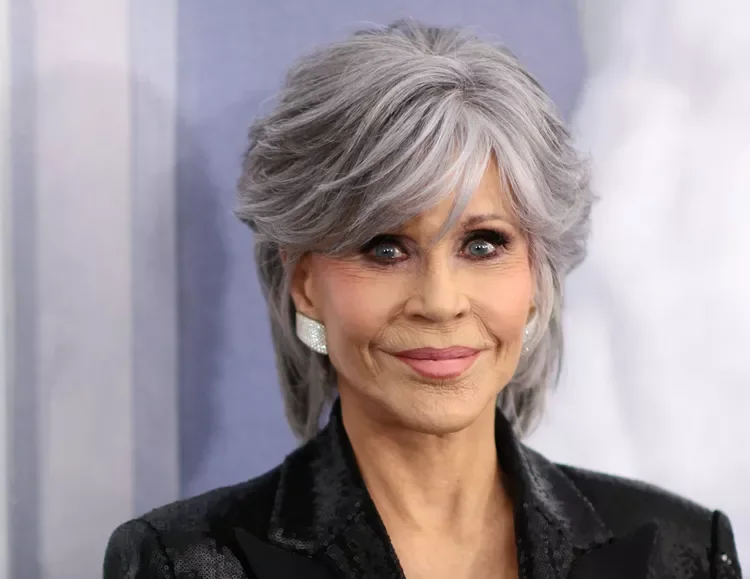
29. Feathered Silver Pixie
Description
A feathered silver pixie with side fringe, airy top layers, and a polished finish.
Why it works
Feathered layers give gray hair lift while the side fringe softens the forehead.
Best for
Silver hair, side fringe, and older women who want a polished short cut.
Maintenance
Use texture cream on the top layer and keep the sides smooth.
Try it yourself for Feathered Silver Pixie
How to DIY
- Prep the ear area of the feathered silver pixie with a small amount of texture cream.
- Dry the feathered silver pixie from the roots first so the short shape does not collapse.
- Shape the ear area of the feathered silver pixie before touching the rest of the haircut.
- Use fingertips to place the visible pieces of the feathered silver pixie, keeping product light near the scalp.
- Check the feathered silver pixie from the side so the pixie still looks neat around the ears and nape.
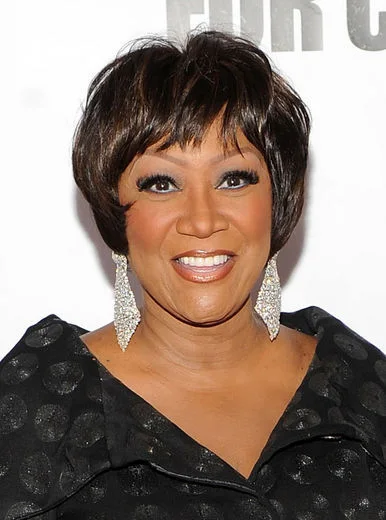
30. Side-Swept Black Pixie
Description
This black pixie uses a side-swept front, close sides, and a polished short silhouette.
Why it works
The side sweep adds lift and softness while the cropped shape stays elegant and easy.
Best for
Older Black women, straight short hair, and polished pixie styling.
Maintenance
Smooth the front in one direction and use light hold near the part.
Try it yourself for Side-Swept Black Pixie
How to DIY
- Prep the part line of the side-swept black pixie with a small amount of heat protectant.
- Dry the side-swept black pixie from the roots first so the short shape does not collapse.
- Shape the part line of the side-swept black pixie before touching the rest of the haircut.
- Use fingertips to place the visible pieces of the side-swept black pixie, keeping product light near the scalp.
- Check the side-swept black pixie from the side so the pixie still looks neat around the ears and nape.
What pixie cut is most flattering as hair matures
The most flattering pixie cut usually supports the crown, keeps the sides clean, and leaves enough softness near the forehead or cheekbones. A short crop can look elegant when the shape is intentional from every angle.
If your hair is fine, avoid removing too much density from the top. If your hair is thick, ask for internal texture so the pixie stays light without puffing out at the sides.
Best pixie details for gray hair and glasses
Gray pixies often look fresh with feathered layers, side-swept fringe, or a tapered nape. Keep the finish touchable so the silver color looks soft rather than stiff.
For glasses, keep the fringe light and make sure the side pieces do not sit awkwardly over the frames. A soft side sweep or short airy bang is usually easier than a heavy fringe.
How to style a short pixie without overworking it
Style the front and crown first, then leave the sides simple. Most short pixies need lift at the top, not product everywhere.
Use root lift or a vent brush for height, texture cream for gray or dry ends, and a tiny amount of paste on visible pieces. Stop before the finish turns stiff.

About the author
Bella Ross
Bella Ross is the hairstyle editor behind Latest Easy Hairstyles. She curates practical haircut, braid, color, and styling ideas with a focus on looks that are easy to browse, realistic to recreate, and useful for everyday hair decisions.